If you buy an inventory item and spend money improving or reconditioning it, you'll probably want to include those additional costs in the item's value.
To do this, you'll create an inventory item for the goods being purchased and set up a new job to track the expenses associated with improving the item. Each expense gets recorded against the job so you can keep track of those expenses. Then, you simply transfer the value of the expenses to be included as part of the item's value.
Before you begin
Before you can add value to an item, you first need to create the inventory item and set up a new job to track the expenses.
In our example, we're buying a second hand car and getting it ready for re-sale.
Set up for adding value
Create a new item for the inventory being purchased (Inventory > Items List > New).
Select an Item Number that best suits your Items List.
Click the Buying Details and Selling Details tabs and specify the applicable Tax/GST Code to use when buying and selling. Check with your accounting advisor if you're unsure what to choose for your situation.
The Cost of Sales Account, Income Account For Tracking Sales, and Asset Account For Item Inventory will be specific to your business and must have previously been created. For more information on creating accounts, see Create detail and header accounts.
Here's our example item (a second-hand car):

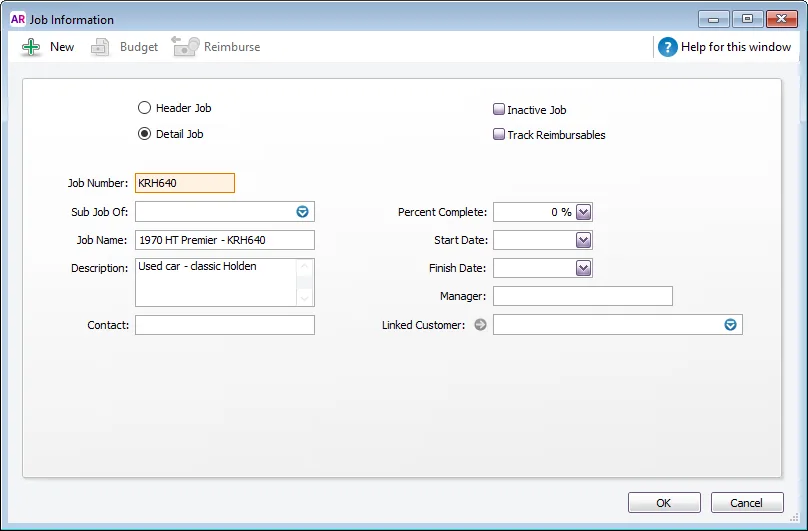
Create a new job which you'll use to track the expenses associated with improving the item (Lists > Jobs > New).
Select Detail Job.
Enter a suitable Job Number and Job Name.
Here's our example:


Adding value to an item
OK, you're now ready to add value to your inventory. First, you're going to record the purchase of the item and its additional costs. Then you'll adjust the item's value using the Adjust Inventory function.
Let's take you through the details.
1. Purchase the item
Enter a new purchase for the original item (Purchases > Enter Purchases > Layout > Item > OK).
Select the Supplier and enter the other transaction details. Here's our example purchase of a used car:
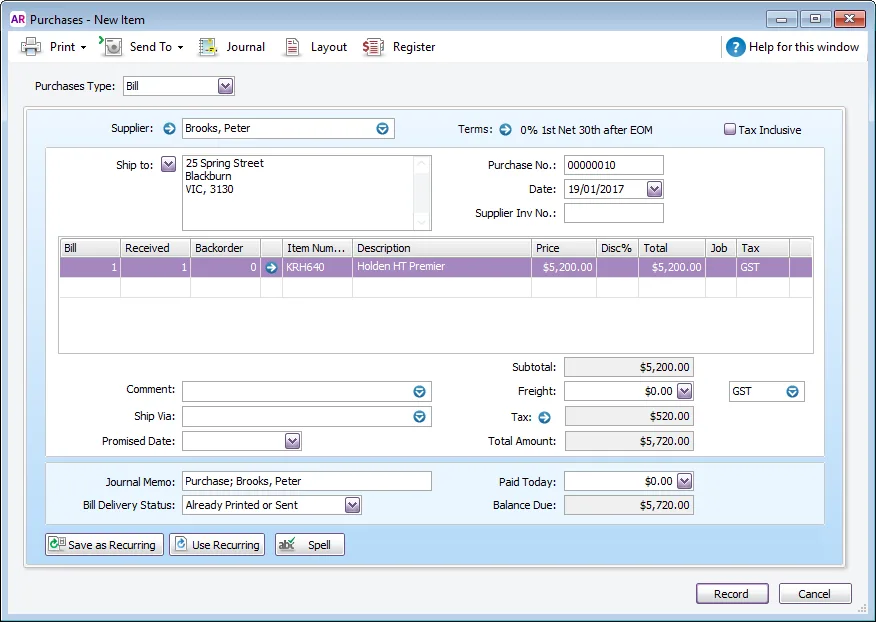
Check the transaction details then click Record.

2. Record the additional costs
Enter the additional costs using either a Spend Money or Purchases transaction. The accounts you allocate these expenses to will need to exist in you company file (create these accounts if required).
Also specify the Job (created earlier) to each expense associated with the item.
Our example shows a Spend Money transaction for the expenses associated with our second-hand car. Note the job specified in the Job column.

3. Report the expenses associated with the item
When all expenses have been recorded, use the Jobs Activity Summary report to determine the expense values and the relevant expense accounts (Reports > Index to Reports > Accounts >Jobs > Job Activity Summary). This information is needed for transferring the expense amounts to the item.
Filter the Jobs Activity Summary report as follows:
In the Source Journal field, select All.
Enter the Dated From and To dates to capture the entire Job activity for the item.
In the Jobs field, select the item's job number.
Click Run Report.
Here's our example which shows the value of the additional costs (Net Activity) associated with our second-hand car:

4. Adjust the item's value
With your Job Activity Summary values, you're set to add value to the inventory. This can be done using an Inventory Adjustment (Inventory > Adjust Inventory).
Enter the Date and Memo.
Enter the Item Number..
Enter zero in the Quantity and Unit Cost fields.
Refer to the Jobs Activity Summary report then enter the Amount and applicable Account.
Repeat steps 2-4 for each expense.
Here's our example for adding value to the used car:

When all the expenses have been entered, click Record. This transaction will reverse the expenses from the expense accounts and transfer them to the cost of the item. The expenses will be realised when the item is sold.
5. Confirm the item's adjusted value
The adjusted value of the item can be confirmed by going to the Inventory command centre and clicking Items List. Open the item and check the amount in the Current Value field.
Our example shows the item's Current Value ($5317), which equals the item's original purchase cost plus the expenses ($5200 + $117).
