If you need to update custom price levels and quantity breaks for lots of items, there's a quick way to do it: export your item info, update it in Excel, then import the info back into AccountRight.
Don't use Excel?
You can modify the export file in any program that can open text files (like Notepad), but it's easier if you use a spreadsheet program.
Let's take you through the required tasks.
Updating selling price
Example
Tee Off is a golf store that specialises in golf clubs and accessories. They have a number of different customer levels for their pricing, and the business wants to mark up the selling price of all their items by 5%.
The Item Information window below shows one of their items with the current selling price and one quantity break.

1. Export your item information
Go to the File menu and choose Import/Export Assistant. The Import and Export Assistant appears.
Select Export data then click Next.
In the Export field, select Items from the drop-down list then click Next. The Format step appears.
Leave the default format options and click Next. The Select Fields step appears. The fields in the left panel are the fields you can export.
Click Add All. This will export all item information. The selected fields are added to the list of fields to be exported in the panel on the right.
Click Export. The Save As window appear.
Specify where you want to save the file. To keep it simple, save the file to your desktop and leave the default file name (ITEM.TXT).
Click Save.
2. Update the information in Excel
Open Microsoft Excel and go to File > Open.
In the Files of type field, select All Files(*.*) and then locate and open the exported text file. The Text Import Wizard appears.
In Step 1 of the Text Import Wizard, select the Delimited option, then click Next.
In Step 2 of the Text Import Wizard, select either the Tab or Comma option (depending on whether you selected to export the data as Tab or Comma separated), then click Next.
In Step 3 of the Text Import Wizard, click Next.
Click Finish. The file contents will be displayed and you can now edit the cells as required. Each column in the spreadsheet represents the fields in your export file, such as Item Number, Selling Price, etc.
Highlight the entire sheet by clicking the square between Column A and Row 1.
Right-click any cell on the sheet and choose Copy.
Create a new sheet.
In the new sheet, right-click the square between Column A and Row 1 and choose Paste. This pastes the cells from the original sheet into the new sheet, starting at cell A1. You should now have two identical sheets.
In the new sheet, create a formula to update the selling prices.
Example: Tee Off are updating all their prices by 5%.
We need to create a formula which refers to the original sheet. In our example the original sheet is called ITEM.
The fields that need to be updated are:
- Selling Price,
- Price Level A, Qty Break 1 to Price Level D, Qty Break 1, and
- Price Level A, Qty Break 2 to Price Level D, Qty Break 2.
The formula to update the selling price in cell B2 is =ITEM!B2+(ITEM!B2*0.05).
This formula has picked up $5 from B2 in the ITEM sheet and increased the value by 5% as shown below.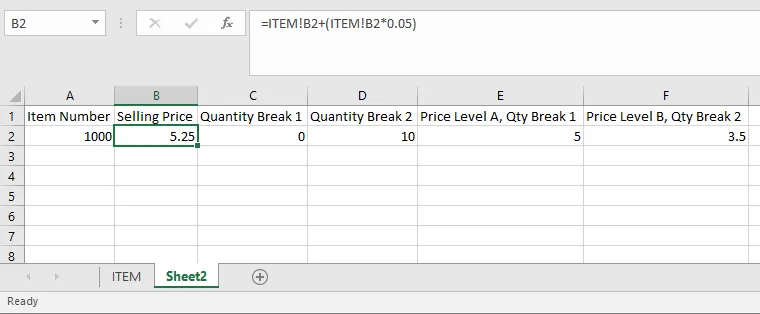
Copy the formula to the appropriate cells to update the prices for the matrix.
Keep the Excel file as a templateIf you'd like to keep a copy of the formulas, save this file in Microsoft Excel format before you save it as a text file.
Keep the Excel file as a template
If you'd like to keep a copy of the formulas, save this file in Microsoft Excel format before you save it as a text file.
After you have updated this information, save the updated sheet as Tab-Delimited text file.

3. Import your changes
In your AccountRight company file, go to File > Import/Export Assistant. The Import and Export Assistant appears.
Select Import data then click Next.
In the Import field, select Items.
Click Browse, locate the file to import and click Open. This will be the file you updated in Excel.
Click Next. The Format step appears.
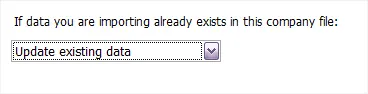
Leave the default format options as they are and select the Update existing data option. This will update the existing item records.

Click Next. The Match Fields step appears.
Click Match All. Because you exported all fields, AccountRight will automatically match all the fields in the import file with the required fields in AccountRight.
Click Next.
Make a backup before you import. If things go wrong, you'll need to restore this backup.
Click Import. Your data is imported and your item price levels will be updated. If you have a large file, this could take some time.
When the import is finished, an import log is created. It's a text file that includes details of any issues with the import data. If get an error, see the Import error log topic for tips on how to fix issues.

Updating buying price
1. Export your item information
Go to the File menu and choose Import/Export Assistant. The Import and Export Assistant appears.
Select Export data then click Next.
In the Export field, select Items from the drop-down list then click Next. The Format step appears.
Leave the default format options and click Next. The Select Fields step appears. The fields in the left panel are the fields you can export.
Click Add All. This will export all item information. The selected fields are added to the list of fields to be exported in the panel on the right.
Click Export. The Save As window appear.
Specify where you want to save the file. To keep it simple, save the file to your desktop and leave the default file name (ITEM.TXT).
Click Save.
2. Update the information in Excel
Open Microsoft Excel and go to File > Open.
In the Files of type field, select All Files(*.*) and then locate and open the exported text file. The Text Import Wizard appears.
In Step 1 of the Text Import Wizard, select the Delimited option, then click Next.
In Step 2 of the Text Import Wizard, select either the Tab or Comma option (depending on whether you selected to export the data as Tab or Comma separated), then click Next.
In Step 3 of the Text Import Wizard, click Next.
Click Finish. The file contents will be displayed and you can now edit the cells as required. Each column in the spreadsheet represents the fields in your export file, such as Item Number, Standard cost, etc.
Update the prices in the standard cost column.
After you have updated this information, save the updated sheet as a Tab-Delimited text file.
3. Import your changes
In your AccountRight company file, go to File > Import/Export Assistant. The Import and Export Assistant appears.
Select Import data then click Next.
In the Import field, select Items.
Click Browse, locate the file to import and click Open. This will be the file you updated in Excel.
Click Next. The Format step appears.
Leave the default format options as they are and select the Update existing data option. This will update the existing item records.
Click Next. The Match Fields step appears.
Click Match All. Because you exported all fields, AccountRight will automatically match all the fields in the import file with the required fields in AccountRight.
Click Next.
Make a backup before you import. If things go wrong, you'll need to restore this backup.
Click Import. Your data is imported and your item price levels will be updated. If you have a large file, this could take some time.
When the import is finished, an import log is created. It's a text file that includes details of any issues with the import data. If get an error, see the Import error log topic for tips on how to fix issues.
