When a customer wants to buy goods or services from you, but you're not yet ready to invoice them, you can create a sales order for them. This will detail the selling price, quantity, type of goods or services provided and the date you promise to provide them. Later, when you're ready to ship the items, or you've completed the service, you can invoice the customer.
You can now create sales orders when you access your AccountRight company file in a web browser. The release of sales orders is part of the rollout of inventory and related features in AccountRight browser and MYOB Business.
There are good reasons to create sales orders in AccountRight browser. You can:
create a sales order anywhere you have access to a web browser – great for when you're dealing with customers on the go
create a sales order in the Items and Services layout – ideal if you sell both services and items
retain a sales order once you've converted it to invoice – unlike AccountRight desktop, you can go back to the original sales order in the browser.
Any sales orders you create in AccountRight browser can be accessed in AccountRight desktop and vice versa.
Do you record deposits on sales orders?
If so, we recommend that you continue to record sales orders in AccountRight desktop for now. Deposits on sales orders will be coming later in AccountRight browser*.
There may be other features you use in AccountRight desktop that aren't available in the browser. Find out what features are available in the browser now and what will be available later.
Creating and using sales orders
Create a sales order
Access your company file in the bowser by going to app.myob.com and logging in with your MYOB details.
Go to the Sales menu > Create sales order.
Choose the Customer you're ordering for. The customer’s address details appear in the field below. If you've entered a shipping address when you created the customer, this will appear on PDF copies of the sales order.
If you want to:
Add a new customer:
Click the Customer dropdown arrow and choose Create customer. Enter as much (or as little) info as you like and click Save. You can always go back later and fill in additional details.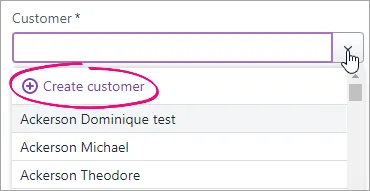
Add missing details to an existing customer:
Type the customer's name in the Customer field and hit Enter. Click the dropdown next for the information you want to add, such as the ABN or billing or shipping address, add the details and click Save.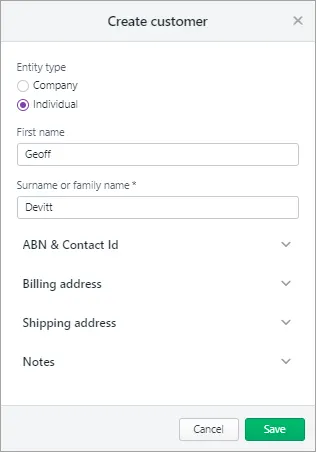
(Australia only) The status of the ABN you've entered in the customer's record will checked, and the status shown. Click the status to see more details.
If necessary, change the Sales order number. This number is automatically generated, based on the last number used in any sales transaction, such as an invoice or quote.
Changing the numbering
If you change the sales order number, you’ll change the automatic numbering. For example, if you change the number to 000081, the next time you create an invoice, quote or sales order, the new number will be 000082.
If you have one, enter the Customer PO Number.
Check the date in the Issue date field.
Click the date in the Promised date field to enter the date you promise to deliver the items to the customer.
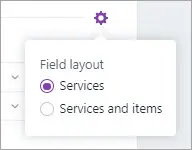
Select an option from the Amounts are list. Click Field layout and select the applicable option based on what you're ordering.
If you want the prices to include tax or GST, choose Tax inclusive. Note that this is the default tax preference.
If you want the prices to exclude tax or GST, choose Tax exclusive.
Click Field layout and select the applicable option based on what you're ordering.
If you're ordering items:
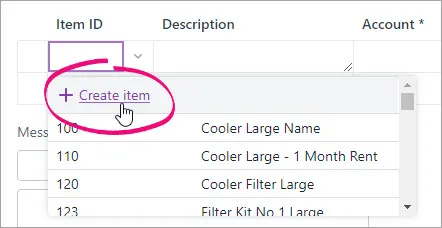
In the Item ID column, click the dropdown to choose an item or search for an item by entering all or part of the Item ID or Supplier item ID. As you type, matching items are shown.
Entering a new item?
Click the dropdown arrow in the Item ID column and choose + Create Item. Enter the item details and click Save. Learn more about Creating items.
When you choose an item:
the item's Description, Account for tracking sales, Unit selling price and Tax code appear automatically, based on what you entered when you created the item (you can edit these details if you want)
the total price of the items is calculated automatically in the Amount field.
If you see an information message that there are no inventory details for this item and you want to track its on-hand quantity, click Edit item and complete the inventory information for the item.
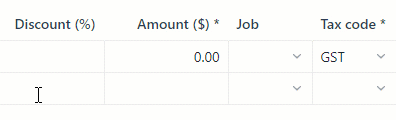
Enter the number of Units of this item you're selling. The calculated Amount is displayed.
There's a built-in calculator in the No of units, Unit Price, Discount and Amount fields. Just enter a calculation in the field and tab out of it:
Repeat step 11 for each item you're ordering. Need to add or remove blank lines or line items?
If you're selling services:
In the Description column, enter a description of the service you're providing.
Choose the Account the income from this service will be allocated to. If you're not sure, check with your accounting advisor.
Enter the Amount of this service.
If required, change the Tax code. If you're not sure, check with your accounting advisor.
Repeat step 11 for each service you're selling. Need to add or remove blank lines or line items?
Enter any charges for Freight, and if required, change the default Tax/GST code. If you can't enter Freight, you'll be prompted to specify a linked account for freight. (What is a linked account?) The totals are calculated at the bottom of the sales order:
Subtotal—the total for the items added to the sales order
Tax—the amount of tax applied to the sales order
Total—the total amount of the sales order including the tax or GST amount
(Optional)
Choose a Job if the line item relates to a specific job. Tell me more about jobs.
If you want to add a note about the sales order, choose a Notes to customer. This note will appear if you create a PDF of the sales order. You could use this area to add additional details about the order.
In sales orders, the ability to create a new customer note, edit an existing one or save a default customer note will be available in a future release.
Check that all the information in the sales order is correct.
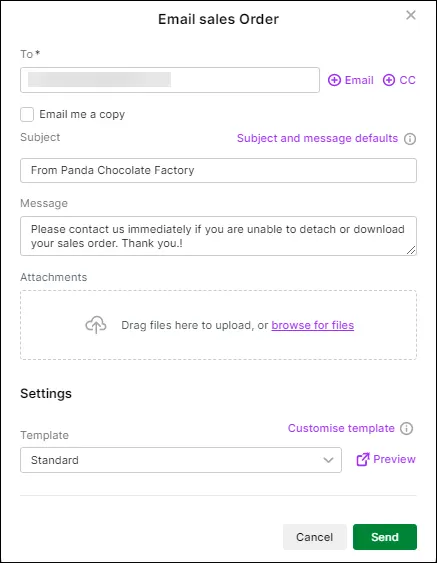
If you want to email the sales order:
Click Email sales order.
Enter or update your From name and Reply-to email address.
If you want to create or update the default subject and message for sales orders, click Subject and message defaults and save your changes in Sales settings > Email defaults. For more information about default emails, see Set up default emails.
If an email address has been saved for the customer, it appears in the To field, but you can add one or change it if needed.
If you want to email the invoice to additional recipients, click Email or CC to enter additional recipients.
If you want to email a copy of the invoice to yourself, select the option Email me a copy. The customer will not be able to see this information.
A PDF of the sales order will be automatically attached to the email, but if you'd If you'd like to attach additional files (total size of uploaded documents can't exceed 25MB):
click and drag files onto the Email sales order page
click browse for files and select files to upload
to remove an attachment, click the remove ( ) icon next to it.
Choose the sales order template that'll be used if the customer prints or downloads their sales order as a PDF (you can choose an AccountRight template if you want). Click Preview to see what it'll look like. Click Customise template to set up your sales templates.
When you're ready, click Send. The sales order is saved and emailed.


Email a sales order
You can email a sales order at the time you create it – see 'Create a sales order', above – or later, after you've recorded it.
Access your company file in the bowser by going to app.myob.com and logging in with your MYOB details.
Go to the Sales menu > Sales orders to open the Sales orders page.
Click the Order number of the sales order you want to email to open it.
Click Email sales order.
Enter or update your From name and Reply-to email address.
If you want to create or update the default subject and message for sales orders, click Subject and message defaults and save your changes in Sales settings > Email defaults. For more information about default emails, see Set up default emails.
If an email address has been saved for the customer, it appears in the To field, but you can add one or change it if needed.
If you want to email the invoice to additional recipients, click Email or CC to enter additional recipients.
If you want to email a copy of the invoice to yourself, select the option Email me a copy. The customer will not be able to see this information.
A PDF of the sales order will be automatically attached to the email, but if you'd If you'd like to attach additional files (total size of uploaded documents can't exceed 25MB):
click and drag files onto the Attachments section of the Email sales order page
click browse for files and select files to upload
to remove an attachment, click the remove icon next to it.
Choose the sales order template that'll be used if the customer prints or downloads their sales order as a PDF (you can choose an AccountRight sales order template if you want). Click Preview to see what it'll look like. Click Customise template to set up your sales templates.
When you're ready, click Send. The sales order is emailed.
Find a sales order
Access your company file in the bowser by going to app.myob.com and logging in with your MYOB details.
Go to the Sales menu and choose Sales orders. You can filter the list of displayed sales orders using the filters across the top and sort them by clicking a column heading.
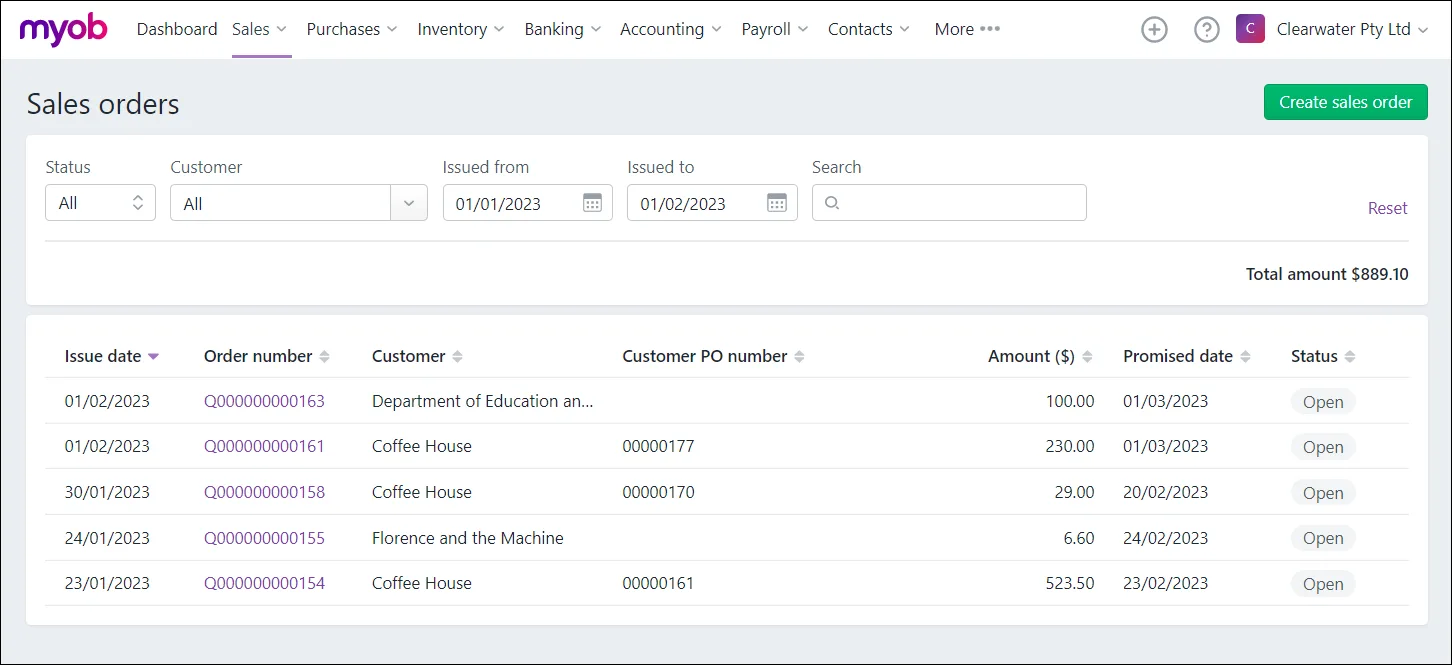
Click a sales order number to view its details.

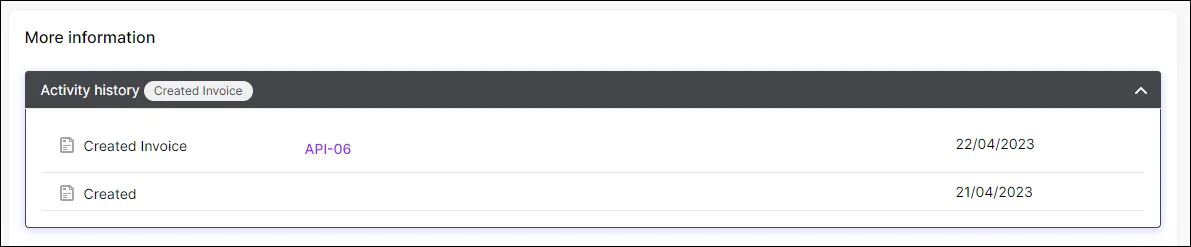
See sales order activity
You can check the status of the sales order at the bottom of the sales order's page. For example, you can see when a sales order was created, emailed and converted to an invoice.
Access your company file in the bowser by going to app.myob.com and logging in with your MYOB details.
Go to the Sales menu and choose Sales orders. You can filter the list of displayed sales orders using the filters across the top and sort them by clicking a column heading.
Click a sales order number to view its details. The Activity history is at the bottom of the sales order:

Change or delete a sales order
Need to change or fix something? Open the sales order and make your changes. You can change anything except the Customer.
If it's easier, you can delete the order and start again.
Access your company file in the bowser by going to app.myob.com
and logging in with your MYOB details.
Go to the Sales menu and choose Sales orders.
Filter the list of displayed sales orders using the filters across the top or sort them by clicking a column heading.
Click a purchase order number to view its details.
If you want to:
change a sales order, make your changes and click Save.
delete a sales order, click Delete and then Delete again in the confirmation message that appears.
If you change an inventory item Order qty, or delete a sales order containing an inventory item, the number of that item committed to customers is automatically updated in your Stock on hand report and Reorder report – see Inventory reports.
Print or download a sales order
Access your company file in the bowser by going to app.myob.com and logging in with your MYOB details.
Go to the Sales menu and choose Sales orders.
Filter the list of displayed sales orders using the filters across the top or sort them by clicking a column heading.
Click a purchase order number to view its details.
Click View PDF.
AccountRight browser users – you can choose a different AccountRight sales order form before printing it.
The sales order appears as a PDF in a new tab where you can download it, print it, or attach it to an email.
Converting a sales order to an invoice
When you're ready to ship inventory items to a customer (or, if you're a service-based business, you've completed a job), you can convert the sales order to an invoice. You can then send the invoice to the customer to complete the sale.
When you convert a sales order to invoice in AccountRight browser, the original sales order is retained so you can go back to it (unlike AccountRight desktop, where the original sales order is no longer available).
So if you want to retain your sales orders, convert them to invoices in the browser.
For all the details, see Converting a sales order to an invoice.
Sales order features in AccountRight browser
Many sales order features in AccountRight desktop are available when you when you access your company file in a web browser, but there are still some coming.
In the browser, you are not yet able to:
put a deposit on a sales order
convert a quote to a sales order
backorder items to fulfil sales.
Terms in sales orders, multiple currencies and adding a salesperson to a sales order are not available in AccountRight browser.
If you need to do these tasks, you can do them in AccountRight desktop.
There are a couple of things you can do with sales orders in AccountRight browser that you can't do in AccountRight desktop:
retain a sales order after converting it to an invoice
create a sales order for the Items & Services layout.
The following table compares the sales order features available in AccountRight desktop versus AccountRight browser:
Feature | AccountRight desktop | AccountRight browser* |
|---|---|---|
Apply a deposit to a sales order | Yes | Not yet available |
Convert quote to sales order | Yes | Not yet available |
Backorder items to fulfil sales | Yes | Not yet available |
See sales order activity | Yes | Yes |
Convert sales order to invoice | Yes | Yes |
Retain original sales order after converting to an invoice |
| Yes |
Create sales order for Items & Service layout |
| Yes |
Print a sales order | Yes | Yes |
Apply freight to a sales order | Yes | Yes |
Create sales order for inventoried and non-inventoried items | Yes | Yes |
Create sales order for service items | Yes | Yes |
Apply terms to a sales order | Yes |
|
Add a salesperson to a sales order | Yes |
|
Create or edit sales orders using multiple currencies | Yes |
* New feature availability is subject to change
FAQs
Who can enter sales orders?
Any user with the following role or permissions can enter purchase orders:
Administrator
Accountant/Bookkeeper /
Sales
You can prevent an ordinary MYOB file user entering purchase orders by deselecting the Sales role and permissions:

Find out more about user roles and permissions.