If you're familiar with general journals, here's how to add a new journal, or find one that's already been entered.
To add a journal entry
Go to the Accounting menu and choose Create general journal.
Enter the Date of the journal, or click the calendar icon to choose the date.
Select whether the journal will Display in GST report as a Purchase or Sale.
(Optional) Enter a Description of transaction to describe the transaction.
Confirm the Reference number is correct. If not, enter a new reference number.
Changing the numbering
If you change the reference number, you’ll change the automatic numbering. For example, if you change the number to 000081, the next time you create a journal entry the new reference number will be 000082.
(Optional) If the journal is an EOFY adjustment, select this option. When running reports you can include or exclude entries with this option selected.
In the Amounts are field, select either Tax inclusive or Tax exclusive.
Start entering a line item by selecting the appropriate Category from the list. If you'd like to add a new category, click the dropdown arrow for the Category field and choose Create category. Find out more about Adding, editing and deleting categories.
As appropriate, enter either a Debit amount or a Credit amount.
Do not enter negative amounts (e.g. -345.00).
(Optional) If there's a quantity associated with this line item, enter it in the Quantity column.
Add a short Description for the line item.
(Optional) Choose a Job if the line item relates to a specific job. Tell me more about jobs.
Select the appropriate Tax code from the list. The tax is calculated and displayed in the totals section.
Add further line items, repeating the steps from step 8 above.
To delete a row, click its delete (x) icon.
When you're done, make sure the Out of balance shows $0.00. If you see an amount in this field, make sure that for each credit, there’s an equal debit, and vice versa. The Out of Balance amount must be $0.00 before you can continue.
If you want, you can save this transaction as a recurring journal entry. This is ideal for journal entries you'll post regularly, like a monthly depreciation expense.
Click Save as recurring.
Enter the recurring transaction Schedule name.
Choose the Frequency, such as Daily, Weekly or Monthly.
Choose the date the recurring transaction will start.
Select how many times you want the transaction to recur.
Click Save.
For more information on recurring transactions, see Recurring transactions.
Click Record to save the journal entry, or if you need to create another journal entry, choose an option under Record and new:
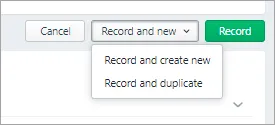

Click Record and create new to record the transaction and create a new one
Click Record and duplicate to record the transaction and create a new one with the same details (which you can then edit).
To find a journal entry
Go to the Accounting menu and choose General journals. The Find transactions page appears, with the Source Journal filtered to show General journal.
Filter the list as required.
Enter a date range to find journals within that date range.
Choose a category to find journals containing that category.
Enter all or part of the journal's description or amount in the Search field.
Matching journals will be displayed.
To open a journal entry to see its details or make any changes, click the journal's Reference no.
To delete a journal entry
AccountRight browser users only
If you need to reverse a journal entry you can only do this if you're accessing an AccountRight company file. You'll need to do the reversal in your AccountRight desktop software. See the AccountRight help topic, Reversing a transaction.
Go to the Accounting menu and choose General journals. The Find transactions page appears, with the Source Journal filtered to show General journal.
Filter the list as required.
Enter a date range to find journals within that date range.
Choose a category to find journals containing that category.
Enter all or part of the journal's description or amount in the Search field.
Matching journals will be displayed.
Click the journal's Reference no. to open it.
Click the Delete button and Delete again in the message that appears.
Printing journals
Run the Journals report then print the displayed report. See Business reports for details.