After adding your inventory items to MYOB Business, you can enter their opening balances. You would do this if you had items on hand before you started using MYOB Business. You can enter opening inventory balances by making an inventory adjustment.
To enter opening inventory balances
Go to the Inventory menu > Items page.
Select one or more inventory items you want to adjust.
If you select an inventory item that isn't tracked, you'll see a warning icon next to it. If you want to make the item a tracked inventory item, you can edit it (depending on how many inventory items you already have, you may need to add Premium Inventory to do this).
Click Adjust inventory. This opens the Adjust inventory page.
All of the details of the items will be automatically prefilled. You just need to enter details of the adjustment and the account to record the adjustment in.
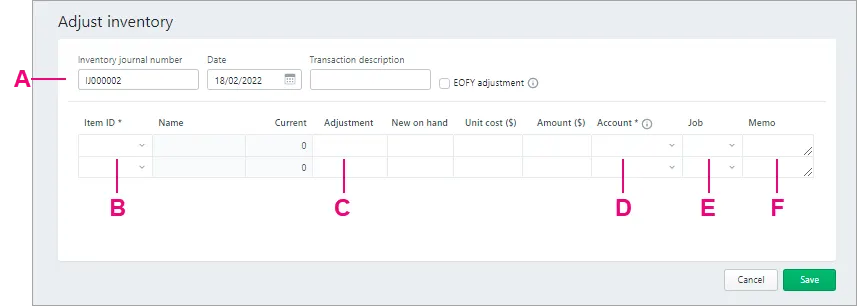
A - The Inventory journal number appears by default. You can change this is if you want, as well as the date of the adjustment. You can also enter a description of the inventory adjustment transaction.
Select whether you want this adjustment to be allocated as an end-of-financial-year adjustment. EOFY adjustments can be excluded from your financial reports.B - The Item ID of the item you want to adjust appears by default. The name and the current on-hand quantity of the item also appear. You can also find add other items the Adjust inventory page by typing the item number or item name into this field.
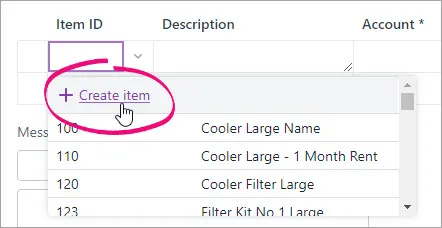
Entering a new item?
Click the dropdown arrow in the Item ID column and choose + Create Item. Enter the item details and click Save. Learn more about Creating items.
If you want to see information about an item, such as the quantity on order, click the information icon:
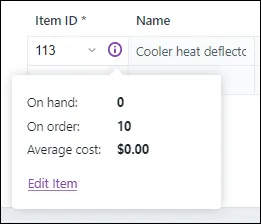
You can also make changes to an item by clicking Edit item.
C - In the Adjustment column, enter the quantity of the item held. Only enter the quantity variation. Enter the quantity in inventory units, not buying or selling units. Enter a positive number — that number is added to your on-hand inventory. If you enter a negative number, that number is subtracted from your on-hand inventory.
When you enter the adjustment:the New on hand column displays what the on-hand quantity of the item will be after recording the adjustment
the Unit cost of the item appears by default. This is calculated as the total cost of the item divided by the number of units on hand (or the 'average cost'). You can edit the Unit cost if you want.
For new items, with no stock on hand or average cost, the Unit cost will be the purchase cost.
the Amount field displays the value of the adjustment.
D - Choose the account you want to assign the adjustment amount to. If you’re reducing the inventory value, this account is usually a cost of sales or expense account.
E - If the item is related to a job, choose the Job.
F - You can add a description of the adjustment line in the Memo field.
Click Save to save the inventory adjustment.
You can also make inventory adjustments to account for stock damage and losses, or to change the value of your inventory — for examples, see Making inventory adjustments.


Review your inventory items and quantities
After setting up your items and entering your opening balances, you can get a quick view of your inventory by going to the Inventory menu > Items:

You can open an item and edit its details by clicking the Item ID.
If everything looks good, you can start buying and selling your inventory items.