| HTML Wrap |
|---|
|
External timesheet importThe Payroll module in MYOB Advanced Payroll can import timesheets generated from external applications or from Employee Time Cards Advanced Workforce Management, employee time cards entered in MYOB Advanced, and external timesheet systems not provided by MYOB. When you import timesheet data is imported into a pay run, pay items based on the timesheet data are created or updated automatically. Where payroll expenses are allocated to projects of GL accounts, allocation information can be imported from timesheets or MYOB Advanced time cards, for employees who are configured for time-based payroll allocations. Process overviewThe process of setting up the Payroll module Setting up for timesheet imports and importing involves several steps:Optionally, set employees to be excluded from new pay runs.Set Data mappingAs a one-time setup task, an MYOB Partner or consultant needs to set up data maps that map records from timesheet data to records in MYOB Advanced.Generate timesheet data. Either:
- Export data from an external timesheeting system and format it as required, or
- Enter time card information on the Employee Time Cards screen on the Employee Time Card screen (EP305000).
Import timesheet data into the Payroll module:- Create a timesheet batch in MYOB Advanced.
- Import data into the batch (upload a timesheet XLSX and/or import time cards).
- Perform mapping on the imported data, based on the data maps you set up previously.
- Validate the data mapping and make corrections as necessary.
Import timesheet data into an individual pay run:- Open a pay run for a pay period covered by the timesheet data.
- Import timesheet data into the pay.
- Validate and correct the data if necessary.
- Process the pay as normal.
Each of these steps is detailed in the sections that follow. | Anchor |
|---|
| exclude | exclude | associate MYOB Advanced records with imported timesheet records.
When your company adds a new employee or pay item, you need to update the data map to include the employee or pay item.
(Optional) Excluding employees from new pay runs
If your company has a lot of casual employees, they might not have timesheet hours every pay run. To save yourself the hassle of manually removing each employee without timesheet hours from every new pay run, you can set set those casual employees to be excluded from new pay runs.
Then, This lets you can easily only add just the employees that do have with timesheet hours.
| Anchor |
|---|
datamap | datamap | Data mappingData maps are used to map the imported timesheet data to records in the MYOB Advanced Payroll module. Set up data maps on the Data Maps screen (MPPP7020).
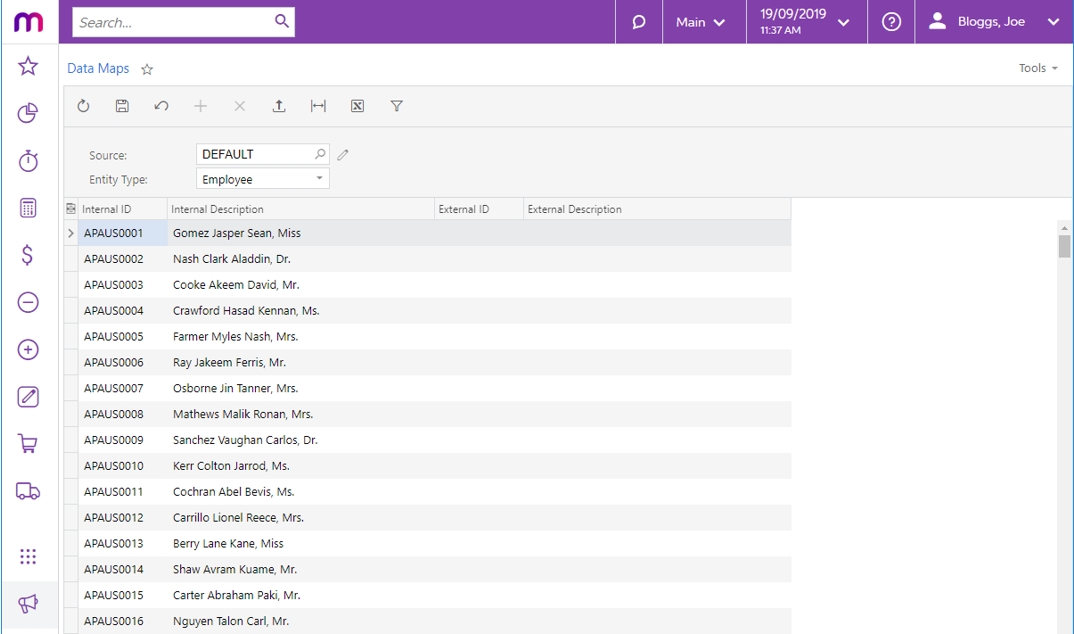 Image Removed
To set up a data map, first choose a Data Source Type in the Source field. Advanced provides a DEFAULT source, but you can set up new data sources by clicking the edit button next to the Source field. This opens the Data Source Types window (MBCS7010):
 Image Removed
When setting up a new data source, tick the Time Card type box if the source will be used to import data from MYOB Advanced Time Cards.
Once you have selected a Data Source Type, select the kind of records to map from the Entity Type dropdown. Selecting an Entity Type populates the main grid with all records of that type. Three types of record can be mapped:
| Record | Description |
|---|
| Employee | Main grid displays all active payroll employees |
| Pay item | Main grid displays all active pay items that have a calculation method of “Rated” or “Amount” |
| Subaccount | Main grid displays all active subaccounts |
| Project | Main grid displays all projects |
| Inventory Item | Main grid displays all Non-Stock Items |
| UI Text Box |
|---|
|
Mapping for projects and inventory items is used for the allocation of payroll expenses. Project tasks can also be imported, but the mapping for these is not set here—tasks are mapped directly by name, or the default project task is used. |
To begin with, the grid contains details of the records in the Internal ID and Internal Description columns—to complete the mapping, you must supply the External ID and External Description that each records maps to. There are two ways of doing this:
Enter mapping details directly into the External ID and External Description columns for each record.
| UI Text Box |
|---|
|
Each record can only have a single external identifier mapped against it. |
Click the Export button ( Image Removed) to export the grid to an Excel file. Open the file in Excel, complete all mappings, then use the Upload button (
 Image Removed) to upload the completed Excel file back into the grid.
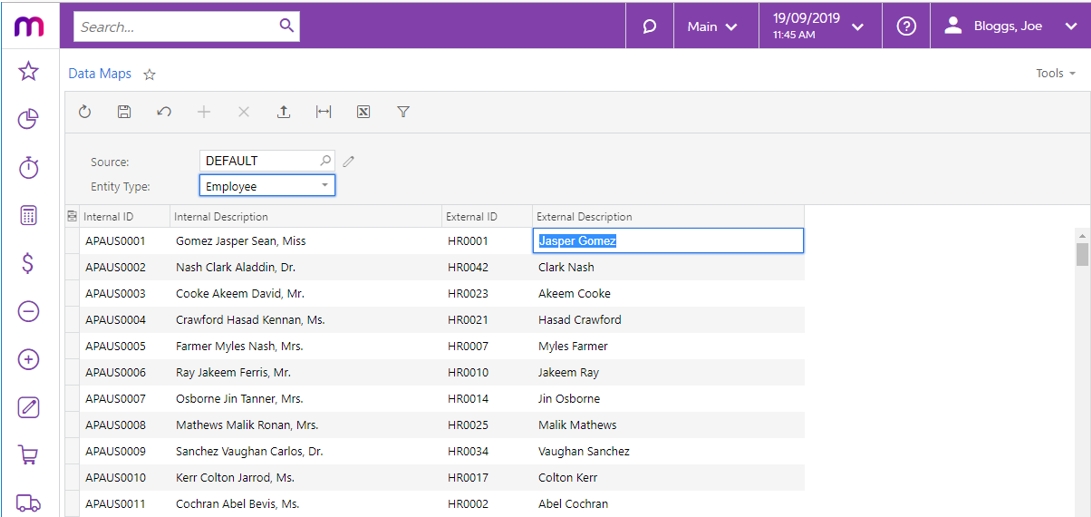 Image Removed
| UI Text Box |
|---|
|
You don’t need to map all records to be able to save the mapping—any unmapped records will be ignored when mapping imported timesheet data. |
Importing timesheet data
Importing records
Once data maps have been set up, use the Import Timesheets screen (MPPP7030) to import external records and apply the mappings you’ve set up.
| UI Text Box |
|---|
|
For employees with time-based payroll expense allocations from MYOB Advanced time cards, the data must be imported using the Import Timesheets screen, even if this data is not then imported into a pay run. The imported time batch is always used as the source of time-based payroll expense allocations, whether the data came from Advanced time cards or an external timesheet. |
Select the Data Source Type that matches the source chosen to be the same as the source of the appropriate data mapping configuration.
Next, create a new batch using the + button and upload timesheet details by clicking the Upload Timesheet option in the Actions dropdown.
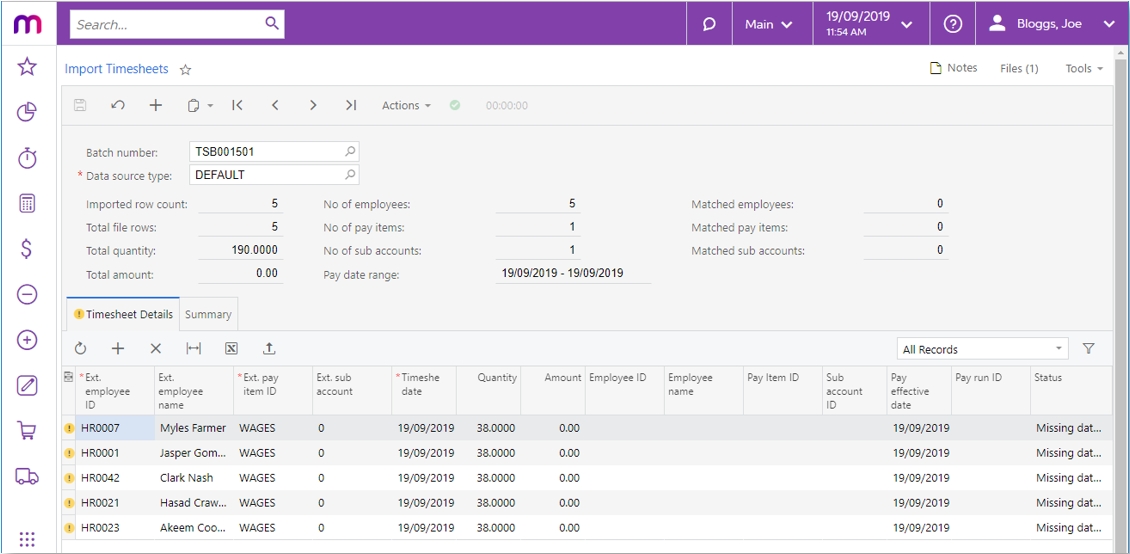 Image Removed
Immediately after importing data, warning messages appear saying that data is missing (see screenshot above). These warnings will disappear once the data is mapped—see Mapping records.
| UI Expand |
|---|
| title | Timesheet import file format |
|---|
|
Timesheet import files should be Excel files with the same column layout as the main table of the Import Timesheets screen:
| Record | Description |
|---|
| Ext. employee ID | the employee’s ID in the external system |
| Ext. employee name | the employee’s name in the external system |
| Ext. pay item ID | the ID of the pay item in the external system |
| Ext. sub account | the subaccount ID in the external system |
| Ext. Project | the ID of the project in the external system |
| Ext. Project Task | the ID of the project in the external system |
| Ext. Inventory Item | the ID of the project in the external system |
| Timesheet date | the date of the timesheet entry |
| Quantity | the quantity (hours/days) for Rated pay items |
| Amount | the amount for Amount pay items |
The import headers are case-sensitive. The easiest way to create an import file template is to click the Export button (Image Removed) on the main table toolbar to export a blank table to Excel—this will create a file with the required column headings in the correct order. You can delete the columns after Amount, as these columns relate to data from the MYOB Advanced system that will be filled in by the data mapping.
| UI Expand |
|---|
| title | Importing time cards |
|---|
|
If the Data Source Type has the Time Card type box ticked, an Import Time Cards option is also available in the Actions dropdown. Select this option to import timesheet data from MYOB Advanced time cards. | UI Text Box |
|---|
| The Upload Timesheet action is still available in this case—it is possible to import data from time cards and from a XLSX file into the same batch. |
Time cards are generated against a specific week, which is displayed for the time card on the Employee Time Card screen (EP305000). When importing time cards, you will need to specify the range of weeks to import time cards from:  Image Removed Image Removed
Data from all approved and released time cards within the range of weeks you selected is imported. |
Mapping records
Once timesheet data has been imported, click Map Imported Items from the Actions dropdown to apply the mapping set up for the selected Data Source Type to the imported data. The remaining fields are filled in automatically based on the data mapping:
 Image Removed
| UI Text Box |
|---|
|
Mapping pay items and employees is mandatory. Subaccount mapping is optional, however: if no subaccount is mapped, the default subaccount on the relevant GL Purpose code will be used. |
| UI Expand |
|---|
| title | Updating timesheet records manually |
|---|
|
The records on the Import Timesheets screen can be edited manually if necessary, e.g. to correct mapping errors or to enter details for records that aren’t included in the data map. You can enter new details into each cell directly: 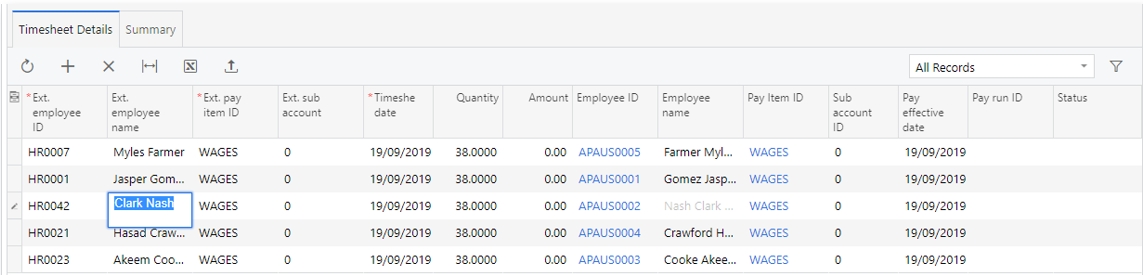 Image Removed Image Removed
| UI Text Box |
|---|
| The Pay Effective Date of each timesheet record is defaulted from the timesheet date, but can be changed as required. You can incorporate historic timesheet entries into open pay runs by adjusting this date to fall within the applicable pay period. |
In the case of the Employee ID, Pay Item ID and Subaccount ID columns, you can manually select records to map the timesheet data to using standard selection windows: 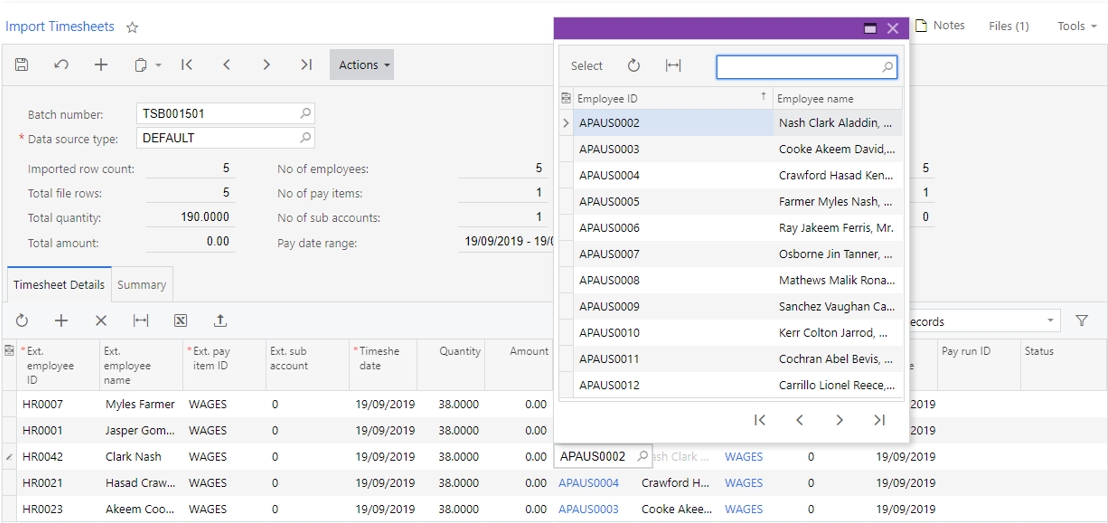 Image Removed Image Removed
Any manual edits you make can be applied to the data map for the selected Data Source Type. The following message appears when you save a batch after manually editing the data:  Image Removed Image Removed
Click Yes to apply your edits to the data map. This will ensure that any new timesheet batches will map values according to the edits.
Click No to leave the data map as it is—the edits you make will apply to this batch only. |
Validating imported values
Warning indicators appear on rows with missing or faulty record values. Details of the problems are also displayed in the Status column. Correct these records before importing the data into a pay run.
| UI Text Box |
|---|
|
You can filter the Status column by “Is Not Null” to show only those rows with warnings. |
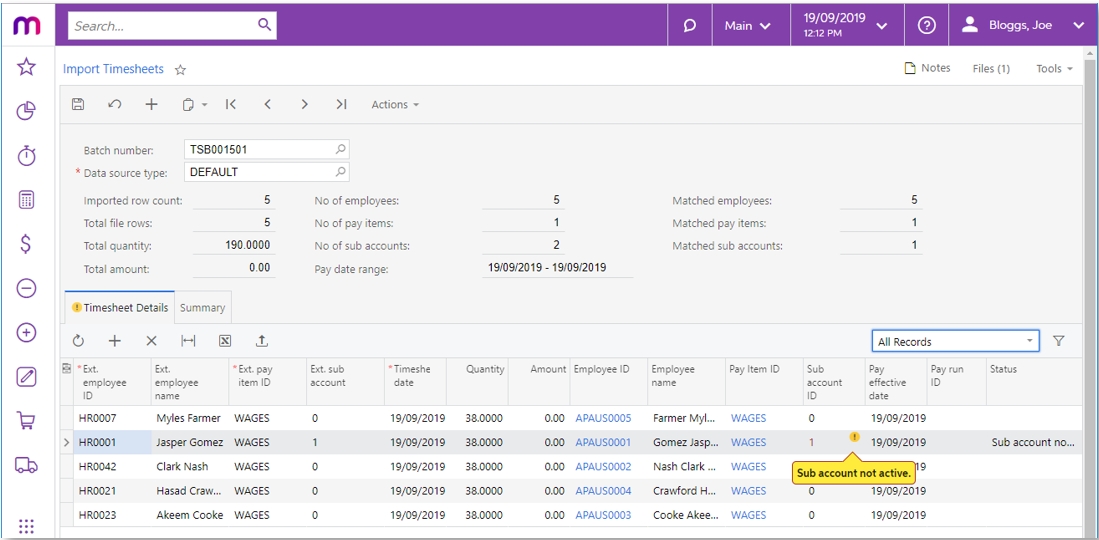 Image Removed
The summary area provides an overview of the imported record set. Use these totals to confirm that all relevant timesheet data is present and mapped correctly by, for example:
- Comparing the presented totals with the record totals of the imported timesheet file
- Comparing the number of imported records against those mapped.
- Evaluating the Pay Date range
The Summary tab provides an additional level of reporting by grouping the imported data by Employee, Pay Item and Subaccount:
 Image Removed
| UI Text Box |
|---|
|
The Summary tab only reports on the imported external data, and is not indicative of what will be imported into a pay run—this purpose of this view is to help you confirm that all data was correctly imported. |
| Anchor |
|---|
addfromtimesheet | addfromtimesheet | Adding employees from timesheetIf you have employees set to be excluded from new pay runs, you can quickly add them on the Pay Run Details screen (MPPP3120) by clicking the three dots icon (. . .) and choosing Add Employees from Timesheet. This doesn’t add the timesheets, just any employees who are not already in the pay run that have records created in the imported timesheet batch within the current pay period dates.
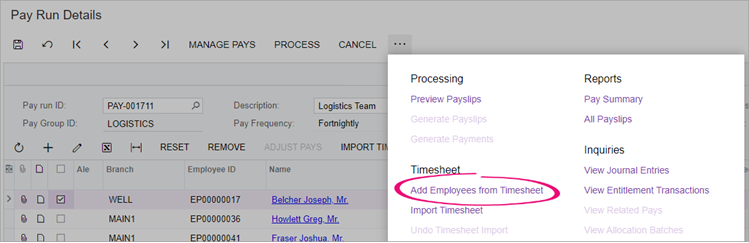 Image Removed
Pay run timesheet import
Once timesheet data has been imported and validated, you can go on to import unprocessed timesheet batches into an open pay run from the Pay Run Details screen (MPPP3120).
The import process scans all timesheet batches for records that match the following criteria:
- Not associated with any other pay run.
- The Pay Effective Date on the timesheet record falls within the Pay Period of the pay run (including the start and end dates).
- The employee associated with the timesheet record exists in the pay run.
| UI Text Box |
|---|
|
The Pay Item attached to imported timesheet data does not need to exist on the Standard Pay of the Employee. Where applicable, the timesheet import process dynamically adds these pay items to employees’ pays. |
You can import timesheets for all employees at once by clicking the three dots icon (. . .) on the form toolbar and choosing Import Timesheet.
 Image Removed
Validating pay run changes
Click the Time Summary button on the Pay Run Details screen to display the Pay Run Time Summary window (MPPP7050), which shows all timesheet records that were imported into the pay run, including the source timesheet batches.
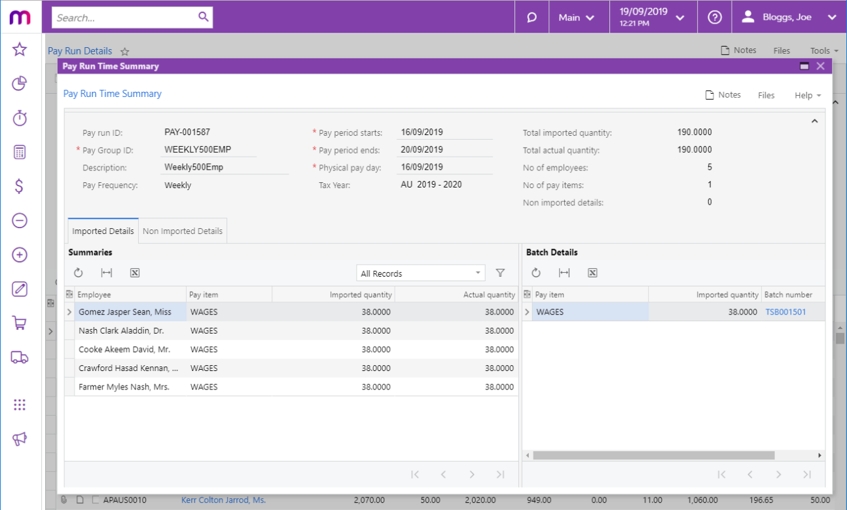 Image Removed
The Non Imported Details tab displays any records that were present in the imported batches, but were not imported into the pay run. This allows you to find and correct any problems that may have caused the records to be left out of the import.
| UI Text Box |
|---|
|
Any difference in the Imported and Actual Quantity of the pay item will be highlighted in red. |
The pay run life cycle
Timesheet record associations are maintained throughout the various stages of pay run processing. When a pay run is in the “OPEN” status, you can import timesheet records and undo the import if necessary (see below). Once a pay run has moved on from this status, into the “PROCESSING” or “COMPLETE” statuses, you cannot change any imported timesheet data, i.e. you cannot import new data or undo timesheet imports. At this stage, the only way to change the timesheet data is to reverse or cancel the pay.
When a pay is reversed or cancelled, any timesheet data imports are undone—the association between the timesheet data and the pay run is removed, so that the timesheet data can be imported into a new run (see below).
Undo timesheet import
Once a timesheet batch has been imported into a pay run, a link is created between the batch and the pay run, and the batch can no longer be edited. On the Import Timesheet screen, records imported into a pay run will no longer be editable—the Pay Run ID column displays the pay run that each timesheet record has been imported into.
 Image Removed
If you need to correct timesheet records after they have been imported into a pay, you will first need to undo the import, to break the link between the pay run and the timesheet records. There are three ways to do this on the Pay Run Details screen:
- To remove all pay items affected by the import process, on the form toolbar, click the three dots icon (. . .) and choose Undo Timesheet Import.
 Image Removed
 - To remove timesheet data for individual employees, select one or more employees and click Undo Timesheet Import on the main table's toolbar.
 Image Removed
 - To reset the current pay individual employees, select one or more employees and click the Reset button in the main table’s toolbar.
| UI Text Box |
|---|
|
When a pay run is reversed or cancelled, any timesheet imports in the pay run are undone. |
| HTML |
|---|
<h2><i class="fa fa-comments"></i> FAQs</h2><br> |
| UI Expand |
|---|
| title | Do I need to add all an employee's timesheet pay items to their standard pay? |
|---|
|
No. The timesheet import process dynamically adds any relevant pay items to employees’ pays. As such, these pay items don’t need to be configured against the employee’s Standard Pay by default.
Keeping the Standard Pay configuration lean and relying on the import process to add the relevant pay items should make it easier to maintain pay item and employee records. |
| UI Expand |
|---|
| title | What happens if I import leave through a timesheet? |
|---|
|
It depends on your settings. On the Pay Items screen (MPPP2210), there’s an Allow Leave Reduction option. If you select this option for a leave taken pay item, it will automatically reduce the calculated leave amount on the associated income pay item.  Image Removed Image Removed
You should only select this option for salaried employees who normally work 40 hours per week.
You shouldn’t select this option in the following situations: - If you import leave via timesheets, because imported income pay items already exclude any leave taken.
- For salaried employees who have rosters entered in Workforce Management.
You can also exclude employees from having their income reduced by leave payments from pay items with the Allow Leave Reduction option selected. This is useful when you have a mixture of salaried and waged employees. To exclude an employee from leave reduction, go to the Employment tab of the Pay Details (MPPP2310) screen and select the Leave does not reduce income checkbox.  Image Removed Image Removed
|
html
Importing timesheetsPreparing timesheet batchesBefore you can import timesheets into a pay run, there's a few steps you need to complete to prepare a batch of timesheet records. Importing a timesheet batch into a pay runOnce your timesheet batch is ready, importing it into a pay run is simple, one-click process.
Editing timesheets and data mapsIf you need to make changes to a timesheet batch after importing it into a pay run, start by removing the timesheets from the pay run. If you're getting warnings about missing data maps, see the MYOB Advanced support knowledge base. |
