| HTML Wrap |
|---|
|
| HTML Wrap |
|---|
| When your client has sold or disposed of an asset during the year you'll need to update your asset register. You can edit, delete, sell or dispose of assets in Assets Live using the various functions on the TASKS bar. For assets created in the current asset year you can make any changes to the asset details except for the Asset type and Control Group. To change the Asset type you'll need to delete and recreate the asset with the correct type. If you want to change the Control Group you can transfer the asset to another group. Lets see how this is done. | UI Text Box |
|---|
| This example is an AU system but can be used for NZ. NZ systems may have some differences. |
| HTML |
|---|
<iframe src="https://fast.wistia.net/embed/iframe/1u7lnh94wu?time=7m09s" title="Wistia video player" allowtransparency="true" frameborder="0" scrolling="no" class="wistia_embed" name="wistia_embed" allowfullscreen mozallowfullscreen webkitallowfullscreen oallowfullscreen msallowfullscreen width="560" height="315"></iframe>
<script src="https://fast.wistia.net/assets/external/E-v1.js" async></script> |
| Excerpt |
|---|
| UI Expand |
|---|
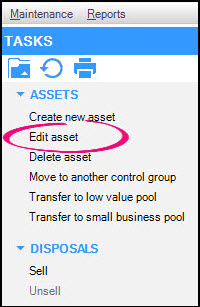
| - Select the asset that you want to edit, on the TASKS bar, click Edit Asset. The Edit Asset window appears.
Make any adjustments required and click OK to save your changes. The Edit Asset window closes. - Check all details are correct. You'll only be able to edit the General details tab, the depreciation Rate Year 2+ and the Private use portion in subsequent years.
 Image Removed Image Removed
|
| UI Expand |
|---|
| If you want to delete an asset, you will need to do this in the year the asset was created in. The asset item must be active in the created year and not sold in any subsequent year. If you want to remove an asset added in a prior year, you can sell or dispose of the asset to remove it from the register. This is covered in the next procedure. There are two ways you can delete an asset: - select the asset that you want to edit and, on the TASKS bar, click Delete Asset, or
- right click on the asset and select Delete.
The message Are you sure you want to delete the selected asset? appears.  Image Removed Image Removed
Clicking Yes will delete the asset. Clicking No will cancel the deletion process and return you to the Asset register. |
| UI Expand |
|---|
| title | To sell or dispose of an asset |
|---|
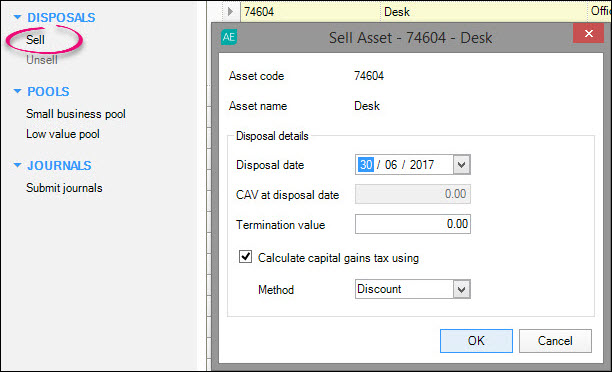
| - Click the asset that you want to dispose of and, under Disposals on the TASKS bar, click Sell. The Sell Asset window appears, displaying the asset code and name.
 Image Removed Image Removed - Click the Disposal date for the asset. The default Disposal date is the year end date of the opened year. The Closing Asset Value (CAV) at disposal date is calculated based on the Disposal date.
- Enter the Termination Value in the sales price of the asset.The termination value is the amount received for the asset when it was sold or disposed of, once balancing adjustments have been made. The default value is 0.00.
For AU: If required, select the Calculate capital gains tax using checkbox. This checkbox is only active if the depreciation calculation is for Taxation purposes. Select the method to be used to calculate the capital gains tax. There are two options: Discount and Indexation. However, depending on the type of asset and the dates you held it for, you may only be able to select one option.
Click OK. The sold asset appears grey in the asset register.
|
| UI Expand |
|---|
| title | To transfer an asset to a different control group |
|---|
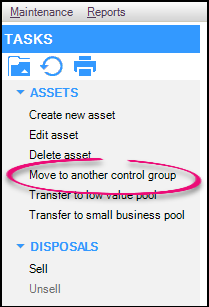
| You may notice when editing the asset that the Control Group is greyed out, indicating that this field cannot be changed. You can however transfer the asset to another control group in the year the asset was created. To transfer the asset: - Select the asset you wish to move. The selected item is highlighted.
- On the TASKS bar, click Move to another control group. The Transfer Asset window appears.
- Select the control group you would like to move the asset to, then click OK. The asset is transferred.
 Image Removed Image Removed
|
|
|
| HTML Wrap |
|---|
| width | 15% |
|---|
| class | col span_1_of_5 |
|---|
| | |
| HTML Wrap |
|---|
| float | left |
|---|
| class | col span_1_of_5 |
|---|
| | Panelbox |
|---|
| name | yellow |
|---|
| title | You are in MYOB Ledger module... |
|---|
| | HTML Wrap |
|---|
| | HTML |
|---|
<style>
#container {
    text-align: justify;
    -ms-text-justify: distribute-all-lines;
    text-justify: distribute-all-lines;
    display:inline-block;
    width:100%;
    white-space: nowrap;
    overflow:hidden !important;
    overflow-x:hidden !important;
    margin-left:-5px;
    margin-right:-5px;
    margin-top:-3px;
    margin-bottom:-3px;
}
.box img {
    height:100%;
    width:100%;
}
.stretch {
    width: 100%;
    height: 110%;
    display: inline-block;
    font-size: 0;
    line-height: 0
}
.box {
    display:inline-block;
}
</style>
 <div id="container">
    <div class="box">
        <a href="http://help.myob.com/wiki/x/0gVNAQ"><img src="/wiki/download/attachments/21824856/step4.png?api=v2"></a>
</div> |
|
| Panelbox |
|---|
| name | yellow |
|---|
| title | Tasks in this module |
|---|
| | HTML Wrap |
|---|
| | Page Tree |
|---|
| expandCollapseAll | true |
|---|
| root | MYOB Ledger module 4. Substantiate balances |
|---|
|
|
|
| Panelbox |
|---|
| name | yellow |
|---|
| title | Other MYOB Ledger modules |
|---|
| |
| Panelbox |
|---|
| name | yellow |
|---|
| title | Related topics |
|---|
| |
|
|
|
| HTML Wrap |
|---|
|
| UI Button |
|---|
| color | purple |
|---|
| size | large |
|---|
| link | Module 1. Setup |
|---|
| text | Setup > |
|---|
| title | << Adding new assets |
|---|
| url | http://help.myob.com/wiki/x/CQZNAQ |
|---|
|
| UI Button |
|---|
| color | purple |
|---|
| size | large |
|---|
| link | Module 1. Setup |
|---|
| text | Setup > |
|---|
| title | Finalising assets >> |
|---|
| url | http://help.myob.com/wiki/x/DAZNAQ |
|---|
|
|
Just a sec...
We're taking you to the new workflow!
| Redirect |
|---|
| delay | 5 |
|---|
| location | cah:Get on board with Client Accounting |
|---|
|