ANSWER ID:4185This page explains how to manually import your MYOB Payroll journals into AccountRight. SetupThere are few things that you need to set up, but once this is done it is an easy procedure to complete each pay period. In your accounting software, you first want to ensure the following: Make sure that you have the following accounts in your Chart of Accounts: Liability account for Wages or Payroll Liability, such as Wages Clearing Expense Account for Wages and Salaries, or one for each department If you use Job Centres, print a list of all your job codes (this is found in the Accounts tab of the reports index)
Create a folder on your hard drive where MYOB Payroll will save the journal file, such as My Documents\Payroll Export the chart of accounts from your accounting software ready for use in MYOB Payroll. Make sure the export file is a comma-separated .txt file called "accounts.txt" containing the following fields: account code, account description, and account type (optional), e.g. 2-2000 Wages Liability. For more information on this, see the Payroll user guide.
The next steps in the setup process depend on what AccountRight version you're using (new or Classic AccountRight). | UI Expand |
|---|
| title | If you're using the new AccountRight (v2011 or later) |
|---|
| - Go to the File menu and choose Import/Export Assistant.
- Select the Export Data option then click Next.
- In the Export field, select Accounts.
- In the Select Accounts type field, select Account Information. Leave all other settings untouched.
 - Click Next.
- For the Separate data using option, select Commas.
- Deselect the option Include field headers in the file.
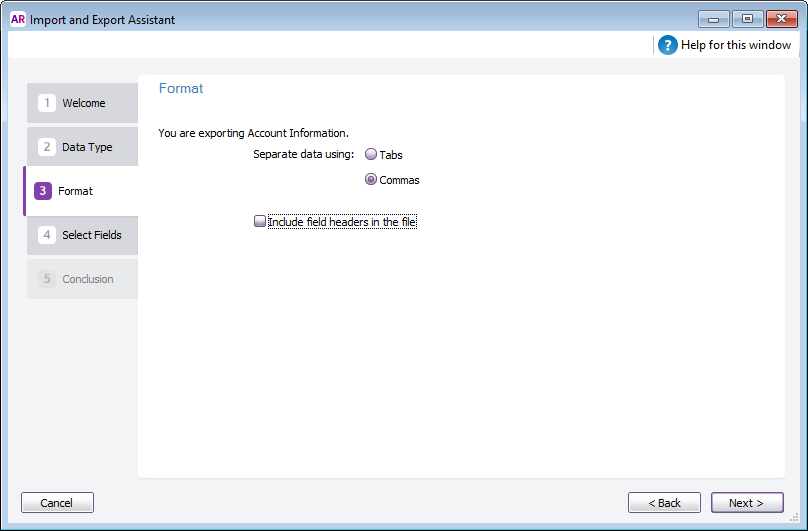 - Click Next.
- From the list of Available fields, click Account Number, then click Add. Also add Account Name and Header.
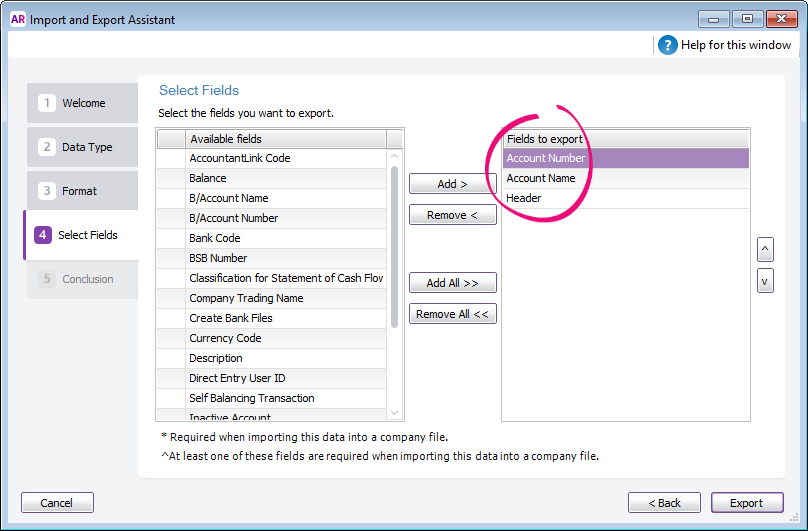 - Click Export.
- Save the export file with the default name (ACCOUNTS.TXT).
- Save the file in the folder created earlier.
|
| UI Expand |
|---|
| title | If you're using Classic AccountRight (v19 or earlier) |
|---|
| - Go to the File menu and choose Export Data then choose Accounts, then choose Account Information.
- For the Export File Format field select Comma-separated, and for the First Record is field select Data Record. Leave all other values untouched.
 - Click Continue.
- Select Account Number, Account Name, and Header, then click Export.
 - Save the export file with the default name (ACCOUNTS.txt).
- Save the file in the folder created earlier.
|
With your accounting software set up, it's time to set up MYOB Payroll. | UI Expand |
|---|
| - In Payroll, go to the Tools menu and choose Options then click the Accounting tab.
- Choose Other as the Accounting System. Do not select one of the AccountRight options.
- In the Path field, click the Browse button (...) and find the folder where the ACCOUNTS.txt file is located (as created earlier).
For the Default General Ledger Code for Payroll Liabilities, select the account for Payroll (wages). | UI Text Box |
|---|
| If the default ledger drop down shows as blank This means the wrong export fields have been selected in AccountRight, the wrong folder has been selected in the Path field, or the file is not called ACCOUNTS.TXT. |
- Click OK.
- Go to the Maintenance command centre and click Maintain Departments.
- For the General Ledger Expense Code, specify the applicable account for each department.
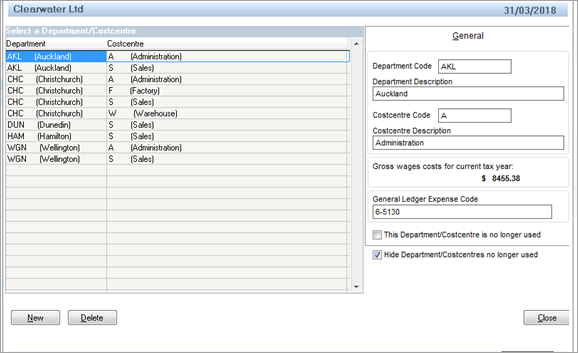 - If you use Jobs in your accounting software you can enter the Job Number as the Costcentre Code in each relevant department. This needs to be typed exactly the same as the Job Number in your accounting software. Also, the Costcentre Description must match the Job Name in your accounting software.
- Go to the Maintenance command centre and click Maintain Pay Codes.
- Select the TAX pay code then click the Other tab.
- For the General Ledger Liability Code, select your PAYE Liability account.

|
The setup is now complete! Creating the journalsEach time you Finalise the pay, the payroll.txt file is created. This file is in the path located in the path as defined in Tools > Options (the folder created at step 2 above). As with the setup, this process differs depending on your accounting software. | UI Text Box |
|---|
| | Use Job centres? Make sure you select the option Include Cost Centres. |
| UI Expand |
|---|
| title | New AccountRight (v2011 and later) |
|---|
| - Go to the File menu and choose Import/Export Assistant.
- Select the Import Data option then click Next.
- In the Import field, select Transaction Journals.
- Click Browse and select the Payroll.txt file saved in the folder created in Step 2 earlier in this page.
 Image Added Image Added - Click Next.
- Select the Commas and Data options, then click Next.
- Match the fields by clicking Match All or match the fields individually by name, then click Next.
 Image Added Image Added - If you want to make a backup of your AccountRight company file, click Back up, otherwise click Import.
- Click Close. The imported journal can be found in your AccountRight company file as a general journal.
|
| UI Expand |
|---|
| title | Classic AccountRight (v19 and earlier) |
|---|
| - Go to the File menu and choose Import Data then choose Transaction Journals.
- For the Import File Format field select Comma-separated.
- For the First Record is field select Data Record.
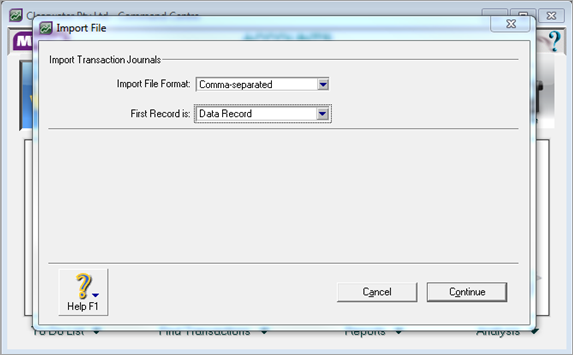 Image Added Image Added - Click Continue.
- Browse to the Payroll.txt file, select the Payroll.txt file saved in the folder created in step 2 earlier in this support note.
- Click Open.
- Click Match All then click Import. Note: In AccountRight Premier/Enterprise, the Allocation Memo needs to be matched manually.
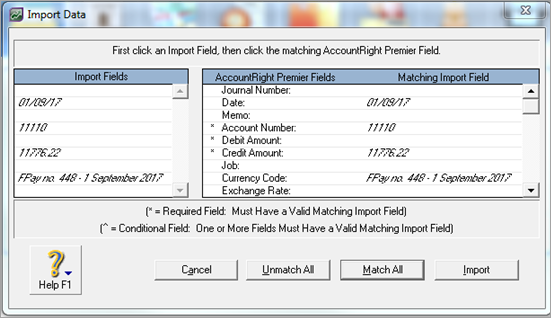 Image Added Image Added - The imported journal can now be found in AccountRight as a general journal.
|
| UI Text Box |
|---|
| | Instead of doing this journal each time you finalise a pay, you may like to do a journal once a month. To do this simply go to the Tools menu and choose Create Journal. Select by month, and if you use Job codes select this option. Then follow the steps above. |
After you have imported the wages journal from MYOB Payroll to clear out the Payroll and PAYE Liability accounts, the following transactions need to be entered into your MYOB accounting software: - Go to the Banking command centre and click Spend Money. Select the Pay from Account: option and specify the Cheque account (the Account No needs to be set to your Payroll Liability account (2-xxxx)).
- The payment to the IRD for PAYE can also be entered as a Spend Money transaction, with the PAYE liability account selected.
|
