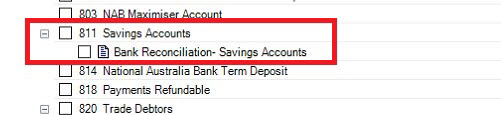
For each client account, use Add workpaper to attach workpapers which will substantiate or calculate the balance in the account. Workpapers can also be attached to the period and not linked to a specific account. You can attach workpapers to detail and header accounts. For example a General Cheque Account could have the Bank Statement and Bank Reconciliation attached to the account. | UI Text Box |
|---|
| This example is an AU system but can be used for NZ. NZ systems may have some differences. |
| UI Text Box |
|---|
| New workpapers must have a unique name. |
Attached workpapers are stored in the Workpapers module. If a workpaper is deleted it is permanently deleted and cannot be restored. If the period has been rolled over from a previous period, new workpapers are automatically attached to the accounts in the new period using the previous period as a guide. Those workpapers which were completed and attached to accounts in the previous period, will be recreated and attached to the same accounts in the new period. Only those workpapers with the rollover option selected will be generated and attached. | UI Text Box |
|---|
| You can add a workpaper to the next successive year period if you are configured with either :
AccountRight 2013.0 or later, or
Essentials Accounting or Cashbook
as the financial data source. |
| UI Expand |
|---|
| title | To add a workpaper to an account |
|---|
| - Go to the client’s Client Accounting > Trial Balance (Workpapers) tab and click a period in the Select Period section.
- On the TASKS bar, click Open Period. The table for the period appears.
 - Select the checkbox next to the account that you want to add the workpaper to.
- On the Tasks bar, click Add workpaper. The Add Workpaper window appears and the Account field displays the selected account.
- In the Select workpaper template section, select the Category and Template.
- Enter a new Workpaper name for the client account. Each workpaper name needs to be different.
If available, click your preferred rollover option: | Rollover this workpaper to the next period | Rollover the workpaper to the next period. During rollover, the previous workpaper period is used as a base.
The current workpaper is recreated and attached to the same account in the next period. | | Retain links to all external documents | Include links to all documents which are linked within the workpaper when it is rolled over into the next period. If Document Manager is installed, you can add links to Document Manager files in the workpaper. If Document Manager is not installed, you can can open and view linked documents from within the workpaper. |
- Click Add.
- If an error message appears saying the workpaper name is already taken:
- If you want to go back and change the workpaper name:
- Click Yes.
- Change the name.
- Click Add.
- If you want to keep the existing workpaper name but add a number to the name, click No.
- The workpaper is attached below the account in the period table with a workpaper icon (
 ). ).
|
If the workpaper is not related to a specific account, attach the workpaper to a period. This is called non-account specific documents and can include workpapers such as the Review Points or Client Queries. 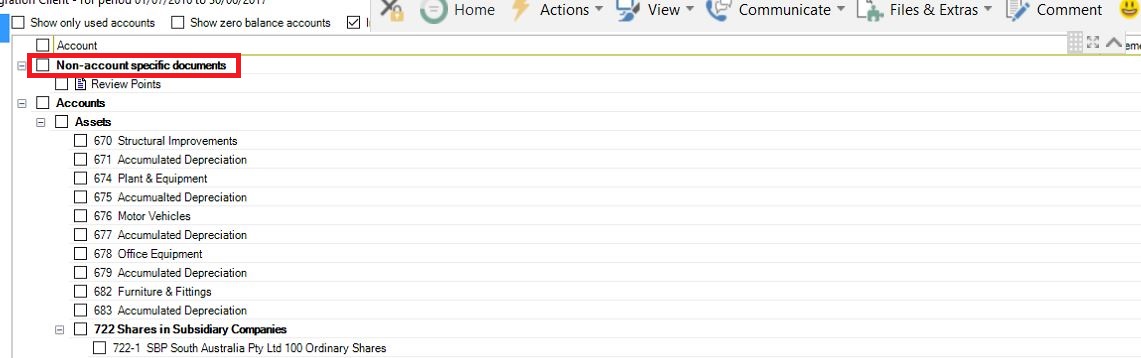 Image Added Image Added
| UI Expand |
|---|
| expanded | true |
|---|
| title | To add a workpaper to a period |
|---|
| - Go to the client’s Client Accounting > Trial Balance (Workpapers) tab and click a period in the Select Period section.
- Select the Non-account specific documents
Click the Non-account specific documents checkbox in the table. This is the first item listed in the table.Click Add workpaper on the Tasks bar. Add Workpaper window opens. | UI Text Box |
|---|
| Another way of attaching workpapers to a period, is to select Non-account specific documents in the table, right-click and select Add workpaper. |
Leave the Account field blank. The workpaper is being attached to the period and not to a specific account. In the Select workpaper template section select: Category — use the drop-down to filter the list of templates which are displayed on the Template drop-down. Only templates of the selected category are displayed on the Template drop-down. Select All to see all templates regardless of category. Template — use the drop-down to select the workpaper template to be attached to the selected account.
Enter a new Workpaper name. Rename the selected template to a something more appropriate for the client account. | UI Text Box |
|---|
| Workpapers must have unique names.
An error message is displayed if the Workpaper name is already in use. Click OK to create a workpaper with a suffix added to the workpaper name. Click Cancel to return to the Add Workpaper window. |
Set the Rollover options- On the Tasks bar, click Add workpaper. The Add Workpaper window appears.
- Leave the Account field blank.
- In the Select workpaper template section, select the Category and Template.
- Enter a new workpaper name for the client account. Each workpaper name needs to be different.
If available, click your preferred rollover option: | Rollover this workpaper to the next period |
| Rollover the workpaper to the next period. During rollover, the previous |
| workpaper period is used as a base. |
| is recreated and attached to the same account in the next period. | | Retain links to all external documents |
| Include links to all documents which are linked within the workpaper when it is rolled over into the next period. |
If Document Manager is installed, you can add links to Document Manager files |
in the workpaper. If Document Manager is not installed, |
you can can open and viewed linked documents from within the workpaper. |
Click Add. - If an error message appears, saying the workpaper name is already taken:
- If you want to go back and change the workpaper name:
- Click Yes.
- Change the name.
- Click Add.
For instructions on opening and viewing workpapers, see Opening workpapers for more information.
- If you want to keep the existing workpaper name but add a number to the name, click No.
The workpaper is attached below the account in the period table with a workpaper icon (Image Added).
|
| 
 Yes
Yes
 No
No
 Thanks for your feedback.