When a company or officeholder officer changes their address, they'll need to notify ASIC by completing a Form 484 - Changes to company details Change a company's details 484 Form. To avoid any fees or penalties, this form should be lodged within 28 days of the change occurring. You can lodge Form 484 to make changes to the following address types: - Registered office – the —the address ASIC send your company correspondence to. This address can be the same as company's principal place of business, but it can't be a PO box.
- Principal place of business – the —the main address where you conduct business. This address can't be a PO box.
- Officeholder or Member residential address – When —When appointing a director, alternate director, secretary or issuing shares to a member, you need to provide ASIC their residential address. If this address changes, ASIC must also be notified. The address can't be a PO box.
To get started, select your client from My List and click Corporate admin on the top-menu bar. Click Manage an entity on the top-right of the screen and choose Notify of company changes. The Notification of company changes - Form 484 screen appears. | UI Expand |
|---|
| expanded | true |
|---|
| title | To change the company address |
|---|
| - Open the form.
- From the Notification of company changes - Form 484 screen page, select Change of address. The Change of address panel appears options appear.
Type the new address in the New address field. A list of valid address suggestions appear. Select the correct address from the list of suggestions. The Street address, Country, State and Suburb fields populate. | UI Text Box |
|---|
| Using an overseas address? If the new address is an overseas address, click Manually enter address. Type the new Street address, Country and Locality (i.e. suburb, province or region) in the relevant fields. |
- If the address is shared across multiple companies, officers or members, you'll be asked if you want to update the address for those entities. Select the clients you also want to update to create a 484 form for each entity.
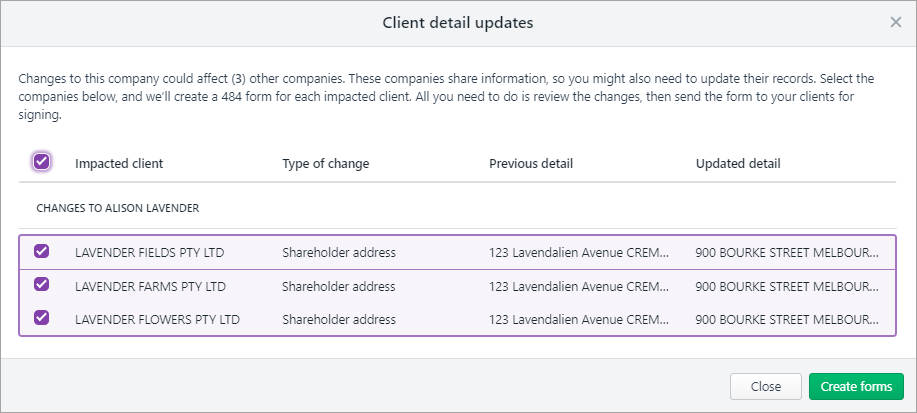 Image Added Image Added - Select the type of address you want to apply the change to:
- Registered office address
- Principal place of business
- Company officeholder's residential address
- Member's address.
changes to. Optionally, select the effective date. | UI Text Box |
|---|
| You can click Preview Form 484 to check the form before you finish preparing it. |
- Click Continue and prepare forms.
Select the signatories. | UI Text Box |
|---|
| You can select multiple signatories. To edit the required signatories of a form, go to the Client lodgements page. |
- Enter the details of the meeting held for the change of address.
Click Create forms. Click the ellipsis button for the form you created and choose Send for signing via portal. The Create task page appears. | UI Text Box |
|---|
| You can select more than one type of address to apply the change to. For example, if the new address is the same for the principal place of business and registered office, select both registered office address and principal place of business. The registered office address and principal place of business will be updated to the new address. To notify of another address change, click + Change another address. You only need to do this if the address is different. |
- If the address is shared across multiple companies, officers or members, you'll be asked if you want to update the address for those entities. Select the clients you also want to update to create a 484 form for each entity.
Image Removed
- Continue to complete each section of the form as required. Once form is complete click Send for Signing.
|
If you’ve made any changes to an address If you regularly send Form 484 with the same text, you can save time by using one of your practice's task templates to automatically fill in the Title and Description fields. Just click Apply a template ( Image Added). Image Added). |
Complete the details on the page. | UI Text Box |
|---|
| When you select the client, you can see the documents that will be sent as part of the change you've made. Use the Signature required option to indicate if any documents need signing. |
- Click Create task for the selected client.
|
| UI Expand |
|---|
| title | To change the address of an officeholder or member across multiple companies |
|---|
| | UI Text Box |
|---|
| When you've edited the details of a client or contact who is also a company officeholder or member, MYOB Practice detects that Corporate admin's data is different from ASIC's records. The Client lodgements page will display the following warning message if there are any differences:
 Image Added Image Added |
| UI Text Box |
|---|
| You can also begin a bulk update for an officeholder or member from two other areas: - For your general contacts, go to Contacts > Contacts List, select your contact, scroll down to ASIC information and click Bulk update (
 Image Added). Image Added). - For your clients, select the relevant client from the client sidebar, click Corporate admin from the top menu bar and click Bulk update (
 Image Added). Image Added).
|
Go to Corporate admin > Client lodgements. - In the warning message near the top of the page, click Review now.
 Image Added Image Added - Under Review contacts, find your clients and contacts in the list.
- Select the relevant client or contact records that require the bulk update.
- Click Bulk update (
 Image Added). Image Added). - In Bulk update, read the information and click Continue.
Select Change of address. - If the fields don't automatically fill in the correct address, type the address in the New address field. A list of valid address suggestions appear.
Select the correct address from the list. The Street address, Country, State and Suburb fields will populate.
| UI Text Box |
|---|
| Need to enter an overseas address?
If the new address is an overseas address, click Manually enter address. Type the Street address, Country and Locality (i.e. suburb, province or region) in the relevant fields. |
Click Continue. | UI Text Box |
|---|
| We'll automatically select the signatories for each company affected by the change. You can view and change the chosen signatories under Signatory selections. |
If you want to change a company's signatory or change the companies that are included in the change of address, click the relevant option in the Signatory selections section: Exclude company—exclude the company from the bulk update. Include company—include the company in the bulk update. Change signatory—change the signatory for the bulk update.
When you select a signatory, you can tick Use the selected signatory for all other companies where applicable to re-use the selected signatory for other companies. This will automatically update all applicable companies to the selected signatory. | UI Text Box |
|---|
| If you can't see Change signatory option, the company hasn't got any other possible signatories. |
- Click Continue.
- On the Confirmation page, under Authorisation form(s) section, click the document name to download a PDF copy.
Check that all the details are correct. On the Confirmation page, click Submit.
| UI Text Box |
|---|
| To filter the Client lodgements page to bulk updates only, click the drop-down under Form types and select Bulk update. Click the Outstanding status to see any bulk updates you've already started. |
In Client lodgements, find the bulk update you've just created and click the ellipsis ( Image Added). Image Added).
- Select View summary.
Under Authorisation form(s), select Send for signing via portal. The Create task page appears. | UI Text Box |
|---|
| If you regularly send Form 484 with the same text, you can save time by using one of your practice's task templates to automatically fill in the Title and Description fields. Just click Apply a template (Image Added). |
Complete the details on the page and click Create task. | UI Text Box |
|---|
| Once all the forms have been signed, the bulk update's status will change to Ready to begin. |
If you closed the bulk update, re-open it in Client lodgements by clicking the ellipsis (Image Added) and selecting View summary. - In Bulk update, click Begin bulk update.
- If the bulk update fails, you can download the validation report and check what went wrong:
- In Client lodgements, find the rejected bulk update and click the ellipsis (Image Added).
- Select Download validation report.
| UI Text Box |
|---|
| To manage your bulk update documents and so you've got proof of its lodgement, you can: - add more profiles your documents to identify them as belonging to multiple clients.
- check the ASIC document number:
- Select the relevant company from All Clients and click Corporate Admin.
- Select the Officers tab.
- Look under Officers change register for the ASIC document number.
|
|
Once ASIC have accepted the form, you'll receive the following message on the Client lodgements page to let you know that ASIC have updated their records, so you might want to update yours.  Image Modified Image Modified
Click Review contactsnow to view the changes, and choose whether you want to update the contact's address in MYOB Practice. If you choose to update the address in MYOB Practice, we’ll also update their contact details in AE/AO. These changes can take up to 5 minutes to appear in AE/AO. |

 Yes
Yes
 No
No
 Thanks for your feedback.