ANSWER ID:11234| UI Text Box |
|---|
| AccountEdge and Mac OS "Catalina" If your new Mac uses the latest operating system (called "Catalina"), be aware that AccountEdge isn't compatible with this operating system. But we're working on an update...Learn more. |
You can copy AccountEdge, your company file, and your customised templates to a new computer in a few easy steps. 
OK, let's step you through it. | UI Expand |
|---|
| title | 1. Back up your company file |
|---|
| Backing up creates a single file that you can copy to a portable storage device, such as a USB stick. Create a backup of your company file- Go to the File menu and choose Backup.
- Select the Back up all data and To a Disk options, then click Continue. Choosing the Back up all data option ensures the backup will include your customised templates (forms, personalised letters, etc.).
- Specify a name for the backup file, and where you want to save it. To make it easier to find later, save it to your desktop.
- Click Save.
Copy the backup file to a portable storage deviceA portable storage device, such as a USB stick, allows you to take files from one computer to another. Copy the backup file from the old computer onto your portable storage device. If you need help doing this, refer to the device's help documentation. |
| UI Expand |
|---|
| title | 2. Install AccountEdge on your new computer |
|---|
| Before you install, make sure AccountEdge will work on your new computer by checking the system requirements (Australia | New Zealand). | UI Text Box |
|---|
| Only download and use products and versions you're licensed for. Visit myob.com/downloads for details. |
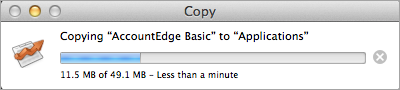
Setting up AccountEdge Network Edition? See the AccountEdge network implementation guide. To start the installation When complete, AccountEdge will be installed in the Applications folder as shown below.  Image Added Image Added
After installing, manually check for additional updates by going to the AccountEdge menu and choosing Check for Updates.
|
| UI Expand |
|---|
| title | 3. Copy and restore the backup on your new computer |
|---|
| Start by copying the backup file from the portable storage device to your new computer. To make it easier to find later, copy the backup file to your desktop. If you're moving AccountEdge Network Edition to a new workstation (and not a new host machine), skip to task 4b below. To restore the backup on the new computer: - Open AccountEdge on the new computer.
- Open the sample company file, then go to the File menu, choose Restore then choose From a Disk. In AccountEdge Pro or Network Edition v12 or later you can click Restore from a disk on the Welcome window (under the Company File Maintenance dropdown list).
On the Open window, select the backup file you copied from the old computer, then click Open. | If restoring | Do this |
|---|
| AccountEdge, AccountEdge Basic, or AccountEdge Pro | - On the Choose a Folder window, click Desktop, then click New Folder.
- Name the new folder Restored, or similar, then click Create.
- Click Choose. The backup is restored to the Restored folder on the Desktop.
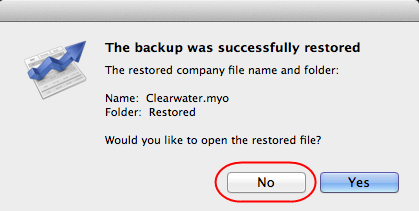
- If the following prompt appears, click No:
Your company file and customised templates will be restored into the Restored folder on your desktop. You now need to copy the restored files to the AccountEdge folder as described in task 4a below. | | AccountEdge Network Edition (on a new host machine) | On the Restore Company File Browser window, select the Host name then click Save. Your company file will be restored in this location on the host machine: Macintosh HD/Library/Application Support/AccountEdge NE/Databases You now need to copy your customised templates as described in task 4b below. |
|
| UI Expand |
|---|
| title | 4a. Copy custom templates to the AccountEdge folder (not Network Edition) |
|---|
| The Restored folder created in the previous task contains your restored company file and customised templates (forms, letters, reports, etc.). You need to copy these into your AccountEdge folder to ensure they're accessible when using AccountEdge on the new computer. Here's how. - Using Finder, open the Restored folder. Here's an example of what you'll find in this folder:
 - Copy the company file and each of the folders from the Restored folder and paste them into your AccountEdge folder. Depending on your version, the AccountEdge folder will be in either the Applications or Documents folder. You'll be alerted that items with those names already exist in the destination folder. This is OK.
- Select the option Apply to All then click Replace.

When everything in the Restored folder is copied to the AccountEdge folder, AccountEdge is ready to use on the new computer. |
| UI Expand |
|---|
| title | 4b. Copy custom templates to the Documents folder (Network Edition only) |
|---|
| Your customised templates (forms, letters, reports, etc.) are in folders in the backup file you copied to your desktop. Copy these folders to the Documents folder to ensure they're accessible when using AccountEdge Network Edition on the new computer. Here's how. - Double-click the backup file on your desktop. This creates a new folder with the same name as the backup file.
- Double-click to open the new folder. Here's an example of what you'll find in this folder:
 - Copy all of the folders (not the company file). Here's how you can copy multiple folders:
- Hold down the Command key on your keyboard and click each folder to be copied.
- Right-click the selected folders and choose Copy.
- Click the Documents folder.
- Right-click your AccountEdge NE folder and choose Paste. You'll be alerted that items with those names already exist in the destination folder. This is OK.
- Select the option Apply to All then click Replace.
AccountEdge is ready to use on the new computer. |
|