Before you can import timesheets into a pay run, you need to: - Create a timesheet batch.
- Map timesheet records.
- Check and edit records in the timesheet batch.
1. Create a timesheet batchThe steps for creating a timesheet batch depend on what your company uses for timesheets: - MYOB Advanced Workforce Management
- MYOB Advanced time cards
- An external timesheet system not provided by MYOB.
| UI Expand |
|---|
| title | Creating an MYOB Advanced time card batch |
|---|
| For employees with time-based payroll expense allocations from MYOB Advanced time cards, the data must be imported using the Import Timesheets screen. The imported time batch is always used as the source of time-based payroll expense allocations, whether the data came from Advanced time cards or an external timesheet. - Go to the Import Timesheets screen (MPPP7030).
- Select the correct Data source type.
On the toolbar, click the three dots icon (. . .) and choose Import Time Cards. Time cards are generated against a specific week, which is displayed for the time card on the Employee Time Card screen (EP305000). In the From Week and To Week fields, specify the range of weeks to import time cards from. 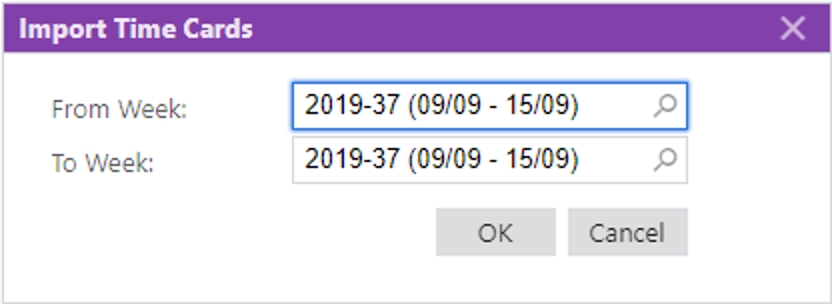 - Click OK. Data from all approved and released time cards within the range of weeks you selected is imported.
|
| UI Expand |
|---|
| title | Creating an external timesheet system batch |
|---|
| Preparing a timesheet fileTo import timesheets into MYOB Advanced from an external system, you need a Microsoft Excel file with the timesheet data. The file must have the same column layout as the main table of the Import Timesheets screen in MYOB Advanced: | Record | Description |
|---|
| Ext. employee ID | the employee’s ID in the external system | | Ext. employee name | the employee’s name in the external system | | Ext. pay item ID | the ID of the pay item in the external system | | Ext. sub account | the subaccount ID in the external system | | Ext. Project | the ID of the project in the external system | | Ext. Project Task | the ID of the project in the external system | | Ext. Inventory Item | the ID of the project in the external system | | Timesheet date | the date of the timesheet entry | | Quantity | the quantity (hours/days) for Rated pay items | | Amount | the amount for Amount pay items |
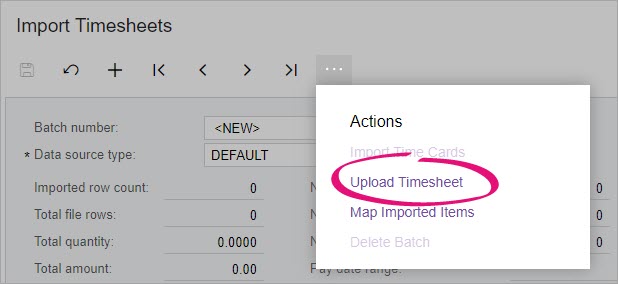
The import headers are case-sensitive. The easiest way to create an import file template is to click the Export button ( ) on the main table toolbar to export a blank table to Excel—this will create a file with the required column headings in the correct order. You can delete the columns after Amount, as these columns relate to data from the MYOB Advanced system that will be filled in by the data mapping. ) on the main table toolbar to export a blank table to Excel—this will create a file with the required column headings in the correct order. You can delete the columns after Amount, as these columns relate to data from the MYOB Advanced system that will be filled in by the data mapping. Uploading a timesheet file- Go to the Import Timesheets screen (MPPP7030).
- Select the correct Data source type.
- On the toolbar, click the three dots icon (. . .) and choose Upload Timesheet.
 - In the Timesheet File Upload window, click Choose File and select the file you want to upload.
- Click Upload.
|
2. Map timesheet recordsAfter creating a timesheet batch, you need to map the information imported in the batch to records in MYOB Advanced. It's mandatory to mapping pay items and employees, but optional to map subaccounts. However, if no subaccount is mapped, the default subaccount on the relevant GL Purpose code will be used. On the toolbar, click the three dots icon and choose Map Imported Items. The remaining fields are filled in automatically based on the data map. 
3. Check and edit timesheet records in a timesheet batch| UI Expand |
|---|
| title | Checking that all timesheet records have been imported and mapped |
|---|
| The summary area provides an overview of the imported record set. Use these totals to confirm that all timesheet records have been imported and mapped correctly by, for example: - Comparing the presented totals with the record totals of the imported timesheet file.
- Comparing the number of imported records against those mapped.
- Evaluating the Pay Date range.

The Summary tab provides an additional level of reporting by grouping the imported data by Employee, Pay Item and Subaccount. | UI Text Box |
|---|
| The Summary tab only reports on the imported external data, and is not indicative of what will be imported into a pay run – the purpose of this view is to help you confirm that all data was correctly imported. |

|
| UI Expand |
|---|
| title | Resolving timesheet record warnings |
|---|
| If a timesheet record has missing or incorrect information, a warning appears in the affected field. The Statuscolumn also details the problem. For example, the screenshot below shows a warning about an inactive subaccount. To only show records with warnings, you can filter the Status column by “Is Not Null”. For more details on resolving these warnings, see Error: "Missing data map(s)..." when importing timesheets. 
| UI Text Box |
|---|
| | If you've imported a timesheet batch into a pay run, you need to undo the pay run import before you can edit the timesheet batch. |
|
What's next?You're ready to import your timesheet batch to a pay run. | 