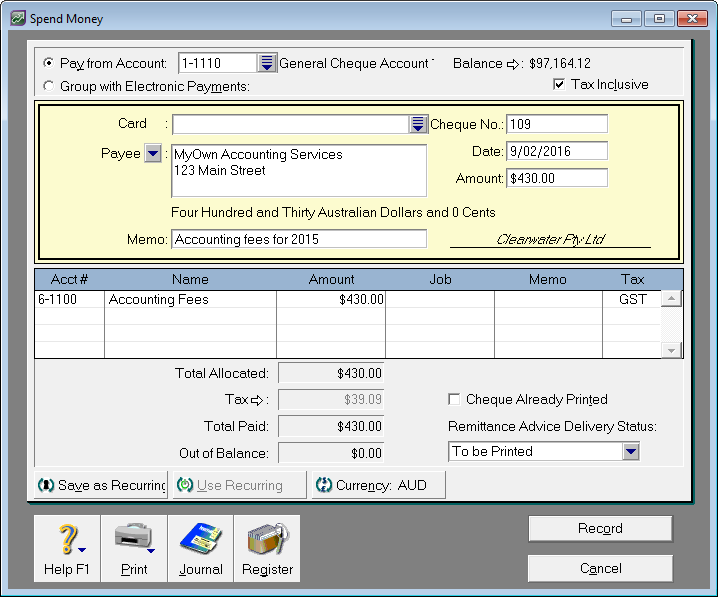
Child pages
  • Using bank and credit card accounts

Versions Compared

Key

  • This line was added.
  • This line was removed.
  • Formatting was changed.
Comment: Reverted from v. 12
HTML Wrap
classsection group
You (or your accounting advisor) will typically set up your accounts list when you first start using AccountRight.

For

an overview of account types and classifications, see the AccountRight help (Australia | New Zealand).

Here are the basic steps for creating a new account.

  • Go to the Accounts command centre and click Accounts List. The Accounts List window appears.
  • Click New. The Edit Accounts window appears.
  • If you want to create a header account, select the Header Account option.
  • Select the account type from the Account Type list. The Account Classification field changes according to the selection you make. For more information on account classifications, see the AccountRight help (Australia | New Zealand).
  • Enter a four-digit number for the account in the Account Number field. The number must be unique within each account classification.
  • Press TAB and type a name for the account.
  • Click the Details tab.
  • If you want, type a brief description of the account in the Description field.
  • In the Tax/GST Code field, select the tax/GST code that you use most often with transactions that will be posted to this account.
  • If you're creating an asset, liability or equity account (other than an asset with the account type of Bank), select an option from the Classification for Statement of Cash Flows list.
    Classifying the accounts allows you to generate a statement of cash flows. This report shows how your cash position has changed over time, profit earned and where your cash was spent. If you’re unsure about which classification to use, consult your accountant or an MYOB Certified Consultant.
  • If you're creating a bank or credit card account, and you want to keep a record of your bank account

    details

    , click the Banking tab and enter your account details.
  • [Detail accounts only] If you want to enter historical balances, complete the Last FY column on the History tab. That way you can compare the year’s monthly account balances with those of the corresponding months last year.
  • [Detail accounts only] If you want to set up a budget:
  • Click Budgets. The Prepare Budgets window appears.
  • Type the budget amounts in the monthly columns.
  • Click Close. For more information on budgets

    on setting up accounts see the AccountRight help (Australia | New Zealand).

  • Click OK when you have finished. The account now appears in your accounts list.
  • Once your accounts are created you can enter their opening balances as described in the AccountRight help (Australia | New Zealand).


    HTML Wrap
    classcol span_3_of_5

    ANSWER ID:9068

    In your software, a bank account typically represents an asset account (for money coming in), and a credit card account typically represents a a liability account (for money being paid out). These accounts can be used in your software for recording customer or supplier payments. This support note explains how to set up and use these accounts in AccountRight.

    UI Expand
    titleSetting up your accounts
    UI Expand
    titleUsing a bank or credit card account

    For money coming in (Receive Money and Receive Payments)

    1. Open Receive Money or Receive Payments.
    2. Click the Deposit to Account option then select the desired chequebook or credit card account in the adjacent Account field.
    3. Enter the transaction details as required then click Record. The window below shows account number 1-1110 selected for an example Receive Money transaction.

    For money being paid out (Spend Money and Pay Bills)

    1. Open Spend Money or Pay Bills.
    2. Click the Pay From Account option, then select the desired chequebook or credit card account in the adjacent Account field.

    3. The window below shows account number 1-1110 General Cheque Account selected for an example Spend Money transaction.

    UI Expand
    titleReconciling bank and credit card accounts

    Bank and credit card accounts are easily reconciled by using the Reconcile Accounts function.

    1. Go to the Banking command centre and click Reconcile Accounts.
    2. Enter your bank or credit card account number in the Account field.
    3. Enter the Bank Statement Date (the bank statement's closing balance date).
    4. Select the transactions that have been presented to the bank. This will place a tick next to those transactions.
    5. Enter the bank statement's closing balance in the Closing Statement Balance field (called the New Statement Balance field in some versions), then press the key.
    6. If the Out of Balance amount is zero, click Reconcile.
    7. You will then receive a prompt to print the Reconciliation Report. Click Print, then click the Reconcile button again. The window below shows the Reconcile Accounts window.
    UI Text Box
    typenote
    You won't be able to reconcile an account if the Out of Balance amount is not zero. For help in these situations, see Out of balance bank reconciliations.
    HTML Wrap
    width15%
    classcol span_1_of_5
     
    HTML Wrap
    floatleft
    classcol span_1_of_5
    Panelbox
    namegreen
    titleRelated topics
    HTML Wrap
    classsidebarlinks

    Electronic payments (Australia)

    Electronic payments (New Zealand)

    Recording, tracking and depositing payments

    Out of balance bank reconciliations

    Loans and repayments

    ...