In this stage, you'll be adding journals and preparing workpapers. Use Workpapers to review the account balances, attach any supporting documents to the accounts and post adjustment journals if required. Once the accounts, workpapers and supporting documents have been reviewed and approved, post the adjustment journals. Any new accounts created in Client Accounting will also be created in the ledger during this process. There are four main tasks to verify your closing balances: 1. Create a workpaper periodBefore you can make any adjustments, you'll need to create a workpaper period. The workpaper period is where you'll do most of your work so this is a must. | UI Expand |
|---|
| | Section |
|---|
| Column |
|---|
| - Go to the client’s Client Accounting > Trial Balance/Workpapers tab.
- From the TASKS bar, click Add period.
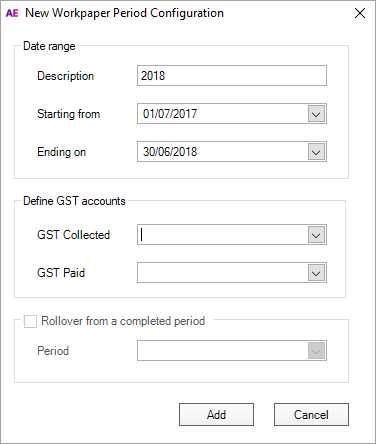
- In the Date range section:
- Enter the Description of the Workpaper period. This can be up to 100 characters.
- Enter the period Starting from date in the format dd/mm/yyyy.
- Enter the period Ending on date in the format dd/mm/yyyy.
By default, the starting from and ending on dates are automatically set to the current financial year, minus one year, as per the configured ledger.
In the Define GST Account section: Select from the drop-down the account where amounts for GST Collected will be recorded. Select from the drop-down the account where amounts for GST Paid will be recorded.
Click Add. The new period is created and opened in the Prepare Trial Balance (Workpapers) table. Double click on the period to open the Trial Balance/Workpapers view. This is where you'll perform most of your accounting work for the client.
|
| Column |
|---|
| 
|
|
|
2. Add your journalsOpen the Workpaper period and add any movements or adjustments to correct balances. | UI Text Box |
|---|
| If you're using MYOB ledger and have transactions to import, see Importing data for information. |
| UI Expand |
|---|
| - From within your client's Client Accounting > Workpapers (Trial Balance) tab, double-click on the relevant workpaper period to open.
- Click Add located underneath the Journals heading on the TASKS bar.
 From the Add Journal window, click in the first row and type in the journal details. For information on each field, refer to Adding a new adjustment journal. Add further rows until the amounts have been correctly distributed between the accounts.
 | UI Text Box |
|---|
| You can delete rows by selecting the checkbox next to the row you wish to delete. Click the Delete button and the row disappears. If you need to add an account, click Add Account and enter the details. |
Once you've finished entering data for the journal, click Add. The Add Journal window clears but remains open so you can create more journals. Repeat from step 2for each additional journal. - When you have finished adding journals, click Close.
If required, you can fill out and attach a workpaper to an account to show how the balance has been made up. This is useful for calculating interest and repayments on Bank Loans, Hire Purchase or Chattel Mortgage balances, or you may want to use workpapers to reconcile accounts. We'll explain more about this in Other Tasks below. |
| UI Expand |
|---|
| Workpapers and Source documentsYou may need to include some additional information to explain how you arrived at some of those numbers. Use our workpaper templates to help reconcile your balances and add documents to support those balances. Attaching a workpaper or linking documents to an account in Client Accounting can save you a lot of time later – for example, if you need to provide these documents in case of an audit. When printing or creating a PDF of workpapers, all workpaper templates and supporting documents linked to accounts will also be printed, so you don't need to rummage through your folders to find them. See Adding workpapers and source documents for more information. Fixed assets and depreciationIf you plan to keep a fixed asset register for your client, you may want to look into creating an assets register in Assets Live. If you're already using AE Assets, AMS (NZ) or the Fixed Assets module in AO Classic, you can move data over to Assets Live. Otherwise, you can also create a brand new asset register for the year. Find out more in Take your assets online. |
3. Post journals to the ledger| UI Expand |
|---|
| title | To post journals and accounts to AccountRight, MYOB Business/Essentials or MYOB ledger |
|---|
| From within the Workpaper period, click Post journals and accounts on the TASKS bar. | UI Text Box |
|---|
| By default, only journals that have not already been posted will be included. To post all journals including those which have been posted previously, select the Include previously posted journals checkbox. However, be careful as this may result in duplicate journal entries in the client's ledger. |
Click Yes. A Post Journals and New Accounts confirmation window appears, confirming that the journals and new accounts were posted successfully. - Click OK to dismiss this message.
Once posted, the closing balances of the affected journals are adjusted by the amounts in the journals. |
| UI Expand |
|---|
| title | To create a journal export file (MAS, Accounts, AO Classic GL) |
|---|
| - From within your client's workpaper period, click Create Journal Export File on the TASKS bar.
- Click Yes to the Confirm exporting journals window. The Export Journals window appears.
- Browse to the location for the exported journal file and click Save.
- Click OK to create the journal export file.
You can now import the transactions into your MAS or Accounts ledger. If you've configured an AO Classic general ledger, click Post in Client Accounting. The Post option lets you export the file to your local machine and post the results back to your AO Classic general ledger. 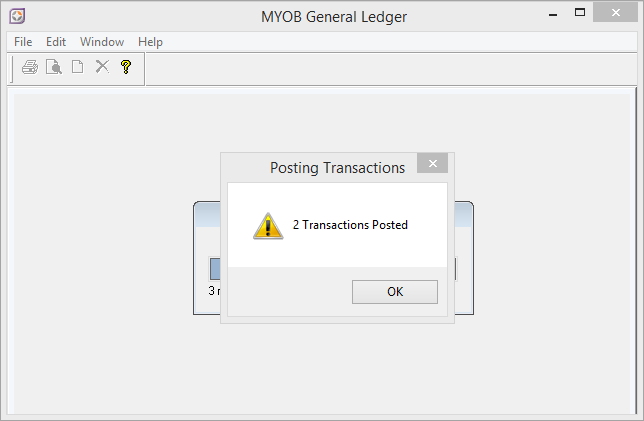
|
Once you're ready to produce financial reports for your client, click Next. |

 Yes
Yes
 No
No
 Thanks for your feedback.