| UI Text Box |
|---|
| | AccountRight Premier 2018.3 and later only |
If you deal with suppliers in foreign currencies, you can now create multi-currency purchases in AccountRight. It’s still in beta which means the full multi-currency experience isn't here yet, but it's getting close. If you deal in foreign currency exports (sales), stay tuned—multi-currency sales functionality is coming soon. Want to give it a try? To see what you can—and can’t—do with AccountRight's multi-currency features, have a play in AccountRight's sample company file. You can then work out if it's right for you before turning it on in your company file. To learn more about our multi-currency beta program, where it’s headed, or how you can get involved, visit our website. If you have any questions or feedback, let us know on the community forum. Using a classic AccountRight version? If you’ve used multi-currency in AccountRight Classic (v19 and earlier), you’ll notice some changes <add link to new topic>. And by ‘changes’ we mean ‘exciting improvements’. Because it’s still in beta, you’re not yet able to upgrade classic AccountRight company files that have used multi-currency, but we’re working on it. We’ll let you know when it’s ready. Setting up multi-currencyTo use the multi-currency features, you’ll need to turn on the multi-currency preference. You can then enter exchange rates, choose your suppliers’ default currencies, and create foreign currency bank accounts. Let’s get started. | UI Expand |
|---|
| title | 1. Turn on the multi-currency preference |
|---|
| - Go to the Setup menu and choose Preferences.
- On the System tab, select the option I Deal in Multiple Currencies.
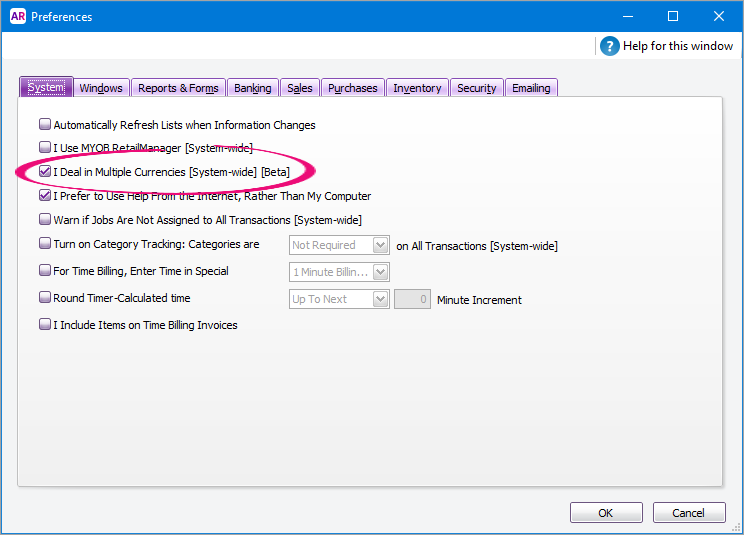 Click OK. | UI Text Box |
|---|
| Once you turn this preference on in the sample file, you won't be able to turn it off (AccountRight 2018.2 only). |
By turning on this preference: - Foreign currencies now available from the Lists menu.
- Currency information is available in supplier cards and the Enter Purchases, Pay Bills, Spend Money, Receive Money, Purchases Register, Reconcile Accounts, and Find Transactions (Bill tab) windows.
- A new income account (4-9999 Currency Gain/Loss) is created to track gains and losses from exchange rate changes.
|
| UI Expand |
|---|
| title | 2. Set your exchange rates |
|---|
| Currently you need to manually set exchange rates. In a future release, this will be automated using online exchange rates. The exchange rate will be used when recording and paying bills, or a custom exchange rate can be used per transaction. - Go to the Lists menu and choose Currencies.
- Use the Search field to find the currency by currency code or name.
- Enter the currency’s Exchange Rate. The rate represents the foreign value for $1 of local currency, e.g. 1 AUD = entered exchange rate.
 - Click OK.
- Repeat for other currencies.
|
| UI Expand |
|---|
| title | 3. Set the default currency for each supplier |
|---|
| You can set a supplier’s default currency in their card. If needed, you can choose a different currency when recording purchases. - Go to the Card File command centre and click Cards List.
- Click the Supplier tab.
- Click the blue zoom arrow to open a supplier’s card.
- On the Profile tab, select the supplier’s Default Currency. Here’s an example:
 - Click OK.
- Repeat for other suppliers.
|
| UI Expand |
|---|
| title | 4. Create foreign bank accounts |
|---|
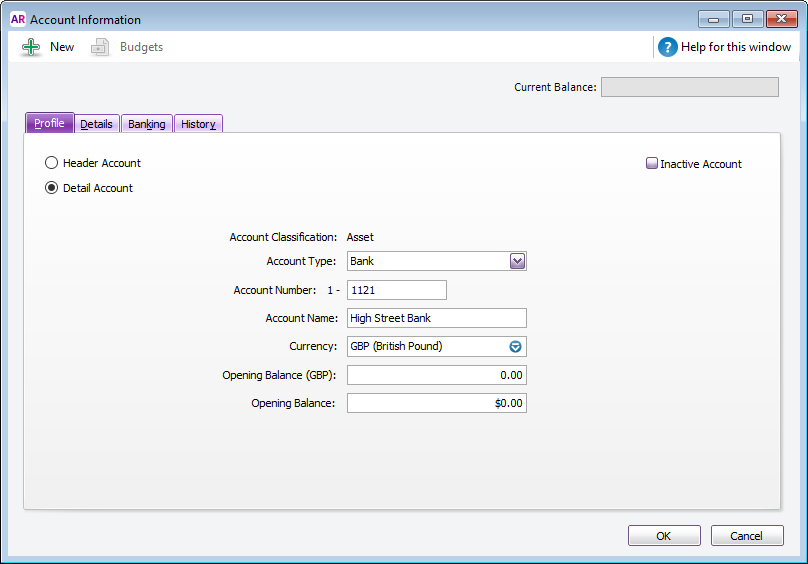
| If you have a bank account in a foreign currency, you can create a matching account in AccountRight. Currently these accounts can only be Bank type accounts, but credit card type accounts will be supported in a future update. Once an account is created, you can’t change the account type or currency. - Go to the Accounts command centre and click Accounts List.
- Click New.
- Select Bank as the Account Type.
- Enter an Account Number and Account Name.
Select the Currency for this account. Here’s an example account:
 | UI Text Box |
|---|
| Opening balances If the account has a balance, you can enter it here in both foreign and local values. You'll need to manually calculate the local value based on the currency's exchange rate. |
- Click the Details tab.
- Select the Tax/GST Code for this account. This must be a code with a 0% tax rate. Check with your accounting advisor if unsure.
- Click OK.
- Repeat for additional foreign bank accounts.
Once an account has been used in a transaction, the Accounts List window shows the account balance in your local currency. 
To see the account’s foreign currency balance, double-click to open the account. 
|
Transacting in multiple currenciesNow that you're set up, you can start recording multi-currency purchases. But first, you might need to transfer funds into a foreign currency bank account (created during the setup above). Let's step you through this, and also how to record and pay bills. | UI Expand |
|---|
| title | Transfering funds into foreign bank accounts |
|---|
| Use a Receive Money transaction to transfer funds from one AccountRight bank account into a foreign bank account. Here’s how: - Go to the Banking command centre and click Receive Money.
- In the Deposit to Account field, select the foreign bank account. The Currency field updates based on the account chosen, and the exchange rate is shown.
- If required, change the exchange rate (click the blue zoom arrow
 next to the Currency field). Changing the rate will result in an unrealised gain or loss. next to the Currency field). Changing the rate will result in an unrealised gain or loss.- Changing the Default rate will update the rate set against the currency list.
- Setting a Custom rate will use that rate for this transaction only.

- Enter the Amount of the transfer (in foreign currency).
- On the first line of the transaction, select the Acct. No. the funds are coming from.
- The local Amount is calculated and cannot be changed.
- The foreign currency Amount is copied from what you entered above. This can be changed, if needed.
- Ensure the correct Tax/GST code is selected. Here’s an example transaction:
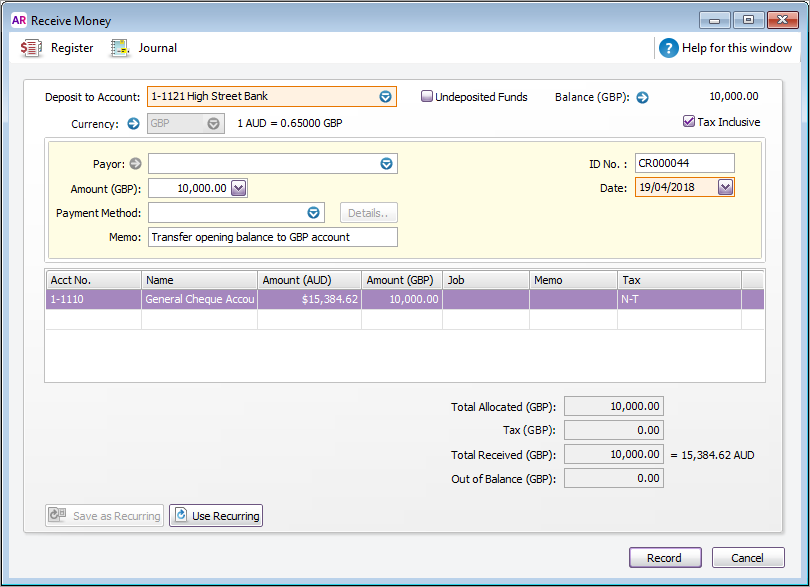 - Click Record.
|
| UI Expand |
|---|
| title | Entering foreign currency purchases |
|---|
| By turning on the multi-currency preference as described earlier, currency information is available when recording purchases (quotes, orders and bills). This means you’ll see the purchase value in both local and foreign currencies. The default exchange rate set against the currency is used, or you can choose a custom rate. | UI Text Box |
|---|
| | Only the Item and Service layout is currently supported. |
OK, let’s create a foreign currency purchase.
- Go to the Purchase command centre and click Enter Purchase.
- Click Layout and choose Item or Service.
- Choose the Purchases Type (Quote, Order or Bill).
- Choose the Supplier. The default currency set in their card is shown. If required, you can click the dropdown arrow
 to select a different currency for this purchase. to select a different currency for this purchase.
 - If required, change the exchange rate (click the blue zoom arrow next to the Currency field).
- Changing the Default rate will update the rate set against the currency list.
- Setting a Custom rate will use that rate for this transaction only.
- Enter the details of the purchase.
- Only the foreign currency amount can be entered. The local currency amount is calculated for you.
- Only 0% tax/GST codes can be assigned in foreign currency transactions.
Here’s an example:
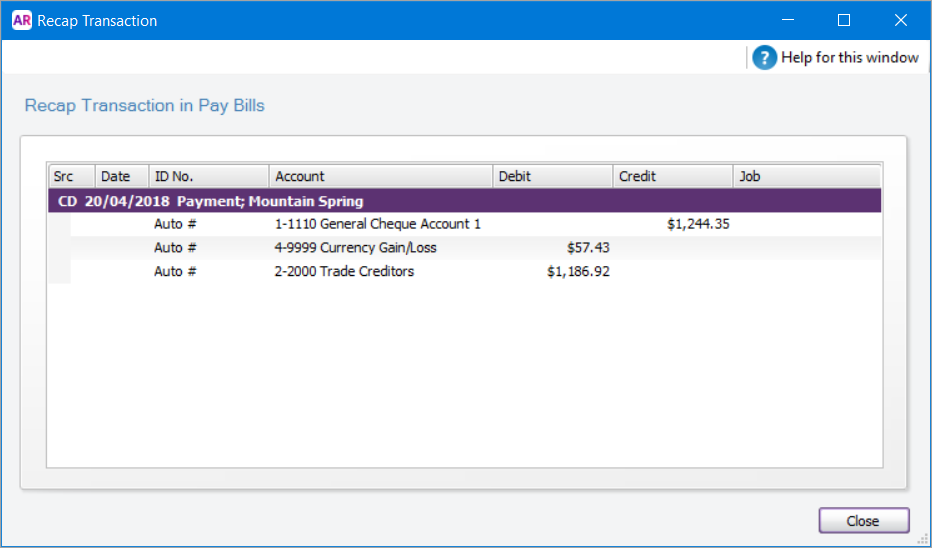
 - (Optional) Recap the transaction (Edit menu > Recap Transaction) to view journal postings in local currency, then click Close.
 - Click Record.
The way you change a quote or order into a bill remains the same. Learn more about Changing the purchase type. |
| UI Expand |
|---|
| title | Paying foreign currency bills |
|---|
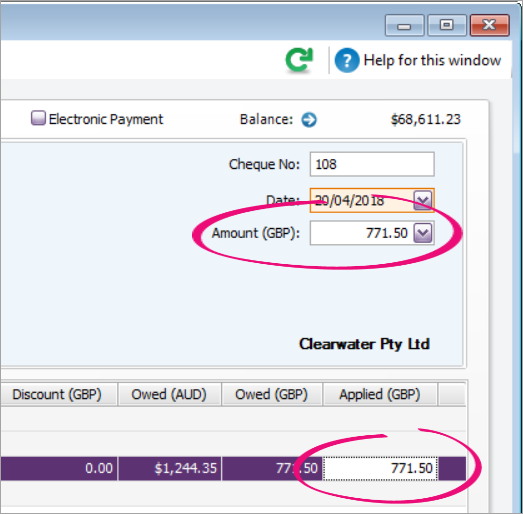
| Paying foreign currency bills is similar to paying other bills, but with some handy extras. Let’s take a look: - Go to the Purchases command centre and click Pay Bills.
- Choose the Pay from Account. This can be a local or foreign currency bank account.
- Choose the Supplier. Their open bills are listed.
- Bills are grouped by currency (if you’ve recorded bills in multiple currencies).
- Click a currency to see those bills - the exchange rate and amounts on the window update accordingly.
- The Owed columns and Total Paid field show local and foreign values.
 - If required, change the exchange rate (click the blue zoom arrow next to the Currency field). Changing the rate will result in a realised gain or loss.
- Changing the Default rate will update the rate set against the currency.
- Setting a Custom rate will use that rate for this bill payment only.
- In the Amount field, enter the total foreign currency amount being paid.
In the Applied column, enter how much of the payment you want to apply to each purchase in that currency.
 | UI Text Box |
|---|
| Click Pay All  to pay all a supplier’s bills for the same currency. The total payment amount appears in the Amount field and the individual payment amounts are applied to each open purchase in that currency. to pay all a supplier’s bills for the same currency. The total payment amount appears in the Amount field and the individual payment amounts are applied to each open purchase in that currency. |
Ensure the Out of Balance is zero. An out of balance will show if the Total Paid and Amount fields don’t match.
Notice the converted local value is also shown.
 - (Optional) Recap the transaction (Edit menu > Recap Transaction) to view journal postings in local currency, including any realised gains or losses. Then click Close.
 - Click Record.
|
| UI Expand |
|---|
| title | Reporting on foreign currency purchases |
|---|
| We’re still working on adding multi-currency info to AccountRight’s reports. But we’ve enhanced the Purchases Register to give you some great insights into your multi-currency transactions. Once you’re in the Purchases Register (accessible from the Purchases command centre), here’s just a few things you can do. | UI Text Box |
|---|
| | Clicking Print from the Purchases Register will display the Purchases Register Detail report in local currency values only. |
Try this | Details |
|---|
Expand the window to see all columns | We’ve made the Purchases Register window wider to accommodate the new foreign exchange columns Amount (FX) and Amt Due (FX) . (click to enlarge) 
| Group by currency | Right-click the Currency column and choose Group By This Column . 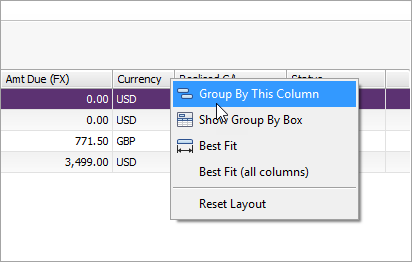
Currencies are then grouped with subtotals. (click to enlarge) 
| Group by multiple levels | Right-click and column heading and choose Show Group By Box . Drag the columns you want to group by, such as by supplier, then by currency.
(click to enlarge) 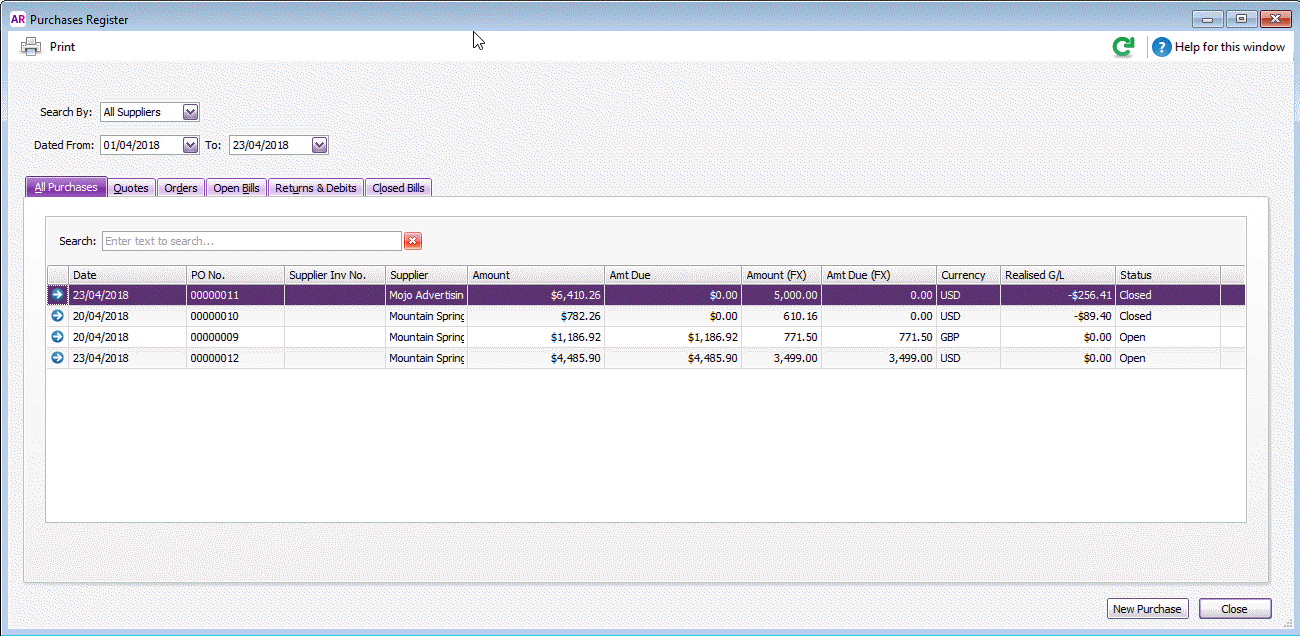
| View your realised gains and losses | The Realised G/L column shows any gains or losses (in local currency) resulting from exchange rate changes. 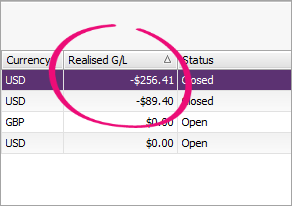
Negative values are losses, and positive values are gains. | Analyse your data further | Copy info from the Purchases Register to paste into Excel for further analysis. Right-click the list and choose Copy to Clipboard , then paste into Excel. (click to enlarge) 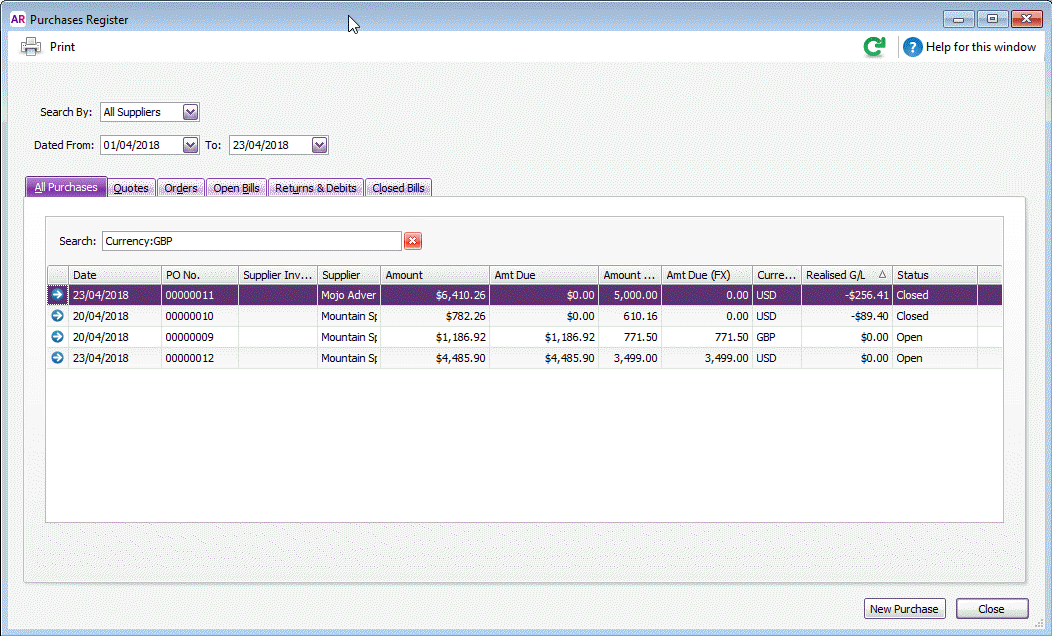
|
|
| HTML |
|---|
<h2><i class="fa fa-comments"></i> FAQs</h2><br> |
| UI Expand |
|---|
| title | What can and can’t be done with multi-currency in the AccountRight 2018.2 sample company file? |
|---|
| What can and can’t be done with multi-currency in AccountRight? CAN do | CAN’T do (yet) |
|---|
Create a quote, purchase order and bill for Item and service layouts. Set a default currency on a supplier card. Set default exchange rates from the currency list. Set a custom exchange rate for a specific transaction. Create and reconcile a bank account using a foreign currency. Create Spend Money and Receive Money transactions using the foreign bank account. Pay foreign bills and track the realised gain or loss. Raise and settle debits against foreign bills. View transactions grouped and subtotalled by currency in the Purchases Register.
| Create foreign sales quotes, orders and invoices. Create foreign purchases using the Professional and Other layouts. Create foreign recurring purchases. View foreign currencies in forms and reports (but you can track the realised gains and losses from the Purchases Register window). - View foreign currency values in printed and emailed purchases (orders, quotes, bills and remittance advices)
Upgrade AccountRight v19 or earlier company files (also known as classic AccountRight versions) that use or previously used multi-currency
|
|
| UI Expand |
|---|
| title | How do I sort my suppliers by currency? |
|---|
| How do I sort my suppliers by currency?You can add the Currency column to the Cards List so you can group your suppliers by currency. Here's how: - Go to the Card File command centre and click Cards List.
- Click the Supplier tab.
- Right-click a column heading and choose Column Chooser.
- Double-click Currency from the list. The Currency column is added to the list. If you like, click and drag the column heading to move the column to a new position.
- Right-click the Currency column heading and choose Group By This Column.

Learn more about searching, filtering and grouping in the Cards List. |
|

 Yes
Yes
 No
No
 Thanks for your feedback.