| HTML |
|---|
<span data-swiftype-index="true"> |
MYOB Ledger only Transactions can be imported into Client Accounting using the Manage client file imports wizard. You can find this function on the Tasks bar of your client's Client Accounting > Trial Balance (or Workpapers) tab. You can only import transactions via Client Accounting if your configured ledger is an MYOB Ledger. If you're using something different, you can still use the import functions in your configured ledger's software. | UI Text Box |
|---|
| We'll guide you through importing transactions using the QuickBooks Online Template. Whilst we can tell you about our MYOB Software, we're not experts with QuickBooks. If you need help with QuickBooks Online, the QuickBooks help should answer your questions. |
Generating a Transaction list with Splits reportIn the first stage of the Manage client file imports wizard. you'll need to select the QuickBooks Online Template. This template is based on the output of the Transaction list with Splits report with account codes and without headers or footers. In QuickBooks Online, make sure all accounts have an account number, then generate a Transaction list with Splits report. You'll need to customise this report to exclude headers and footers and include the following columns: - Date
- Memo
- Description
- Account
- Amount
Once you've customised the report, export this report to Microsoft Excel. Open the Transaction list with Splits report in Microsoft Excel. You may notice that the date is missing from some rows in the exported file. | UI Text Box |
|---|
| Do your transactions balance? There may be some transactions exported from QuickBooks Online that are not balanced. If you're having issues importing, use the =SUM formula to check that all values in the Amount column is equal to $0. For example, =SUM(J2:J546) where J is the Amount column. If the sum of the Amount column does not equal $0, there are transactions in your file that do not balance and need to be amended manually. |
To import successfully into MYOB ledger, a date must be present for each row that contains an amount. | UI Expand |
|---|
| title | To populate dates for each row |
|---|
| - From within Excel, select the column range that needs to be filled for non-contiguous range of blank cells. For example, B3:B2000 (where B is the Date column and the data begins at row 3 and ends at row 2000).
- With the column range selected, press the F5 key on the keyboard to open the Go To dialog.
 - In the Go To dialog window, click Special.
- Select Blanks then click OK. All blank cells in the range are selected.
 - With these cells selected, type = and then cell that is the start of the range. For example =B3.
- Press CTRL+ ENTER on the keyboard.
Once all transactions are balanced and each row with an amount has a date, save the file as a CSV file. |
| UI Expand |
|---|
| title | To save the file as a CSV file type |
|---|
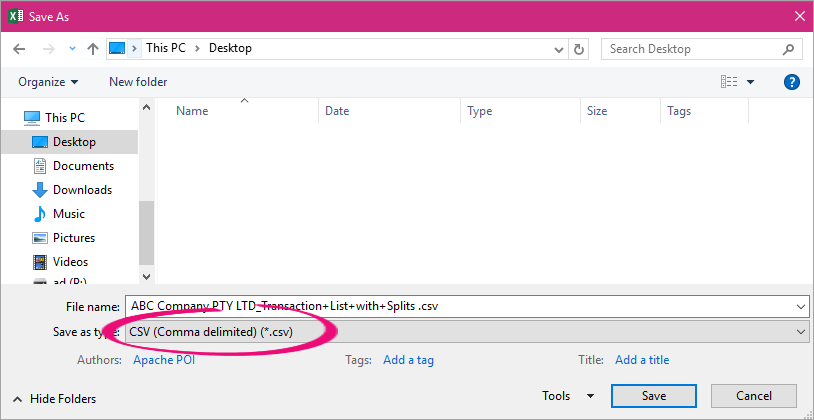
| - From within Excel, click File and choose Save As from the left-navigation panel.
- In the Save As screen, click Browse.
- Navigate to a memorable location and enter a name in the File Name field.
- Click on the Save as type drop-down menu and choose CSV (Comma delimited) (*.csv).
- Click Save.
|
Importing your data| UI Expand |
|---|
| title | Stage 1: Choose a file to import |
|---|
| - From AE/AO, open the client and go to the Client Accounting > Trial Balance (Workpapers) tab.
- On the TASKS bar, click Manage client file imports. The Manage Client File Imports window appears.
 - Select .CSV .
- At the Select file to import field, click the ellipses (
 ) button and browse to the location of the export file. ) button and browse to the location of the export file. Highlight the file and click Open. The file path appears in the Select file to import field. - At the Select template field, click on the drop-down menu and choose QuickBooks Online Template
- Click Next.
|
| UI Expand |
|---|
| title | Stage 2: Choose how to map accounts |
|---|
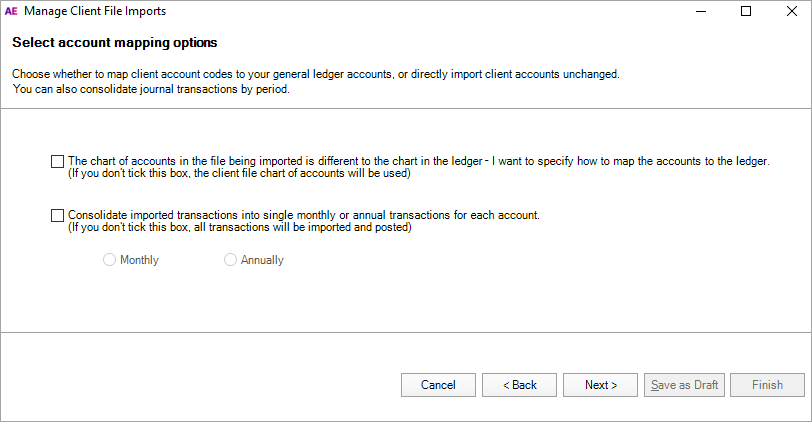
| Choose whether you want to map your client's account codes to your ledger's accounts, or to import your client's accounts: | Option | Description |
|---|
| The chart of accounts in the file being imported is different to the chart in the ledger – I want to specify how to map the accounts to the ledger | If the chart of accounts in the export file is the same as your chart of accounts, you can choose whether to select this option. When this option is not selected, all transactions import with the account code from the export file. Any accounts that don't exist in your chart are automatically added. If your chart of accounts is different from the chart in the export file, select this option. This will let you map the exported accounts to your ledger accounts. | | Consolidate imported transactions into single monthly or annual transactions for each account | Consolidates transactions into a single monthly or annual transaction for each account. To import all transactions, leave this checkbox unticked. | UI Text Box |
|---|
| Only imported transactions can be viewed. If you choose to import consolidated transactions, you'll only be able to view one imported transaction per month or year (as selected). You can import up to 38,000 transactions. If you have more than this, select this checkbox to consolidate your transactions or alternatively, separate the CSV file into multiple files. |
If you've selected this checkbox, select to import either: |
Click Next.
If you've selected the first option, continue to Map Accounts. Otherwise, continue to Stage 4.
|
| UI Expand |
|---|
| title | Stage 3: Map the accounts |
|---|
| In the Map Accounts window, click in the Map to column for each account and choose an account to import your client's transactions to. 
The Account name, Account type and Balance are updated automatically. Repeat this step for each account code. | UI Text Box |
|---|
| Can't find the account you're looking for? You may need to create a new one. Click Add account and fill in the details. 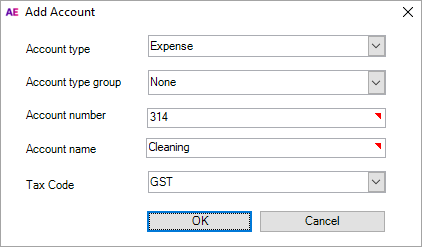
|
Once all accounts have been mapped, click Next.
|
| UI Expand |
|---|
| title | Stage 4: Review and submit |
|---|
| Preview the accounts and make sure all accounts are mapped correctly. | UI Text Box |
|---|
| To export the data, click Export to Excel. |
When you're ready to submit the transactions, click Finish. The client data is posted to your ledger.
|
|

 Yes
Yes
 No
No
 Thanks for your feedback.