Page tree

Versions Compared

Key

  • This line was added.
  • This line was removed.
  • Formatting was changed.
CSS Stylesheet
.confluence-content-image-border {
	border-style: solid !important;
	border-width: 1px !important;
	padding: 4px;
}
Was previously mapped to the chart of accounts
HTML Wrap
classsection group
HTML
<span data-swiftype-index="true">
HTML Wrap
classcol span_3_of_5

If you ticked the checkbox to map the client accounts, the Map Accounts window will open. The Map Accounts window enables you to select the account(s) on the Practice ledger chart that correspond to each account on the accountant's chart. You can make adjustments to the ledger accounts, where required, to align the balances with the equivalent accountant's accounts.

ui-expandtext-box
titleMap Accounts window options

Option

Description

typenote

Any GST columns in the imported file will be ignored. Make sure to add any GST data manually.

Map accounts window

Image Added


Button / Field

Description

A

Client account code / name

These columns represent your client's chart of accounts. They're populated with the data in the Account code and Account name columns of the file you've selected to import in stage 1 of the import wizard.

B

Include Automatically mapped accounts

Tick

Select this checkbox to display all

mapped accounts. Selected

accounts automatically mapped by the system (indicated with Image Added in the status column). This option is selected by default.

Add account

Click this button to add a client account to the ledger’s chart of accounts.

If the system has mapped the account incorrectly, choose the correct account by clicking in the Map to column for the account, and choosing the correct account.

C

Status

Displays the mapping status for each account. A legend for these icons is available on the bottom-left of the window.
D

Search for account

Enter an account code or name to search the client chart of accounts.
EMap to

Click in the Map to column for each row and choose an account from your chart of accounts to allocate the balance of the client's account to. See To map an accounts below for a demonstration.

FAdd account

If you can't find the account you're looking to map to, create a new account by clicking the Add account button.

In the Add account window, specify the Account type, Account type group, Account number, Account name and Tax Code for the new account.

When finished, click OK to create the account.

GName, Account type, BalanceThese columns represent the chart of accounts in your MYOB ledger. These fields are populated automatically when you select an account in the Map to column for the row.
HClear all mappings

Click this button to clear all mappings, including automatic system mappings and any manual mappings you have made.

A confirmation window displays requesting confirmation to clear the mappings. Click Yes.

ISave as DraftSave your current mappings as a draft. When you reopen this window, your saved mappings will appear so you can continue where you left off.
JRestore default mappings

Click this button to clear any changes you

have made to the mappings and

've made when mapping your accounts. This will restore the account mappings to their original state

. Any changes

and any changes you've made will be lost.

A

You confirmation window displays requesting confirmation to restore the default mappings.

Click Yes.

The third column of the Map Accounts window (to the right of the Client account name column) displays the mapping status of each account, as shown in the following table.


Icon

Mapping status

Image Removed 

Automatically mapped by the system to the chart of accounts

Image Removed 

Mapped by the user to the chart of accounts

Image Removed

Possible mappings exist to the chart of accounts

Image Removed 

Has no mapping to the chart of accounts

Image Removed 

KFinish

This button becomes active once all accounts have been mapped.

UI Expand
titleTo map an account
  1. In the Map Accounts window, click in the Map to column for each account and choose an account to import your client's transactions to.

    Image Added

    The Account name, Account type and Balance are updated automatically. Repeat this step for each account code.

  2. Once all accounts have been mapped, click Next.

UI Expand
titleTo create a new account
UI Text Box
typetip

Can't find the account you're looking for?

Before adding an account, select the View all accounts and Include zero balances options, then try searching for the account.

You may notice the account you're looking for already exists!

Image Added

  1. Click Add account.
  2. Specify the Account type, Account type group, Account number, Account name and Tax Code for the new account.
  3. Click OK.
UI Expand
titleTo view or edit the mapping template

The mapping template displays the most recently imported client accounts that are mapped to ledger accounts.

You can select to View/Edit mapping template from the Select File screen, which means you can view and modify account mappings without having to choose a client file to import.

Image Added

The View/Edit mapping template window is identical to the Map Accounts window

  • To change a mapping, click the drop-down menu in the Map to field.
  • To add an account, click Add Account.

The Save button will be enabled once a change has been made. Click Save to save your changes.

UI Text Box
typenote

There is an interpretive key for these icons at the bottom of the Map Accounts window.

Existing mappings cannot be cleared or restored from default mappings.

HTML
<br><h2><i class="fa fa-comments"></i>&nbsp;&nbsp;Mapping FAQs</h2>
UI Expand
title
Viewing and editing automatic mappings
How does the system know which accounts to automatically map to?

The system maps some

accountants’ accounts automatically, including those that have the exactly the same balance as an account on the

of the accounts automatically based on the account name and account balance:

  • where the account name on your chart of accounts is the same as an account name in your client's chart, and no other accounts exist with the exact same name.
  • where the balance of an account in your chart of accounts is exactly the same as the balance of an account in your client's chart, where no other accounts exist with the same balance.

These mappings are displayed on the Map Accounts window with a Image Modified icon in the

left hand

status column.

Select

To re-allocate a system mapped account, select the account and click the drop-down arrow in the Map to column.

The Mappings window displays, listing the client’s chart of accounts.
UI Text Box
typenote

Press Esc if you want to dismiss the Mappings window.

  • Select the View suggested accounts option at the bottom of the list. This enables viewing of a list of suggested mappings.

  • Select the View all accounts option to return to the full list of accounts.

  • Ensure that the Show unmapped accounts only checkbox is selected. This hides those client accounts that have already been mapped.

  • Deselect the Include zero balances checkbox if it is selected. To hide accounts with zero balances.

  • Select an account from the list. Double-click on the account or highlight it and click Select .

  • UI Expand
    titleViewing and editing selected mappings

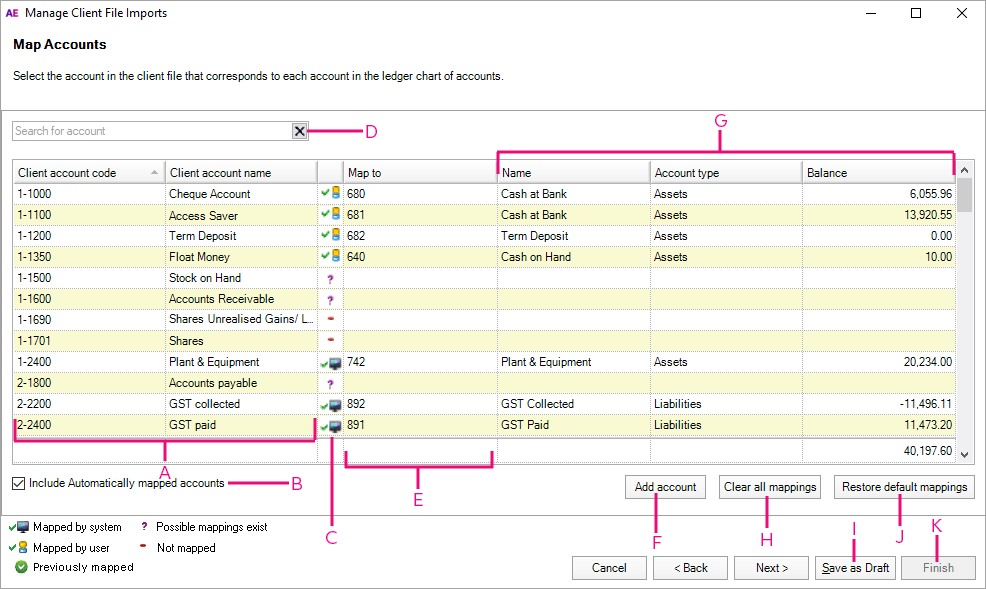
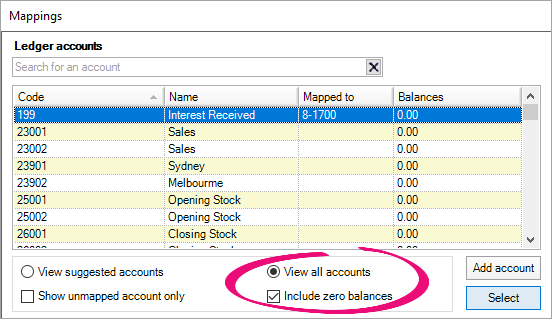
    The system suggests mappings for some accountant's accounts. These suggestions are based on the descriptions and balances of the accounts on the client's chart. Accountant's accounts, for which suggested mappings exist,

    If the system can't find an exact match, you'll need to map the account manually. The system may suggest accounts that you may want to map to instead. Accounts with suggested mappings are displayed on the Map Accounts window with a  icon in the left hand status column.

    Click the drop-down arrow in the Map to column. The Mappings window displays, listing suggested accounts from the

    For example, where the account name on your chart of accounts is similar to an account name in your client's chart,

    with the most likely match listed first.
    UI Text Box
    typenote

    Press Esc if you want to dismiss the Mappings window.

  • Select the View all accounts option at the bottom of the list. This enables viewing of all accounts on the client's chart.

  • Select the View suggested accounts option. This returns to the list of suggested mappings.

  • Ensure that the Show unmapped accounts only checkbox is deselected. This displays all accounts, regardless of whether they have already been mapped.

  • Deselect the Include zero balances checkbox if it is selected. To hide accounts with zero balances.

  • Select an account from the list, or add a new account. Double-click on the account or highlight it and click Select

    or is exactly the same as more than one account in your chart of accounts, the system will suggest

    If the account has not been mapped or no suggested mappings exist, a Image Added is displayed in the status column.


    Icon

    Mapping status

    Image Added 

    Automatically mapped by the system to the chart of accounts

    Image Added

    Possible mappings exist to the chart of accounts

    Image Added

    Has no mapping to the chart of accounts

    Image Added

    Mapped by the user to the chart of accounts

    Image Added

    Was previously mapped to the chart of accounts

    UI Expand
    titleCan I override a system mapped account?

    Yes! Click in the Map To field for that row and choose another account.

    Accountants accounts for which no automatic or suggested mappings exist are displayed in the Map Accounts window with a Image Removed icon in the left hand column.

  • Click the drop-down arrow in the Map to column. The Mappings window displays, listing the client chart of accounts.

  • UI Expand
    titleMapping other accounts
    UI Text Box
    typenote

    Press Esc if you want to dismiss the Mappings window.

    Ensure that the Show unmapped accounts only checkbox is selected. This hides those client
    Why can't I see all accounts when choosing an account to map to?

    The Mappings window has a number of display options:

    OptionDescription
    View suggested accounts

    Displays a list of suggested mappings for the account. If the status column displays an Image Added icon, this display option is chosen by default.

    View all accountsDisplays a full list of accounts.
    Show unmapped accounts onlyHides accounts that have already been mapped to an account on your client's chart.
    Deselect the
    Include zero balances
    checkbox if it is selected. To hide accounts with zero balances.
  • Select an account from the list. Double-click on the account or highlight it and click Select .

  • UI Expand
    titleAdding a new client account
    UI Text Box
    typenote

    If you are adding an account from the Mappings window, make sure that you select the View all accounts option before clicking Add account

    1. Click Add account. The Add Account window opens.
    2. Specify the Account type, Account type group, Account number, Account name and Tax Code for the new account.
    3. Click OK.
    UI Expand
    titleEdit an existing client account code on the client’s Chart of Accounts

    Type a new value in the Client account code  field on the Map Accounts window.

    UI Expand
    titleCompleting account mapping

    When you have finished mapping accounts:

    1. Click Next. The Import MYE Wizard closes and you are returned to the Preview screen.
    2. Click Finish to post the accounts to the ledger.
    3. Continue to Previewing mapped accounts.
    UI Text Box
    typenote

    Any GST columns in the imported file will be ignored. Make sure to add any GST data manually.

    Displays accounts on your chart with a balance of $0.00.

    If you can't find an account, select View all accounts and Include zero balances, then type any part of the account code or name in the Search for an account field.

    Image Added

    If the account you're looking for doesn't exist, click Add account to create a new account and add it to the chart.

    HTML
    </span>
    HTML Wrap
    width15%
    classcol span_1_of_5
     
    HTML Wrap
    floatleft
    classcol span_1_of_5
    Panelbox
    namegreen
    titleRelated topics
    HTML Wrap
    classsidebarlinks


    Selecting account mapping options

    Previewing mapped accounts

    Using the Opening Review Wizard


    Importing an .MYE or .TXT file


    Importing a .CSV file


    Importing a Chart of Accounts


    Using the QuickBooks 2014 template


    Using the QuickBooks Online Template