IntroductionThe 2018.1.7 release adds bank feeds functionality to MYOB Advanced, and adds support for multiple, named Partner Support users. New FeaturesBank FeedsThis release adds bank feeds functionality to MYOB Advanced. The bank feeds feature use MYOB's online services to import transactions from your bank account or credit card statement into a nominated Cash Account. Setting up Bank FeedsUser AuthorisationBefore you can begin the setup process, you must nominate one or more MYOB Advanced users to be able to apply for bank feeds. These users will need: - A Secure Authentication login, if they do not already have one. If the user can log in to MYOB Advanced using the Sign in with Secure Authentication button on the login screen, then they are already set up. Secure Authentication was introduced in the 2018.1.2 release of MYOB Advanced - once your site is using this version, onscreen messages will appear when users log in, prompting them to sign up for Secure Authentication. Users can follow these prompts to set up a Secure Authentication login for themselves. More information on Secure Authentication is available on the MYOB website.
- Authorisation to apply for bank feeds. To authorise a user to apply for bank feeds, an MYOB Advanced administrator with access to the Users screen (SM201010) selects the user who requires authorisation and clicks the new Authorise MYOB Admin toolbar button. This sends an authorisation request on behalf of the user to MYOB Sales Operations. An automated email will be sent to the user when they have been authorised.
- Access to bank feeds screens. Any user who will be applying for bank feeds should have access rights to the following screens:
- Apply for Bank Feeds (MBCA2010)
- Track Bank Feed Applications (MBCA2015)
- Manage Bank Feeds (MBCA2020)
Setup ProcessOnce a user has been authorised to apply for a new bank feed, they can navigate to the new Apply for Bank Feeds screen (MBCA2010) to begin the application process. The first step is to click the + button, then select the Financial Institution that the bank feed will be imported from. | UI Text Box |
|---|
| The institutions available in the Financial Institution field’s search window are restricted based on the company’s jurisdiction - only Australian institutions are available in Australia and only New Zealand institutions are available in New Zealand. |
There are two types of application: Paper and Online. - Online – For financial institutions that offer online bank feed applications, MYOB Advanced generates a passcode, which you copy down and supply when setting up the bank feed at the institution's website.
- Paper – Where online applications are not available, MYOB Advanced generates a printable Client Application Form (CAF) containing details of the account you want to set up a bank feed for. The CAF must be printed out, signed, uploaded and sent for processing (all of these actions are performed in MYOB Advanced).
Which type of application you create depends on the financial institution that you selected - in most cases, institutions only offer one method, in which case the Application Type options will be read-only. In cases where an institution offers both methods, the options are editable, and you can select the method you prefer. Paper ApplicationsWhen the Paper option is selected under Application Type, extra fields become available on the Apply for Bank Feeds screen. These fields let the user enter the information required by the institution - usually an account name and number, and possibly other details like a BSB number in Australia. Fill in these fields, then save the application. | UI Text Box |
|---|
| The Account Name is the name that appears on statements for the account, not the name of the account holder or the type of account (Cheque, Savings, etc.) |
You can also nominate the Cash Account that the bank feed will import transactions into, but this is not necessary at this point. Only one bank feed can exist for each Cash Account. 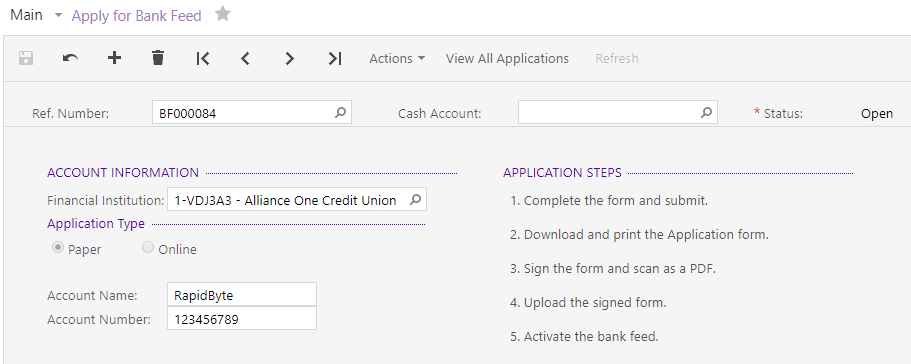
Once the application has been saved, the user selects Submit from the Actions dropdown to register the application with MYOB’s online services. If the submission is successful, they can then select the Download action to receive a Client Application Form (CAF) in PDF format. This form must be printed out and signed by an approved signatory of the specified account; the signed form must then be scanned and uploaded. The user can upload the form by selecting the Upload action - this opens a popup window where the user can select the file to upload: 
| UI Text Box |
|---|
| The email address entered here will be used if MYOB needs to contact the user directly regarding the application. |
Once the signed form has been uploaded, the user clicks Submit Application on this window to send it for processing. | UI Text Box |
|---|
| It’s possible to upload and submit new versions of the CAF - this might be necessary if there was a mistake that needed to be corrected. |
Online ApplicationsWhen the Online option is selected under Application Type, no other details are needed. You can nominate the Cash Account that the bank feed will import transactions into, but this is not necessary at this point. (Only one bank feed can exist for each Cash Account.) 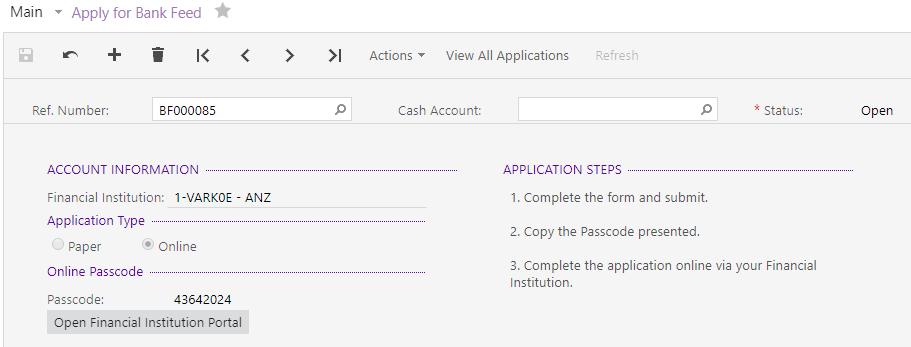
Once the application has been saved, the user selects Submit from the Actions dropdown to register the application with MYOB’s online services and generate an online passcode. The user then clicks the Open Financial Institution Portal to go to the financial institution’s website to set up feeds for the accounts they require. | UI Text Box |
|---|
| Use this link to open the financial institution’s website, rather than navigating to the website manually. In some cases, the URL launched by the button includes authorisation information required by the website. |
The details of how to set up the bank feeds are specific to each financial institution - contact the institution if you need assistance for this stage. At some point in the process, you will need to specify that you are connecting each account to an MYOB product and supply the passcode generated on the Apply for Bank Feeds screen. | UI Text Box |
|---|
| The passcode can be used for the selected financial institution only; however, you can use it to set up feeds for multiple accounts from the same institution. |
Tracking Bank Feed ApplicationsThe new Track Bank Feed Applications screen (MBCA2015) shows the status of all bank feed applications, so their progress can be monitored. 
If the application is processed successfully, indicated by a “Success” status, the user can then activate the bank feed by selecting Activate from the Actions dropdown on the Apply for Bank Feeds screen. The bank feed is now ready for use. | UI Text Box |
|---|
| If a Cash Account hasn’t been selected for the bank feed yet, it must be selected now - the feed can’t be activated until an account is chosen. Only one bank feed can exist for each Cash Account. |
Multiple Online Bank Feeds from One PasscodeWhen applying for feeds online, the online passcode from the application in MYOB Advanced can be used to set up multiple bank feeds from the same financial institution. In these cases, separate bank feed records will be created automatically for each bank feed beyond the first. The records are created once MYOB Advanced receives notification from MYOB’s online services - click the Refresh button on this screen to check the online services for new bank feeds. Importing Bank Feed DataOnce a bank feed has been activated, it will appear on the new Manage Bank Feeds screen (MBCA2020). This screen displays all Cash Accounts that have an active bank feed: 
The screen displays the results of the most recent import, including the date of the import, the user who initiated the import and the number of transactions imported. Bank feed transactions can be imported by any user with access to the Manage Bank Feeds screen - the authorisation credentials needed to apply for a bank feed aren’t needed to import transactions. To import transactions from a bank feed, either: - Select one or more feeds and click Import Selected Feeds, or
- Click Import All Active Feeds.
Any warnings or errors encountered during an import will result in a warning or error icon at the left of the row—hover the mouse pointer over this icon for a short description of the problem. Detailed information on any errors appears on the Import Errors tab. The Trans. Last Imported column displays the number of transactions imported in the last import operation. Clicking on this value opens the Import Bank Transactions screen (CA306500), showing the imported transactions: 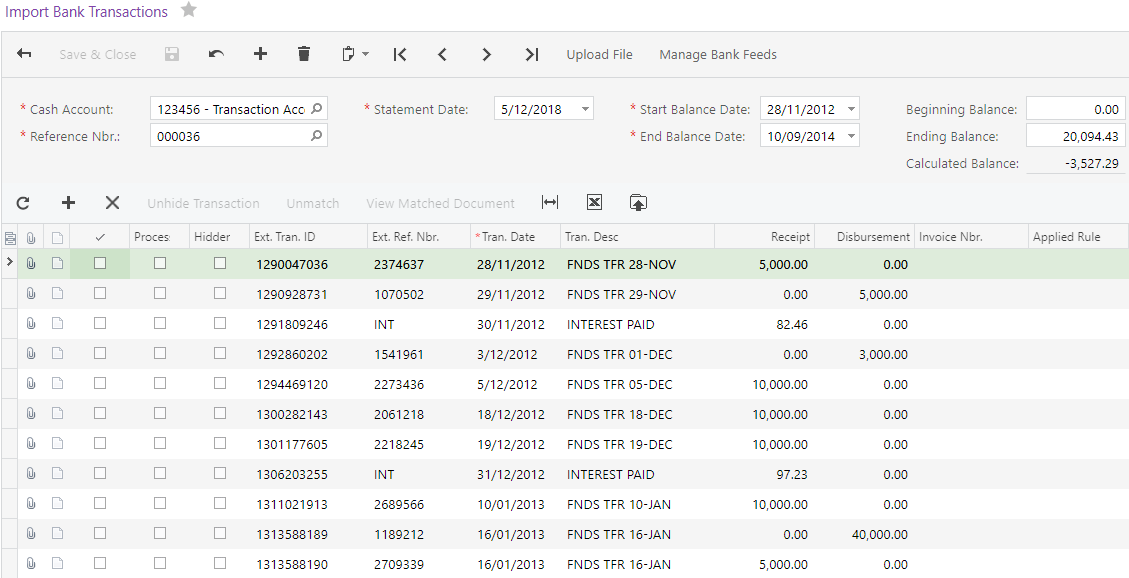
A new Reference Nbr. is assigned to each batch of imported transactions. From this screen, users can continue to reconcile the imported transactions as usual. An Import Feed button is also available on the Process Bank Transactions screen (CA306000), if the selected Cash Account has a bank feed set up for it. Click this button to import transactions from the bank feed. 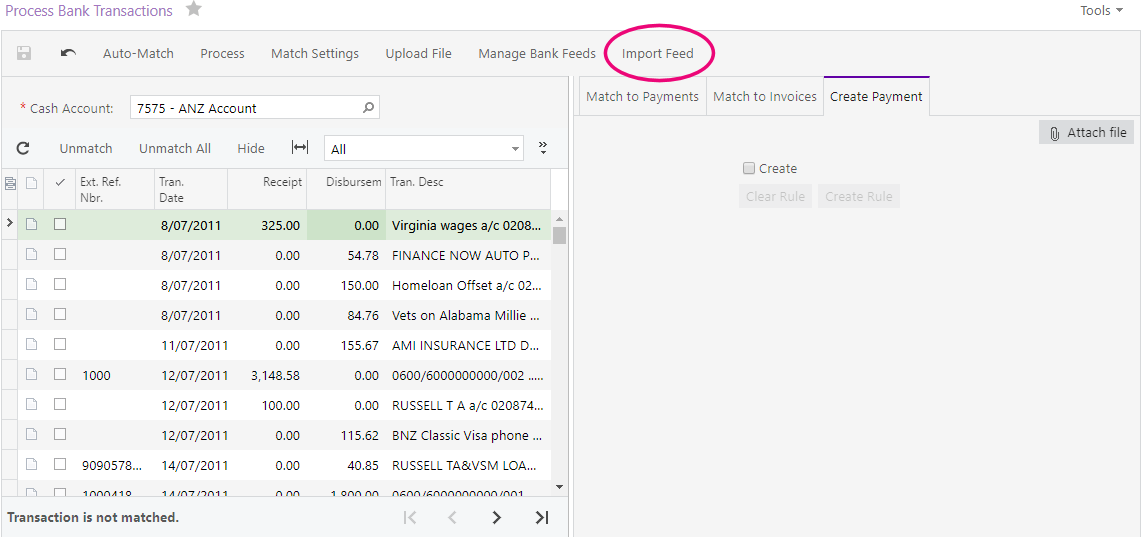
Partner Support Named UsersIn previous release, a single Partner Support user was created for each MYOB Advanced site. As of this release, multiple named users can be set up as Partner Support users and managed in MYOB Advanced. This change increases security and auditability, and allows multiple partners to work on a site at the same time when necessary. Partner Support users use the “MYOB_Partner” licence type. Where previously only a single MYOB_Partner licence type was used for each site, sites now have up to 20 users with this licence type. New Partner Support user accounts must be set up by an existing Partner Support user. Setting up Partner Support UsersNew Partner Support users are set up on the Users screen (SM201010). Existing Partner Support users can select the MYOB_Partner licence type for a new user—when this licence type is chosen, a new Partner Support section becomes available: 
Enter the new user’s email address and the name of the partner company, then save the user. When a new user with the MYOB_Partner licence type is created, an email is sent to their address; this email contains a link that allows the user to sign up for a Secure Authentication login account, which they can then use to log in to MYOB Advanced. | UI Text Box |
|---|
| The Allow access to MYOB Advanced tick box is read-only on this screen—it displays the setting for this user’s access, which can be changed on the Partner Support screen (see below). |
Partner Support users are not visible on user selection screens, dropdowns and search windows, unless the logged in user is a Partner Support user. Managing Partner Support UsersWhile Partner Support users must be created by an existing Partner Support user, they are managed inside MYOB Advanced by administrators with the “Full User” licence type. | UI Text Box |
|---|
| A user cannot have the MYOB_Partner and the Full User licence types at the same time, so that Partner Support users cannot manage themselves. |
The Partner Support screen (MYSM2010) has been updated to display multiple Partner Support users: 
Only users with the Full User licence type are permitted to access this screen. From this screen, and administrator can manage access to the MYOB Advanced system, in the same way that access was managed for the single Partner Support user in previous releases. Management functions include: - Granting or removing access to the MYOB Advanced system as a whole.
- Setting a date at which access will be automatically removed.
- Allowing the user to make company snapshots via the Export Snapshot button on the Companies form (SM203520).
- Assigning or removing MYOB Advanced user roles.
- Restricting a Partner Support user to a specified IP address range.
AU Flat Tax Rates in PayrollAustralia only This release updates the Payroll module to provide support for a flat tax rate, which can be used for contractors on a voluntary agreement, and for a downward withholding variation issued by the ATO. See the ATO website for more information on these situations: A new Override tax scale with flat tax rate option is available on the Taxation tab of the Pay Details screen (MPPP2310). Selecting this option and entering a rate overrides all other taxation settings, with the exception of termination payments, which are taxed as per the normal ATO rules. Licensing UpdatesThis release includes updates to the Employee User and Executive User licence types. Executive UserThe Executive User licence type now gives full access to the Purchase Orders screen (PO301000), where previously it allowed read-only access. Users with this licence type can now create and edit orders using this screen. Employee UserAccess to the various screens has been updated for the Employee User licence type: - Employee Users can now approve or reject documents on the following screens:
- Bills and Adjustments (AP301000)
- Sales Orders (SO301000)
- Quotes (CR304500)
- Employee Users now have read-only access to the Invoices and Memos screen (AR301000).
- Employee Users now have full access to the Purchase Orders screen (PO301000) and the Purchase Order report (PO641000).
Resolved Issues| UI Expand |
|---|
| | HTML Table |
|---|
| cellpadding | 10px |
|---|
| style | border: 1px solid #dddddd; border-collapse: collapse; |
|---|
| | Table Row (tr) |
|---|
| | Table Cell (td) |
|---|
| bgcolor | #f3f4f5 |
|---|
| width | 220px |
|---|
| style | border: 1px solid #dddddd; |
|---|
| Problem ID |
| Table Cell (td) |
|---|
| bgcolor | #f3f4f5 |
|---|
| style | border: 1px solid #dddddd; |
|---|
| Description |
|
| Table Row (tr) |
|---|
| | Table Cell (td) |
|---|
| style | border: 1px solid #dddddd; |
|---|
| - |
| Table Cell (td) |
|---|
| style | border: 1px solid #dddddd; |
|---|
| When a user specified any notification template in the TemplateID box of MailSettings in the Report Designer, this template wasn’t processed correctly on the report processing forms in MYOB Advanced. This has been resolved. |
|
| Table Row (tr) |
|---|
| | Table Cell (td) |
|---|
| style | border: 1px solid #dddddd; |
|---|
| - |
| Table Cell (td) |
|---|
| style | border: 1px solid #dddddd; |
|---|
| The message “The record has been processed successfully.” was not localized on the Validate Account Balances (CA503000) form. This has been resolved. |
|
| Table Row (tr) |
|---|
| | Table Cell (td) |
|---|
| style | border: 1px solid #dddddd; |
|---|
| - |
| Table Cell (td) |
|---|
| style | border: 1px solid #dddddd; |
|---|
| When a user of a Self-Service Portal searched for any string in the Search box, the search results could display cases, sales orders, contracts, and projects related to other business accounts. This has been resolved. |
|
|
|
| UI Expand |
|---|
| | HTML Table |
|---|
| cellpadding | 10px |
|---|
| style | border: 1px solid #dddddd; border-collapse: collapse; |
|---|
| | Table Row (tr) |
|---|
| | Table Cell (td) |
|---|
| bgcolor | #f3f4f5 |
|---|
| width | 220px |
|---|
| style | border: 1px solid #dddddd; |
|---|
| Problem ID |
| Table Cell (td) |
|---|
| bgcolor | #f3f4f5 |
|---|
| style | border: 1px solid #dddddd; |
|---|
| Description |
|
| Table Row (tr) |
|---|
| | Table Cell (td) |
|---|
| style | border: 1px solid #dddddd; |
|---|
| - |
| Table Cell (td) |
|---|
| style | border: 1px solid #dddddd; |
|---|
| In some cases, after a user edited tax report settings and selected the check box in the Detail by Tax Zones column on the Reporting Settings form (TX205100), the related tax groups became associated with incorrect lines which led to incorrect amounts in the tax report. This has been resolved. |
|
| Table Row (tr) |
|---|
| | Table Cell (td) |
|---|
| style | border: 1px solid #dddddd; |
|---|
| - |
| Table Cell (td) |
|---|
| style | border: 1px solid #dddddd; |
|---|
| The FA Balance by GL Account report (FA643000) displayed a double balance of an asset which had been previously transferred. This has been resolved. |
|
| Table Row (tr) |
|---|
| | Table Cell (td) |
|---|
| style | border: 1px solid #dddddd; |
|---|
| - |
| Table Cell (td) |
|---|
| style | border: 1px solid #dddddd; |
|---|
| If the Inter-Branch Transactions feature was deactivated, the system allowed users to apply a bill created under one branch to a debit adjustment from another branch when the branches were linked to different actual ledgers, or to the same ledger but the consolidating branch was not specified for the ledger. This led to a discrepancy between Accounts Payable and General Ledger in each of the branches involved in the transaction. A similar issue happened in the Accounts Receivable module. This has been resolved. |
|
|
|
| UI Expand |
|---|
| | HTML Table |
|---|
| cellpadding | 10px |
|---|
| style | border: 1px solid #dddddd; border-collapse: collapse; |
|---|
| | Table Row (tr) |
|---|
| | Table Cell (td) |
|---|
| bgcolor | #f3f4f5 |
|---|
| width | 220px |
|---|
| style | border: 1px solid #dddddd; |
|---|
| Problem ID |
| Table Cell (td) |
|---|
| bgcolor | #f3f4f5 |
|---|
| style | border: 1px solid #dddddd; |
|---|
| Description |
|
| Table Row (tr) |
|---|
| | Table Cell (td) |
|---|
| style | border: 1px solid #dddddd; |
|---|
| 168928656340 168545286731 |
| Table Cell (td) |
|---|
| style | border: 1px solid #dddddd; |
|---|
| It was possible for a Purchase Order raised from a Sales Order to become read-only and default to “Dropship” instead of “Purchase to Order”. This has been resolved. |
|
|
|
| UI Expand |
|---|
| | HTML Table |
|---|
| cellpadding | 10px |
|---|
| style | border: 1px solid #dddddd; border-collapse: collapse; |
|---|
| | Table Row (tr) |
|---|
| | Table Cell (td) |
|---|
| bgcolor | #f3f4f5 |
|---|
| width | 220px |
|---|
| style | border: 1px solid #dddddd; |
|---|
| Problem ID |
| Table Cell (td) |
|---|
| bgcolor | #f3f4f5 |
|---|
| style | border: 1px solid #dddddd; |
|---|
| Description |
|
| Table Row (tr) |
|---|
| | Table Cell (td) |
|---|
| style | border: 1px solid #dddddd; |
|---|
| - |
| Table Cell (td) |
|---|
| style | border: 1px solid #dddddd; |
|---|
| The following error message was displayed when a user attempted to approve a purchase order on the Purchase Orders form (PO301000): “Cannot insert the value NULL into column ‘Type’, table ‘PMBudget'; column does not allow nulls. INSERT fails. The statement has been terminated.” This has been resolved. |
|
|
|
| UI Expand |
|---|
| | HTML Table |
|---|
| cellpadding | 10px |
|---|
| style | border: 1px solid #dddddd; border-collapse: collapse; |
|---|
| | Table Row (tr) |
|---|
| | Table Cell (td) |
|---|
| bgcolor | #f3f4f5 |
|---|
| width | 220px |
|---|
| style | border: 1px solid #dddddd; |
|---|
| Problem ID |
| Table Cell (td) |
|---|
| bgcolor | #f3f4f5 |
|---|
| style | border: 1px solid #dddddd; |
|---|
| Description |
|
| Table Row (tr) |
|---|
| | Table Cell (td) |
|---|
| style | border: 1px solid #dddddd; |
|---|
| - |
| Table Cell (td) |
|---|
| style | border: 1px solid #dddddd; |
|---|
| The data from the extension tables of the BAccount table was deleted when a customer location was deleted. This has been resolved. |
|
|
|
| UI Expand |
|---|
| | HTML Table |
|---|
| cellpadding | 10px |
|---|
| style | border: 1px solid #dddddd; border-collapse: collapse; |
|---|
| | Table Row (tr) |
|---|
| | Table Cell (td) |
|---|
| bgcolor | #f3f4f5 |
|---|
| width | 220px |
|---|
| style | border: 1px solid #dddddd; |
|---|
| Problem ID |
| Table Cell (td) |
|---|
| bgcolor | #f3f4f5 |
|---|
| style | border: 1px solid #dddddd; |
|---|
| Description |
|
| Table Row (tr) |
|---|
| | Table Cell (td) |
|---|
| style | border: 1px solid #dddddd; |
|---|
| 168960361392 168604053858 165443174701 165327624251 |
| Table Cell (td) |
|---|
| style | border: 1px solid #dddddd; |
|---|
| STP batches could become stuck in the “Approved” status due to an authentication timeout. This has been resolved. |
|
| Table Row (tr) |
|---|
| | Table Cell (td) |
|---|
| style | border: 1px solid #dddddd; |
|---|
| 163215684985 162989370262 |
| Table Cell (td) |
|---|
| style | border: 1px solid #dddddd; |
|---|
| Certain pay item/payment method configurations could result in the error message “Payment method for (pay item) has multiple cash accounts for the employee (employee) branch. Please check the payment method configuration.” when attempting to create a pay. This has been addressed; updating the configuration of affected pay items prevents the error from occurring. |
|
| Table Row (tr) |
|---|
| | Table Cell (td) |
|---|
| style | border: 1px solid #dddddd; |
|---|
| 165443174701 165327624251 |
| Table Cell (td) |
|---|
| style | border: 1px solid #dddddd; |
|---|
| In some cases, an error during the completion of a pay run could leave the pay run’s STP batch in the invalid status “Approved”, which meant that it could not be submitted to the ATO. This has been resolved; the error will no longer occur in new STP batches. | UI Text Box |
|---|
| Existing batches are not affected; because STP submissions contain year-to-date values, each submission effectively overwrites the submissions before it. As the ATO are not penalising for non-compliance this financial year, there is no need to correct even the latest batch, as the first pay run completed after this release will make you compliant again. |
|
|
| Table Row (tr) |
|---|
| | Table Cell (td) |
|---|
| style | border: 1px solid #dddddd; |
|---|
| 145725060309 145725060036 |
| Table Cell (td) |
|---|
| style | border: 1px solid #dddddd; |
|---|
| The default sort order of employees in a pay run is now by the visible employee ID instead of the internal employee code. This applies to the Pay Run Details form (MPPP3120) and when navigating between employees on the Employee’s Current Pay form (MPPP3130). |
|
| Table Row (tr) |
|---|
| | Table Cell (td) |
|---|
| style | border: 1px solid #dddddd; |
|---|
| 160505059185 160082545176 |
| Table Cell (td) |
|---|
| style | border: 1px solid #dddddd; |
|---|
| Changing a rate on the WorkCover Rates form (MPPP3010) did not update any pay items that used that rate. This has been resolved. |
|
| Table Row (tr) |
|---|
| | Table Cell (td) |
|---|
| style | border: 1px solid #dddddd; |
|---|
| 167708503424 167705575337 |
| Table Cell (td) |
|---|
| style | border: 1px solid #dddddd; |
|---|
| In some cases, custom tax amounts or rates did not work WHM employees. This has been resolved. |
|
| Table Row (tr) |
|---|
| | Table Cell (td) |
|---|
| style | border: 1px solid #dddddd; |
|---|
| 165402702942 165106970350 |
| Table Cell (td) |
|---|
| style | border: 1px solid #dddddd; |
|---|
| The error message “Entitlement failed to update Standard Pay. - Error: An error occurred during processing of the field Pay Details for value 35 Error: 'Pay Details for' cannot be found in the system.” could appear when saving entitlement records. This has been resolved. |
|
| Table Row (tr) |
|---|
| | Table Cell (td) |
|---|
| style | border: 1px solid #dddddd; |
|---|
| - |
| Table Cell (td) |
|---|
| style | border: 1px solid #dddddd; |
|---|
| This release updates the validation rules for STP to comply with changes from the ATO: if a pay item has the “Allowance Other” reporting category, the item’s description can now contain only A to Z, a to z, 0 to 9, ! @ $ % & * ( ) - = [ ] ; : ' " , . ? / and the space character. |
|
|
|
| 