Quotes provide your customers with a price that’s guaranteed for a specified period. When the customer accepts or declines the quote, you can update its status. You can also turn a quote into an invoice with just one click. Want to add a personal touch to the look of your quotes? See Sales settings. See a list of your quotes via the Sales menu > Quotes. | UI Text Box |
|---|
| See expired quotes at a glance If the Open status is yellow, the quote is past its expiry date. 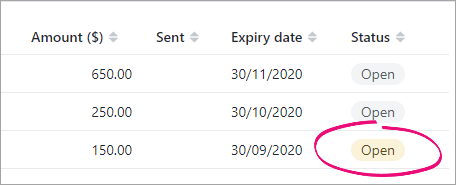
|
| UI Expand |
|---|
| Create a quote - Go to the Sales menu and choose Create quote.
- Select the Customer you're quoting for. If it's a new customer, click + Create customer then enter their details and click Save. Learn more about adding customers.
 - If you want, edit the number in the Quote number field. If you change the number, future quote (and invoice) numbers will increment from this new number.
- Check or change the Issue date.
- Check or change the Expiry date. This defines how long the quote is valid for.
- From the Amounts are list, choose if the quote is Tax / GST inclusive (includes tax) or Tax / GST exclusive (excludes tax).
If the quote will contain items, click Field layout and choose the Services and items option.

If you're adding items to the quote, select the item you're quoting for from the Item ID field and the number of Units of that item. If the item doesn't exist, add it by clicking + Create item, enter the item details, then click Save. Learn more about creating items.

The following details appear, based on what you entered when you created the item: Description, Account, Unit price and Tax code/GST code.
The default quantity you're selling (No of units) is 1, but you can change this. | UI Text Box |
|---|
| There's a built-in calculator in the No of units, Unit price, Discount and Amount fields. Just enter a calculation in the field and tab out of it: 
|
If you're quoting for a service, enter a Description and complete the Account, Amount and Tax code / GST code details. | UI Text Box |
|---|
| To remove a line from the quote, click the delete icon (  ) to the right of the line. ) to the right of the line. |
- (Optional)
- Choose a Job if the line item relates to a specific job. Tell me more about jobs.
If you want to add a note about the quote, choose a Notes to customer and enter any additional notes in the box below it. These notes will appear on the customer's quote. For example, you could use this area to add additional details about payment. You can choose one of the default notes or add your own reusable notes — see Notes to customer.
Repeat from step 8 for each item or service you want to include on the quote. Enter any charges for Freight, and if required, change the default Tax/GST code. If you can't enter Freight, you'll be prompted to specify a linked account for freight. (What is a linked account?) The following totals are automatically calculated: Subtotal—the total for the items added to the quote Tax—the amount of tax applied to the quote Total—the subtotal amount plus the tax amount
Use the buttons across the bottom of the page to choose an action, such as to email the quote or to save the existing quote and create a duplicate from it. | UI Text Box |
|---|
| When you create or send a quote, or convert the quote to an invoice, this is recorded in the Activity history section at the bottom of the quote.
 |
- Click Save.
|
| UI Expand |
|---|
| Duplicate a quoteIf you regularly create similar quotes, you can duplicate one you've already created. You can copy any quote regardless of whether it’s been saved or not. Just open the quote and click Save and duplicate. 
A quote with the same line items is created with a new quote number, date and expired date. If you're working on a quote, and you want to save it and create a new quote, select Save and create new. The quote is saved, and a new one is created and opened. To cancel a quote, just hit the back button on your browser window. |
| UI Expand |
|---|
| Search for a quote- Go to the Sales menu and choose Quotes.
- To help you find a quote, try these filtering options:
- Click the Quote number to view a quote's details.
|
| UI Expand |
|---|
| title | Turn a quote into an invoice |
|---|
| Turn a quote into an invoiceWhen a customer decides to buy what you've quoted, you can quickly turn a quote into an invoice. - Go to the Sales menu and choose Quotes.
- Click the quote you want to turn into an invoice. The Quote page appears, showing the quote details.
- Click Convert to invoice.

The Invoice page appears, containing the items and/or services and prices from the quote. - Make any required changes to the invoice, and click Save, or click Email invoice to send it to the customer.
For more information on entering invoices, see Creating invoices.
|
| UI Expand |
|---|
| Decline a quoteIf a customer declines a quote, simply change its status. - Go to the Sales menu and choose Quotes.
- Click the quote that's been declined. The Quote page appears, showing the quote details.
- In the Status field, choose Declined.
Image Added - Click Save.
|
| UI Expand |
|---|
| title | Reprint or resend a quote |
|---|
| Reprint or resend a quote- Go to the Sales menu and choose Quotes. The Quotes page appears.
- Click to open the quote to be reprinted or resent. The quote is displayed.
Resend or reprint the quote. | If you want to... | Do this... |
|---|
| Print or save the quote | - Click View PDF.
- Choose a template then click View PDF. The quote displays in a PDF reader where you can print or save it.
| | Email the quote | - Click Email quote . The Email quote page appears.
If an email address has been saved for the customer, it appears in the To field—you can change this if you want. If no email address exists, enter one in the To field. - If you want to email the quote to additional recipients, you can:
- click + Add another email and enter additional To recipients
- enter an email address in the CC field
- click + Add another email and enter additional CC recipients
- If you want to email a copy of the quote to yourself, select the option Email me a copy. The customer will not be able to see this information.
- If required, change the text in the Subject and Message fields. If you'd like to change the default text, see Set up default emails.
- If you'd like to attach files to the email (total size of uploaded documents can't exceed 25MB):
- click and drag files onto the Email quote window, or
- click Browse and select files to upload.
- Choose the Template.
- Click Send quote to email the quote.
|
|
| UI Expand |
|---|
| Change a quote- Go to the Sales menu and choose Quotes. The Quotes page appears.
- Click to open the quote to be changed. The quote is displayed.
- Make your changes. See Create a quote above for details.
- When you're done, click Save, or click Email quote to send it to the customer.
|
| UI Expand |
|---|
| Delete a quote- Go to the Sales menu and choose Quotes. The Quotes page appears.
- Click to open the quote to be deleted. The quote is displayed.
- Click Delete.
- Click Yes to the confirmation message.
|
| HTML |
|---|
<h2><i class="fa fa-comments"></i> FAQs</h2><br> |
| UI Expand |
|---|
| title | How do I change the default email message? |
|---|
| How do I change the default email message?This is set in your sales settings. See Set up default emails. |
| UI Expand |
|---|
| title | (AccountRight browser users) Why has the default Freight tax code changed? |
|---|
| (AccountRight browser users) Why has the default Freight tax code changed?If you access an AccountRight company file in a browser, you might notice that the default Tax/GST code for the Freight field is different when you enter a quote in the browser. This is because the default Tax/GST code in the browser is set in the linked income account for freight (Accounting menu > Manage linked accounts > Sales > Income account for freight), whereas in the desktop app it's set in the customer's card (Card Information window > Selling Details > Freight Tax Code). You can easily change the Tax/GST code in the transaction or set a new default Tax/GST code in the browser by editing the freight linked income account. |
|

 Yes
Yes
 No
No
 Thanks for your feedback.