IntroductionThe 2020.1.0 release introduces Employee Self Service features, and contains a range of updates to the Payroll module, including public holiday processing, employee transfers, new reports and the ability to import timesheet information into the Payroll module. The Self Service and Payroll modules are fully integrated, so employees can make leave requests in the Self Service module, which are then approved and processed in the Payroll module. This release also includes updates to Bank Feeds and Fixed Asset features, and resolves issues identified in previous releases. Significant new features are highlighted below, and video overviews are available for the new Payroll and Self Service features. For full information on all of the changes, see the 2020.1 Release Notes document: New FeaturesEmployee Self ServiceThe release introduces that Self Service module to MYOB Advanced. This module allows employees to view and manage their own details, and to submit leave requests, which are then managed and processed in the Payroll module.
With the exception of the Employee Calendar and Team Calendar screens, all Self Service screens are available in the MYOB Advanced mobile app. Setting up Employee Self ServiceThe Employee Self Service module is a separately licensable feature. If you have ESS included in your licence, the ESS features can be enabled by ticking the “Employee Self Service” feature on the Enable/Disable Features screen (CS10000). Once enabled, the Employee Self Service module becomes available, but before it can be used, the system must be set up to use the various Self Service functions. Self Service PreferencesThe Self Service Preferences screen (MPES1010) lets you configure settings that affect the operation of the Employee Self Service module as a whole, including the Numbering Sequence, Approval Map and Notification Template to use for leave requests; and options that determine how records will appear on the Employee and Team Calendars. Setting up Leave TypesTo make leave types visible in the Employee Self Service module, tick the Allow Leave Request option on the Additional Info tab of the Pay Items screen (MPPP2210) for each accrual pay item that should be available to employees when making a leave request (see page 8). If you want to require employees to attach a document when they request leave, tick the Require Attachment Upon Leave Request option. To make leave balances visible on the Leave Balances or Projected Leave Balance screens (see page 7), tick the Show Leave Balances and/or Show Projected Leave Balances options on the Rules tab of the Entitlements screen (MPPP3300) for each leave entitlement that you want to display. Setting up EmployeesTo give an employee access to the features of the Employee Self Service module, a user record, including login and password details, must be created for the employee on the Users screen (SM201010). The user record must have the “People ESS” role selected on the Roles tab and the “People User” licence type on the Licence Types tab. The employee can be linked to the user record via the Linked Entity field on the Users form. You must also set the default Pay Group for each employee—this is the pay group that will be associate with any leave requests they make. On the Employee Pay Groups screen (MPPP2250), make sure that the Default Pay Group box is ticked for the group that should be the employee’s default. Employee DetailsEmployees who have been given access to the Self Service Portal will be able to log in and access a variety of self-service screens: - On the Contact Details screen (MPES3011), employees can view and edit their own personal and contact details.
- The Employment Details screen (MPES3011) allows employees to view details of their employment in the company, their tax details and their year-to-date balances. These details are all read-only.
- The Pay Distribution screen (MPES3012) shows employees read-only information about how their pay is paid to them.
- The Superannuation screen (MPES3013) shows employees read-only information about the superannuation contributions included in their pays.
- The Payslips screen (MPES3014) lists all of the employee’s available payslips. The employee can click on the link in the Pay Date column to download the payslip for that date.
Employee and Team CalendarsThe Self Service module includes two calendar screens: - The Employee Calendar (MPES4001), which lets an employee view a schedule of their own leave requests and enter new requests.
- The Team Calendar (MPES4003), which lets a manager view the leave schedules for the employees that they manage.
Employee CalendarThe Employee Calendar screen shows a calendar month, with any leave requests made by the employee highlighted. Hovering the mouse over a leave request shows additional details in a popup. 
Employees can double-click on a day to request leave on that day, or click and drag across a range of days to request leave for the range. Team CalendarThe Team Calendar screen contains a calendar that shows the leave requests relating to the employees that are managed by the logged in user. Employees are selected for display on the calendar in one of two ways: - The calendar displays all employees who are below the logged in user on the Company Tree screen (EP204061).
- The calendar displays all employees who have the logged in user selected for their Reports to field on the Employees screen (EP203000).
The Team Scheduler Employees Source option on the Self Service Preferences screen (MPES1010) determines which of these methods will be used. As with the Employee Calendar screen, employees’ leave requests are highlighted on the calendar, with additional details available when the mouse is hovered over a leave request. The Team Calendar includes extra controls for viewing a week, fortnight or month, and for selecting a specific date to display (or just “Today”). 
Requesting LeaveThe introduction of the Self Service module adds new workflows for requesting leave and then processing it in one or more pay runs. Leave requests made in the Self Service module flow through to the Payroll module for processing; leave requests’ statuses are then reported back to the Self Service module so employees can track the progress of their requests. Employee Leave BalancesEmployees can view their current leave balances on the Leave Balances screen in the Self Service module (MPES3022): 
Clicking one of the Leave Request links next to a leave type makes a new leave request for that type (see “Making Leave Requests” on page 8). The Projected Leave Balance screen (MPES4012) lets employees enter a future date to check how much leave they will have by then, so that they can plan their leave requests more easily. Making Leave RequestsEmployees can make a new leave request from the Self Service module using the Submit a Leave Request screen (MPES3020). Managers can also use this screen to make leave requests for the employees they manage. The screen can be accessed in several ways: - On the Employee Calendar screen, by double-clicking on a day, or clicking and dragging across a range of days.
- On the Leave Balances screen, by clicking one of the Leave Request links in the main table.
- On the Projected Leave Balance screen, by clicking the New Leave Request toolbar button.
- On the Leave Requests screen, by clicking the + toolbar button.
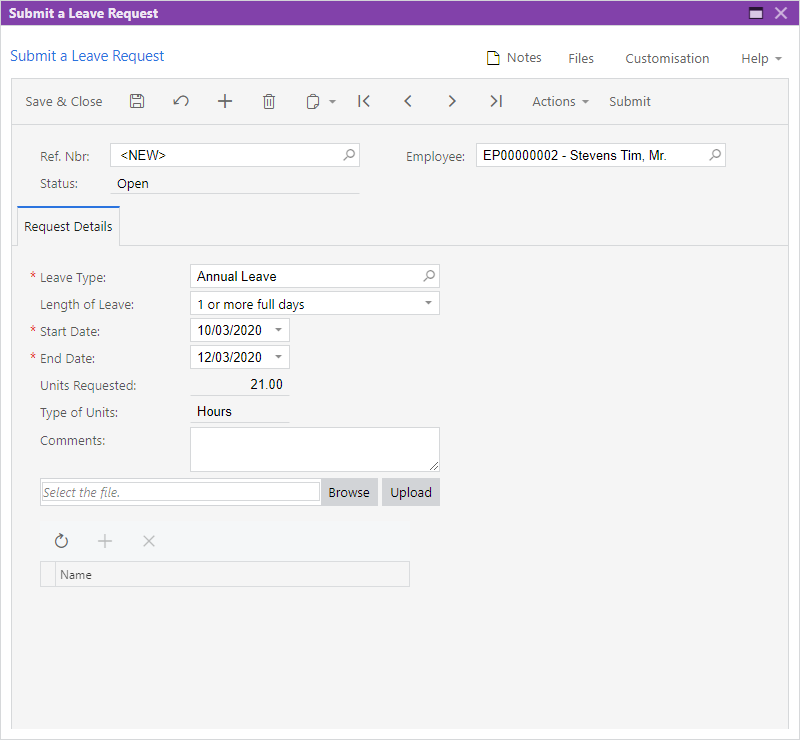
Using this screen, a user (employee or manager) can enter all of the details for the leave request, including the leave type, and leave start and end dates. The user can also attach documents to the request (this may be required, depending on the leave type’s configuration. Approving and Paying LeaveReviewing Leave RequestsEmployees can use the Leave Requests screen in the Self Service module (MPES3021) to see the status of any leave requests they’ve made. Managers can also use this screen to view the leave requests for any of the employees they manage. Managers can use this screen to view the requests for any employees they manage. Leave Request StatusesA leave requests can be in one of the following statuses: - Open – The request has not yet been submitted for approval.
- Submitted – The request has been submitted for approval. It can still be edited or deleted at this stage.
- Approved but not paid – The request has been approved, but has not yet been processed as part of pay run. It can no longer be edited.
- Declined – The request has been declined and will not be processed further.
- Ready To Pay – The request has been marked as ready for inclusion in a pay run (or pay runs, if the amount of leave spans more than one pay period).
- Processing – The request has been added to a pay run, which is currently being processed.
- Cancelled – The request has been cancelled and will not be processed further.
- Partially Paid – If the requested leave spans more than one pay run, this status indicates that one or more of those pay runs has been processed, but there is still some of the request that has not yet been paid.
- Paid – All days of the request have been paid, across one or more pay runs.
Approving Leave RequestsLeave requests that have been submitted for approval appear on the Leave Administration screen in the Payroll module (MPPP5040). 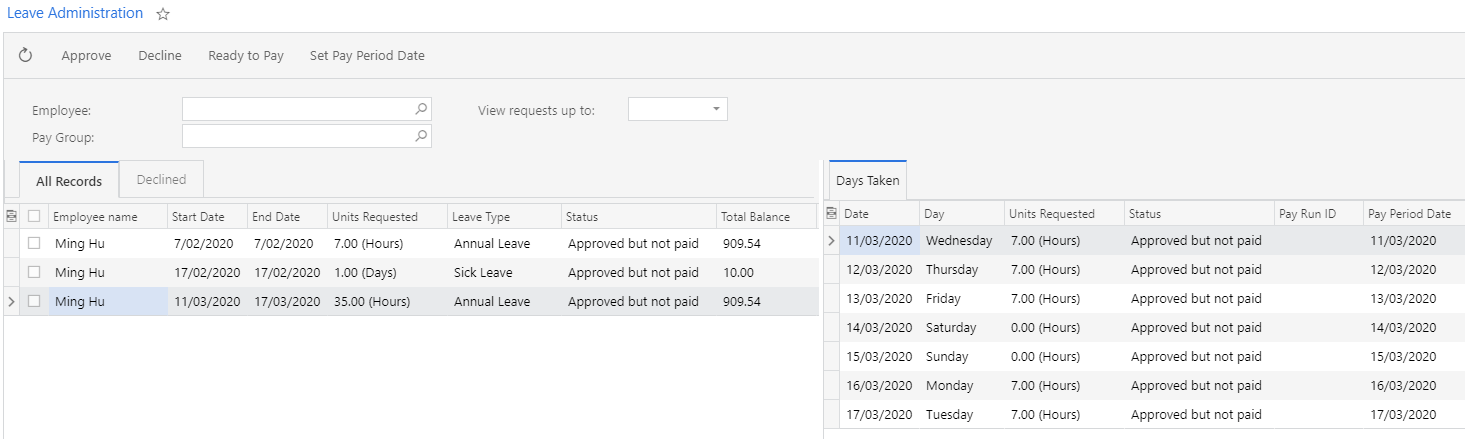
A payroll administrator can select leave requests on this screen and use the toolbar buttons to approve requests, decline requests or set them as ready to include in a pay. | UI Text Box |
|---|
| The approvals process uses the built-in approval features of MYOB Advanced—leave requests can also be approved on the existing Approvals screen (EP503010). |
Leave requests in the “Ready to Pay” status will be added to pay runs based on the dates that leave was taken on. The Set Pay Period Date button allows you to specify a new date for the selected leave request(s). For instance, if a pay run that covers the date of the request has already been run, you can include the leave request in a future pay run by setting a new Pay Period Date. Paying LeaveTo add approved leave to a pay run, click the new Import Leave action on the Pay Run Details screen (MPPP3120). Clicking this action imports any leave requests for employees in the pay run that fall within the pay period’s start and end dates (partially or in full) and have the “Ready to Pay” status. | UI Text Box |
|---|
| If a leave request spans multiple pay periods, only the portion of the request that falls within the pay’s start and end dates will be imported. After the pay is completed, the request’s status will be “Partially Paid”. |
Once leave requests are added to a pay, leave pay items for the request appear on the Employee’s Current Pay screen (MPPP3130) for the affected employees. Once leave has been imported into a pay, it can be viewed and managed in the same way that leave has been managed in previous releases: details of the leave appear in the Days Taken window (opened from the Employee’s Current Pay screen), and in the Leave Summary (click Leave Summary on the Pay Run Details screen). As leave is imported into a pay and processed, the status of the original leave request will be updated. The employee who made the request can check on its status using the Leave Requests screen in the Self Service module (see “Reviewing Leave Requests” on page 10). Undoing Leave ImportsIf you need to undo a leave import, you can click the Undo Timesheet Import action on the Pay Run Details screen to remove all data that was added to the pay run by the import process. You can also undo individual employees’ timesheet imports by selecting them and clicking the Reset button to reset their pay to the Standard Pay. Timesheet ImportsThe Payroll module can now import timesheets generated from external applications or from Employee Time Cards entered in MYOB Advanced. When timesheet data is imported into a pay run, pay items based on the timesheet data are created or updated automatically. The process of setting up the Payroll module for timesheet imports and importing involves several steps: - Set up data maps that map records from timesheet data to records in MYOB Advanced.
- Generate timesheet data from an external timesheeting system or enter time card information on the Employee Time Cards screen (EP305000).
- Import timesheet data into the Payroll module.
- Import timesheet data into an individual pay run.
Data MappingData maps are used to map the imported timesheet data to records in the MYOB Advanced Payroll module. Set up data maps on the new Data Maps screen (MPPP7020). On this screen, you can select the kind of records to map from the Entity Type dropdown. Selecting an Entity Type populates the main grid with all records of that type. Three types of record can be mapped: - Employee – Main grid displays all active payroll employees
- Pay item – Main grid displays all active pay items that have a calculation method of “Rated” or “Amount”
- Subaccount – Main grid displays all active subaccounts
| UI Text Box |
|---|
| Each Employee, Pay Item, or Subaccount record can only have a single external identifier mapped against it. |
To begin with, the grid contains details of the records in the Internal ID and Internal Description columns—to complete the mapping, you must supply the External ID and External Description that each records maps to. There are two ways of doing this: - Enter mapping details directly into the External ID and External Description columns for each record.
- Click the Export button to export the grid to an Excel file. Open the file in Excel, complete all mappings, then use the Upload button to upload the completed Excel file back into the grid.
| UI Text Box |
|---|
| You don’t need to map all records to be able to save the mapping—any unmapped records will be ignored when mapping imported timesheet data. |
Importing Timesheet RecordsOnce data maps have been set up, use the Import Timesheets screen (MPPP7030) to import external records and apply the mappings you’ve set up. Timesheet import files should be Excel files with the same column layout as the main table of the Import Timesheets screen. The easiest way to create an import file template is to click the Export button ( ) on the main table toolbar to export a blank table to Excel—this will create a file with the required column headings in the correct order. You can delete the columns after Amount, as these columns relate to data from the MYOB Advanced system that will be filled in by the data mapping. Select the Data Source Type that matches the source chosen to be the same as the source of the appropriate data mapping configuration. Next, create a new batch using the + button and upload timesheet details by clicking the Upload Timesheet option in the Actions dropdown. | UI Text Box |
|---|
| Immediately after importing data, warning messages appear saying that data is missing (see screenshot above). These warnings will disappear once the data is mapped. |
If the Data Source Type supports MYOB Advanced Time Cards, an Import Time Cards option is also available in the Actions dropdown. Select this option to import timesheet data from MYOB Advanced time cards. | UI Text Box |
|---|
| The Upload Timesheet action is still available in this case—it is possible to import data from time cards and from a CSV file into the same batch. |
Time cards are generated against a specific week, which is displayed for the time card on the Employee Time Card screen (EP305000). When importing time cards, you will need to specify the range of weeks to import time cards from. Data from all approved and released time cards within the range of weeks you selected is imported. The records on the Import Timesheets screen can be edited manually if necessary, e.g. to correct mapping errors or to enter details for records that aren’t included in the data map. Any manual edits you make can be applied to the data map for the selected Data Source Type. Mapping Timesheet RecordsOnce timesheet data has been imported, click Map Imported Items from the Actions dropdown to apply the mapping set up for the selected Data Source Type to the imported data. The remaining fields are filled in automatically based on the data mapping. | UI Text Box |
|---|
| Mapping pay items and employees is mandatory. Subaccount mapping is optional, however: if no subaccount is mapped, the default subaccount on the relevant GL Purpose code will be used. |
Importing Timesheet Data into a Pay RunOnce timesheet data has been imported and validated, you can go on to import unprocessed timesheet batches into an open pay run from the Pay Run Details screen (MPPP3120). Click Import Timesheet in the Actions dropdown to import timesheet data related to the pay run. The import process scans all timesheet batches for records that match the following criteria: - Not associated with any other pay run.
- The Pay Effective Date on the timesheet record falls within the Pay Period of the pay run (including the start and end dates).
- The employee associated with the timesheet record exists in the pay run.
| UI Text Box |
|---|
| The Pay Item attached to imported timesheet data does not need to exist on the Standard Pay of the Employee. Where applicable, the timesheet import process dynamically adds these pay items to employees’ pays. |
Validating Pay Run ChangesClick the Time Summary button on the Pay Run Details screen to display the Pay Run Time Summary window (MPPP7050), which shows all timesheet records that were imported into the pay run, including the source timesheet batches. The Non Imported Details tab displays any records that were present in the imported batches, but were not imported into the pay run. This allows you to find and correct any problems that may have caused the records to be left out of the import. | UI Text Box |
|---|
| Any difference in the Imported and Actual Quantity of the pay item will be highlighted in red. |
Undoing Timesheet ImportsIf you need to undo a timesheet import, you can click the Undo Timesheet Import action on the Pay Run Details screen to remove all data that was added to the pay run by the import process. You can also undo individual employees’ timesheet imports by selecting them and clicking the Reset button to reset their pay to the Standard Pay. Once a pay run has moved into the “PROCESSING” or “COMPLETE” statuses, you can no longer alter the imported timesheet data; however if you can cancel or reverse the pay run, any timesheet imports in the pay run will be undone and you can create a new pay run to correct them. Processing Public HolidaysThis release adds the ability to add Public Holidays to employees’ pays in bulk. The new Public Holiday Processing screen (MPPP3110) lets you create a batch of Public Holiday transactions that can be added to employees’ pays. This screen lets you select the employees to pay, and creates a batch of Public Holiday transactions for those employees. The transactions in a Public Holiday batch are then added to pay runs from the Pay Details screen (MPPP3120). The following records must be set up before you can use this form: - One or more calendars giving the dates for Public Holidays must be set up on the Work Calendars screen (CS209000).
- One or more Public Holiday entitlements must be set up on the Entitlements screen (MPPP3300). Entitlements for Public Holidays should have the Leave and Non Accruing Entitlement options ticked.
- Pay items must be set up for each entitlement on the Pay Items screen (MPPP2210).
- Default Public Holiday pay items must be specified for each Pay Group using the new Default Public Holiday Pay Item column on the Pay Groups screen (MPPP2710).
- A numbering sequence must be selected for the Public Holiday Batch Numbering Sequence field on the Payroll Preferences screen (MPPP1100).
Generating Public Holiday TransactionsOn the Public Holiday Processing screen, create a new transaction batch, then set the filters at the top of the screen. You must select start and end dates—any Public Holidays that appear on Work Calendars between these dates will be selected for adding to employees’ pays. Filters for company, pay group and calendar are also available—these filters are optional and can be used to restrict the employees for whom Public Holiday transactions will be created. Click Generate Pay Items to create Public Holiday transactions for all holidays and employees that match the selected filters. The details of these transactions are displayed on the screen’s main table. | UI Text Box |
|---|
| Any Public Holiday transactions that already exist in another Public Holiday batch will not be added to the new batch. |
Once all of the transactions you want have been generated, save the batch and move it off Hold—the batch is now ready to be imported into one or more pay runs. Importing Public Holiday Transactions into a Pay RunOnce a Public Holiday transaction batch has been created, you can import these transactions into an open pay run from the Pay Run Details screen (MPPP3120). Click Import Public Holidays in the Actions dropdown to import timesheet data related to the pay run. The import process scans all Public Holiday transaction batches for transactions that fall within the Pay Period of this pay run. Pay items are added to the pays of all affected employees and populate the Days Taken window with details of the Public Holiday(s). Public Holiday Batch StatusesThe Status field on the Public Holiday Processing screen shows the batch's current status, which can be one of: - Hold –The batch can be edited but cannot be imported into a pay run.
- Open – The batch can no longer be edited and is ready for import into pay runs.
- Partially Processed – Some, but not all, of the transactions in the batch have been successfully imported into one or more pay runs.
- Closed – All of the transactions in the batch have been successfully imported into pay runs.
Transferring EmployeesA new Employee Transfer screen (MPPP3115) is available to simplify the process of transferring an employee from one branch in the MYOB Advanced system to another. When an employee transfers between branches, their leave liabilities need to be reallocated. In previous releases, this had to be done manually by zeroing out the employee’s leave balance and creating GL journals to correctly allocate liabilities; with the new screen, these steps happen automatically. To transfer an employee, select the employee on the new screen, then click Populate Entitlement Balances. This loads the details of all of the employees’ entitlements into the Document Details tab. | UI Text Box |
|---|
| Only entitlements that have the Include Accrual in GL option enabled will be loaded into the table—if an entitlement does not accrue in the GL, there is no need to transfer it. |
Select the employee’s new branch and GL posting class, then click the Release button to generate GL journals to reallocate their leave liabilities and update the employee’s details as follows: - the employee’s branch is updated, as shown on the Employees screen (EP203000).
- the employee’s Payroll Posting Class is updated, as shown on the Pay Details screen (MPPP2310).
The Financial Details tab displays the details of the GL journals that were created for the transfer. Journals differ depending on whether the “Inter-Branch Transactions” feature is in use: If the feature is in use, a single batch of GL journals will be created; otherwise, the system will create one batch for transferring the employee out of the old branch and another for transferring them into the new branch. Reversing a TransferOnce a transfer is complete, it is moved to the “Closed” status. Closed transfers can be reversed by clicking the Reverse toolbar button. This returns the employee’s details to their original branch and posting class and generates a new GL batch to reverse the GL journals created by the transfer. Employee Transfer SettingsA new Employee Transfer Settings tab has been added to the Payroll Preferences screen (MPPP1100). This tab contains the following settings: - Account – the GL account that should be used by default for the batches created by employee transfers.
- Clearing Subaccount – the GL subaccount that should be used by default for the batches created by employee transfers.
A Numbering Sequence for employee transfers can also be selected on the Numbering Sequence tab of the Payroll Preferences screen. Distributing Employer Super CostsThis release adds the ability to distribute superannuation costs according to the subaccount allocations of superannuation-liable pay items. This means that superannuation costs can be shared proportionally across the relevant Cost Centres. | UI Text Box |
|---|
| This feature supports Super Guarantee employer contributions in Australia and KiwiSaver employer contributions in New Zealand. |
ExampleAn employee, earning $60 an hour, works 40 normal hours a week to earn $2400. Their time is allocated as follows: - 24 hours are spent at Cost Centre A ($1,440 – 60% of their pay)
- 16 hours are spent at Cost Centre B ($960 – 40% of their pay)
At a contribution rate of 9.5%, the total employer superannuation contributions for this employee will be $228, which should be distributed as follows: - Cost Centre A: $136.80 (60%)
- Cost Centre B: $91.20 (40%)
Distributing CostsTo distribute superannuation costs, select the new Distribute Employer Super Costs option from the Action dropdown on the Pay Run Details screen (MPPP3120). This automatically distributes the super costs for all employees in the pay run and updates their Current Pay Accordingly. | UI Text Box |
|---|
| The distribution takes into account all superannuation-liable pay items in each employee’s Current Pay. |
After costs have been distributed, you can check employees’ pays on the Employee’s Current Pay screen (MPPP3130)—the “Employer Super Pay” pay item will display “Allocated” in the GL Account column. You can click the “Allocated” link to open the Allocate General Ledger Accounts window, where the pay item allocations can be viewed (and edited if necessary). Improved Reporting and Data AnalysisThis release adds a suite of generic inquiries and data views to the Payroll module, making it easier to view and extract information about your payroll system. The following new generic inquiries are available for viewing and editing on the Generic Inquiry screen (SM208000): - MP-PayActivitySummary
- MP-PayActivityDetail
- MP-Employee
- MP-EntitlementHistoryGI
New reports, data views and pivot tables that use these generic inquiries have been added. The reports are suited to producing report documents, while the data views are the best way of exporting data to external applications like Excel, and the pivot tables provide a useful way of grouping data. Pay Activity SummaryThe Pay Activity Summary data features use the MP-PayActivitySummary generic inquiry to show pay totals for one or more pay runs in a specified date range, optionally grouped by branch, department posting class and employee. Three Pay Activity Summary interfaces are available: - A report, Pay Activity Summary (MPPP6024)
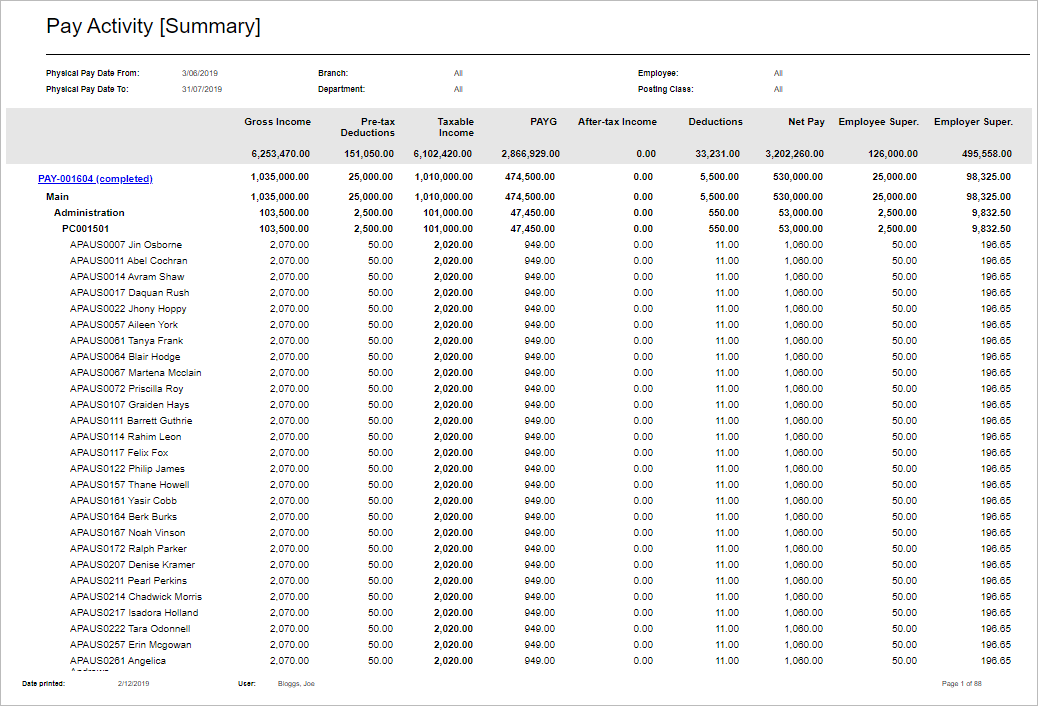
- A data view, Pay Activity Summary Data (MPPP6025)
- A pivot table, Pay Activity Summary Pivot (MPPP6026)
Pay Activity DetailThe Pay Activity Summary data features use the MP-PayActivityDetail generic inquiry to show detailed pay information for each employee in one or more pays. Three Pay Activity Detail interfaces are available: - A report, Pay Activity Detail (MPPP6023)
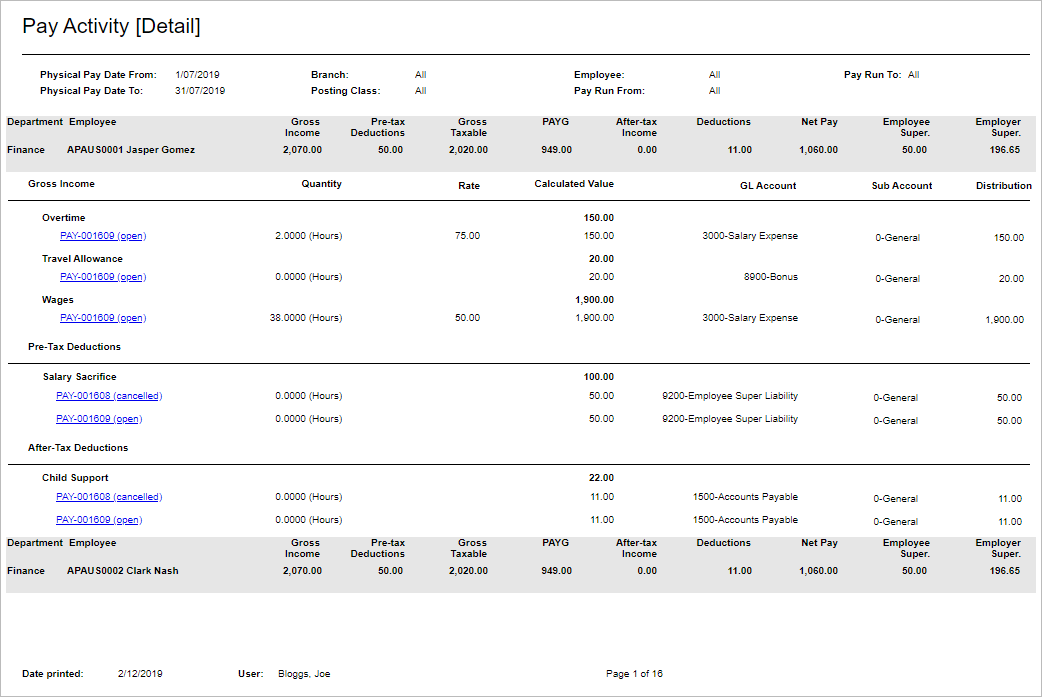
- A data view, Pay Activity Detail Data (MPPP6027)
- A pivot table, Pay Activity Detail Pivot (MPPP6028)
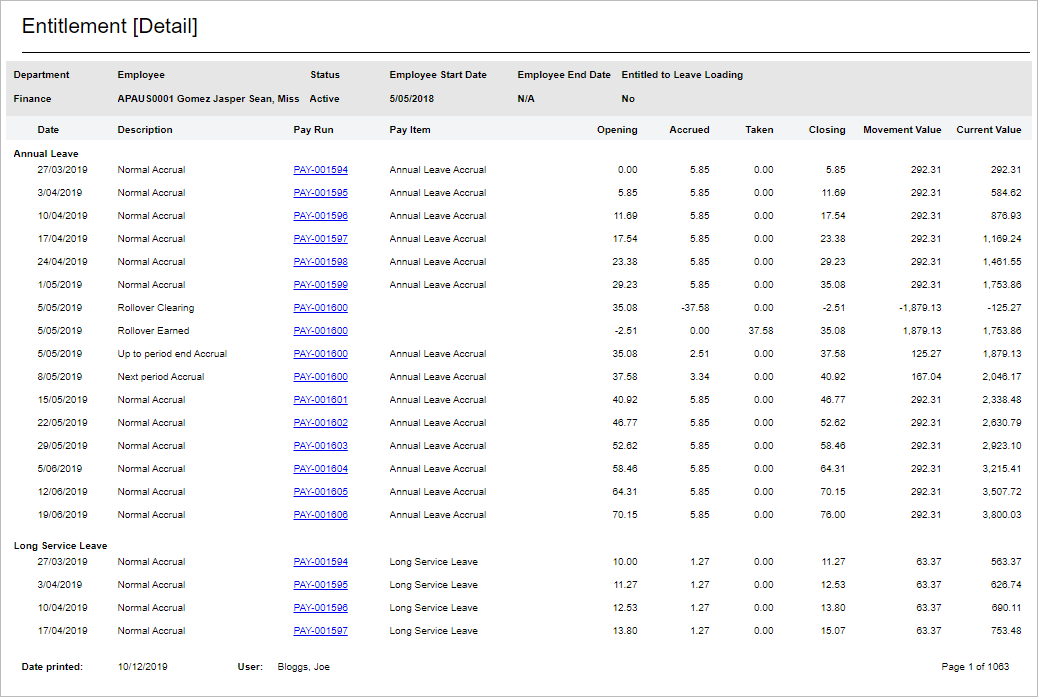
Entitlement MovementsThe Entitlement Movements data features use the MP-EntitlementHistoryGI generic inquiry to show details of all entitlement accruals and payments for one or more employees over a selected date range, including opening and closing balances, the accrual/taken amount and the movement value. Three Entitlement Movement interfaces are available: - A report, Entitlement Movements (MPPP6032)
- A data view, Entitlement History Data (MPPP6033)
- A pivot table, Entitlement History Pivot (MPPP6034)
Employee DetailAustralia only The Employee Detail report (MPPP2311) uses the MP-Employee generic inquiry to provide a one-page summary of contact, taxation and payment information for one or all payroll employees. 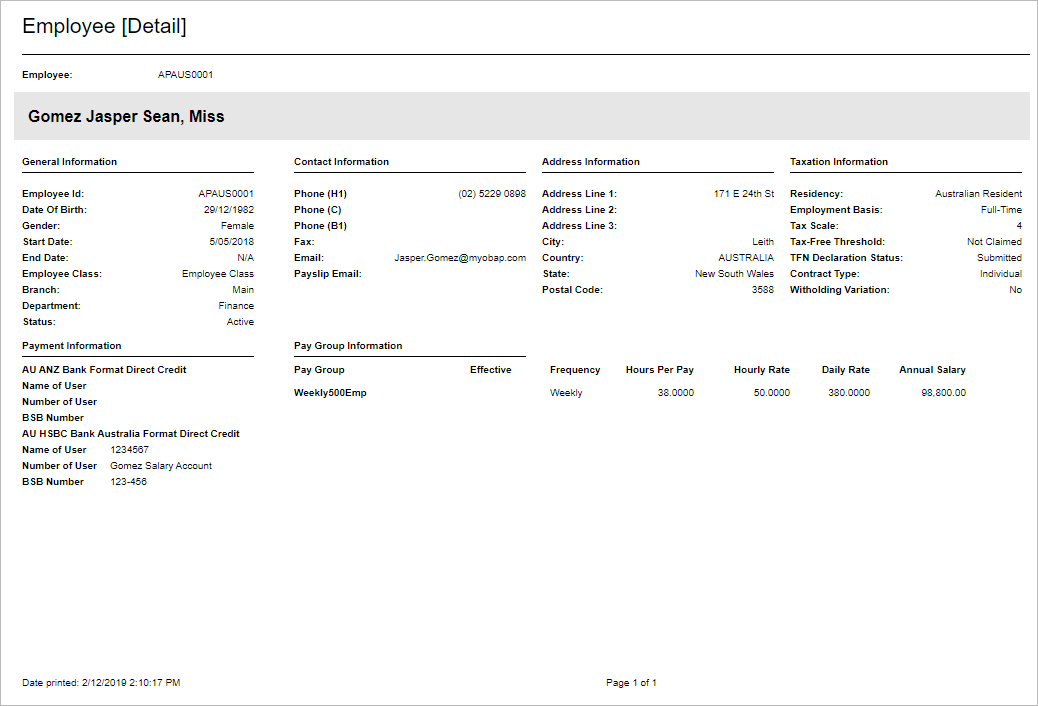
The data used by this report is also available on the Employee Detail Data screen (MPPP2312). Resolved IssuesThe following table details the issues that are addressed by this release. | UI Expand |
|---|
| | HTML Table |
|---|
| cellpadding | 10px |
|---|
| style | border: 1px solid #dddddd; border-collapse: collapse; |
|---|
| | Table Row (tr) |
|---|
| | Table Cell (td) |
|---|
| bgcolor | #f3f4f5 |
|---|
| width | 220px |
|---|
| style | border: 1px solid #dddddd; |
|---|
| Problem ID |
| Table Cell (td) |
|---|
| bgcolor | #f3f4f5 |
|---|
| style | border: 1px solid #dddddd; |
|---|
| Description |
|
| Table Row (tr) |
|---|
| | Table Cell (td) |
|---|
| style | border: 1px solid #dddddd; |
|---|
| 171796826098 171644856991 |
| Table Cell (td) |
|---|
| style | border: 1px solid #dddddd; |
|---|
| When setting up approval maps, the “Does Not Contain” condition was available on the Assignment and Approval Maps screen (EP205000), but not the Approval Maps screen (EP205015). This has been resolved. |
|
| Table Row (tr) |
|---|
| | Table Cell (td) |
|---|
| style | border: 1px solid #dddddd; |
|---|
| 150317848870 150264193211 |
| Table Cell (td) |
|---|
| style | border: 1px solid #dddddd; |
|---|
| Business Accounts that were set up as a supplier and a customer, incomplete supplier location settings could prevent changes being made to the customer location settings and vice versa. This has been resolved. |
|
| Table Row (tr) |
|---|
| | Table Cell (td) |
|---|
| style | border: 1px solid #dddddd; |
|---|
| 173036701557 172748594611 |
| Table Cell (td) |
|---|
| style | border: 1px solid #dddddd; |
|---|
| After using the Link To action on the Incoming screen (CO049000) to link an email to a supplier and saving, the email would not be linked. This has been resolved. |
|
|
|
| UI Expand |
|---|
| | HTML Table |
|---|
| cellpadding | 10px |
|---|
| style | border: 1px solid #dddddd; border-collapse: collapse; |
|---|
| | Table Row (tr) |
|---|
| | Table Cell (td) |
|---|
| bgcolor | #f3f4f5 |
|---|
| width | 220px |
|---|
| style | border: 1px solid #dddddd; |
|---|
| Problem ID |
| Table Cell (td) |
|---|
| bgcolor | #f3f4f5 |
|---|
| style | border: 1px solid #dddddd; |
|---|
| Description |
|
| Table Row (tr) |
|---|
| | Table Cell (td) |
|---|
| style | border: 1px solid #dddddd; |
|---|
| 172900904366 173650702021 173047739881 172970063955 172913381488 172913381301 172908438881 172897163531 172897163231 172897163211 172868715691 172775181461 |
| Table Cell (td) |
|---|
| style | border: 1px solid #dddddd; |
|---|
| GST was not added to AP bills that were created from purchase receipts. This has been resolved. |
|
| Table Row (tr) |
|---|
| | Table Cell (td) |
|---|
| style | border: 1px solid #dddddd; |
|---|
| 173755923640 173709229041 |
| Table Cell (td) |
|---|
| style | border: 1px solid #dddddd; |
|---|
| In some cases, when attempting to post a journal transaction an error message could appear, incorrectly stating that the branch and ledger were not associated with each other. This has been resolved. |
|
| Table Row (tr) |
|---|
| | Table Cell (td) |
|---|
| style | border: 1px solid #dddddd; |
|---|
| 172337575851 172204089681 |
| Table Cell (td) |
|---|
| style | border: 1px solid #dddddd; |
|---|
| After uploading a record to an Expense Claim when tax was inclusive, the tax total could be calculated incorrectly. This has been resolved. |
|
| Table Row (tr) |
|---|
| | Table Cell (td) |
|---|
| style | border: 1px solid #dddddd; |
|---|
| 162427875143 161779815291 |
| Table Cell (td) |
|---|
| style | border: 1px solid #dddddd; |
|---|
| In some cases, a Fixed Asset would not be shown on the FA Balance by GL Account Report after it was transferred. This has been resolved. |
|
| Table Row (tr) |
|---|
| | Table Cell (td) |
|---|
| style | border: 1px solid #dddddd; |
|---|
| 155051606441 154976521421 |
| Table Cell (td) |
|---|
| style | border: 1px solid #dddddd; |
|---|
| In some cases, journal transactions for the same AR payment could be duplicated in multiple batches. This has been resolved. |
|
| Table Row (tr) |
|---|
| | Table Cell (td) |
|---|
| style | border: 1px solid #dddddd; |
|---|
| 172272620344 171939358437 |
| Table Cell (td) |
|---|
| style | border: 1px solid #dddddd; |
|---|
| On the screen Payments and Applications screen (AR302000), payments and pre-payments that were applied and closed still appeared as open. This has been resolved. |
|
| Table Row (tr) |
|---|
| | Table Cell (td) |
|---|
| style | border: 1px solid #dddddd; |
|---|
| 172515907744 172497104291 |
| Table Cell (td) |
|---|
| style | border: 1px solid #dddddd; |
|---|
| In some cases, GL journals for released AR invoices did not appear in the batches they belonged to. This has been resolved. |
|
| Table Row (tr) |
|---|
| | Table Cell (td) |
|---|
| style | border: 1px solid #dddddd; |
|---|
| 172747620158 172740461521 |
| Table Cell (td) |
|---|
| style | border: 1px solid #dddddd; |
|---|
| In some cases, the error message “GL Error: Actual ledger must be defined in base currency only” could appear when attempting to release invoices and transactions. This has been resolved. |
|
|
|
| UI Expand |
|---|
| | HTML Table |
|---|
| cellpadding | 10px |
|---|
| style | border: 1px solid #dddddd; border-collapse: collapse; |
|---|
| | Table Row (tr) |
|---|
| | Table Cell (td) |
|---|
| bgcolor | #f3f4f5 |
|---|
| width | 220px |
|---|
| style | border: 1px solid #dddddd; |
|---|
| Problem ID |
| Table Cell (td) |
|---|
| bgcolor | #f3f4f5 |
|---|
| style | border: 1px solid #dddddd; |
|---|
| Description |
|
| Table Row (tr) |
|---|
| | Table Cell (td) |
|---|
| style | border: 1px solid #dddddd; |
|---|
| 156294308389 174016312151 174007881801 173994671711 173968236241 173934785701 173933629371 173920302561 173913530966 173913530961 173860024931 |
| Table Cell (td) |
|---|
| style | border: 1px solid #dddddd; |
|---|
| The error “Document Status is invalid for processing” could appear when releasing sales order invoices on the Invoices screen (SO303000). This has been resolved. |
|
| Table Row (tr) |
|---|
| | Table Cell (td) |
|---|
| style | border: 1px solid #dddddd; |
|---|
| 172928333120 173825317981 172914000261 |
| Table Cell (td) |
|---|
| style | border: 1px solid #dddddd; |
|---|
| In some cases, payments applied to an open sales order were incorrectly given the status “Closed”. This has been resolved. |
|
| Table Row (tr) |
|---|
| | Table Cell (td) |
|---|
| style | border: 1px solid #dddddd; |
|---|
| 172479826745 172472790091 |
| Table Cell (td) |
|---|
| style | border: 1px solid #dddddd; |
|---|
| This release improves system performance when processing sales orders and purchase orders. |
|
| Table Row (tr) |
|---|
| | Table Cell (td) |
|---|
| style | border: 1px solid #dddddd; |
|---|
| 172431760424 172430355321 |
| Table Cell (td) |
|---|
| style | border: 1px solid #dddddd; |
|---|
| The error message “Transfer from Sales-not-allowed location or Replenishment is required for item” when attempting to create a shipment from a sales order. This has been resolved. |
|
| Table Row (tr) |
|---|
| | Table Cell (td) |
|---|
| style | border: 1px solid #dddddd; |
|---|
| 172659605671 172310532361 |
| Table Cell (td) |
|---|
| style | border: 1px solid #dddddd; |
|---|
| After creating a new sales order using the Copy Order action on the Sales Orders screen (SO30100), the unit cost would remain unchanged, even if the item’s cost had been changed before the order was copied. This has been resolved. |
|
|
|
| UI Expand |
|---|
| | HTML Table |
|---|
| cellpadding | 10px |
|---|
| style | border: 1px solid #dddddd; border-collapse: collapse; |
|---|
| | Table Row (tr) |
|---|
| | Table Cell (td) |
|---|
| bgcolor | #f3f4f5 |
|---|
| width | 220px |
|---|
| style | border: 1px solid #dddddd; |
|---|
| Problem ID |
| Table Cell (td) |
|---|
| bgcolor | #f3f4f5 |
|---|
| style | border: 1px solid #dddddd; |
|---|
| Description |
|
| Table Row (tr) |
|---|
| | Table Cell (td) |
|---|
| style | border: 1px solid #dddddd; |
|---|
| 172527395938 172937193261 172675047021 172667822661 172541450011 172496822151 |
| Table Cell (td) |
|---|
| style | border: 1px solid #dddddd; |
|---|
| After a pay was reversed and a new pay created in its place, payslips for the new pay would show incorrect YTD figures. This has been resolved. |
|
| Table Row (tr) |
|---|
| | Table Cell (td) |
|---|
| style | border: 1px solid #dddddd; |
|---|
| 172643704871 172651903001 172618154051 172487848101 |
| Table Cell (td) |
|---|
| style | border: 1px solid #dddddd; |
|---|
| STP submissions on the Manage STP Submissions screen (MPPP5019) returned the error message "Response status code does not indicate success: 404 (Not Found).” This has been resolved. |
|
| Table Row (tr) |
|---|
| | Table Cell (td) |
|---|
| style | border: 1px solid #dddddd; |
|---|
| 172745710965 173077842321 172731464451 |
| Table Cell (td) |
|---|
| style | border: 1px solid #dddddd; |
|---|
| Generic inquiries based on the Entitlement Movement table returned no results, even though the table contained information. This has been resolved. |
|
| Table Row (tr) |
|---|
| | Table Cell (td) |
|---|
| style | border: 1px solid #dddddd; |
|---|
| 162250685338 161122885889 |
| Table Cell (td) |
|---|
| style | border: 1px solid #dddddd; |
|---|
| When terminating an employee, Unused Long Service Leave (LSL) was not calculating correctly when LSL was accruing in days. This has been resolved. |
|
| Table Row (tr) |
|---|
| | Table Cell (td) |
|---|
| style | border: 1px solid #dddddd; |
|---|
| - |
| Table Cell (td) |
|---|
| style | border: 1px solid #dddddd; |
|---|
| The Payroll module now supports terminations in ad hoc/one-off pay runs. In previous releases, when an employee termination was processed in an ad hoc pay run, the Termination screen’s calculations did not correctly handle the apportionment of entitlement accrual up to the termination date. This has been resolved; accrual on a pro rata basis is now not apportioned, as it is based on actual hours worked; only entitlement accrual on a full contract basis is now apportioned. |
|
| Table Row (tr) |
|---|
| | Table Cell (td) |
|---|
| style | border: 1px solid #dddddd; |
|---|
| - |
| Table Cell (td) |
|---|
| style | border: 1px solid #dddddd; |
|---|
| When terminating an employee, the “Other” option has been removed from the Reason dropdown. When processing a termination for a reason other than resignation, follow the recommendations in the “Non-Resignation Terminations” section of the “Terminations in Payroll” white paper. |
|
| Table Row (tr) |
|---|
| | Table Cell (td) |
|---|
| style | border: 1px solid #dddddd; |
|---|
| - |
| Table Cell (td) |
|---|
| style | border: 1px solid #dddddd; |
|---|
| In some cases, banking files generated by the Payroll module contained duplicated lines. This has been resolved. |
|
| Table Row (tr) |
|---|
| | Table Cell (td) |
|---|
| style | border: 1px solid #dddddd; |
|---|
| - |
| Table Cell (td) |
|---|
| style | border: 1px solid #dddddd; |
|---|
| Some Unused Annual Leave and Long Service Leave pay items that were used in terminations had the wrong GL Purpose applied. This has been resolved. |
|
|
|
| UI Expand |
|---|
| | HTML Table |
|---|
| cellpadding | 10px |
|---|
| style | border: 1px solid #dddddd; border-collapse: collapse; |
|---|
| | Table Row (tr) |
|---|
| | Table Cell (td) |
|---|
| bgcolor | #f3f4f5 |
|---|
| width | 220px |
|---|
| style | border: 1px solid #dddddd; |
|---|
| Problem ID |
| Table Cell (td) |
|---|
| bgcolor | #f3f4f5 |
|---|
| style | border: 1px solid #dddddd; |
|---|
| Description |
|
| Table Row (tr) |
|---|
| | Table Cell (td) |
|---|
| style | border: 1px solid #dddddd; |
|---|
| 162580313666 168110360091 167688030681 165962082891 162190812861 |
| Table Cell (td) |
|---|
| style | border: 1px solid #dddddd; |
|---|
| On the MYOB Advanced login screen, tenants did not always appear in the order set up on the Tenants screen (SM203530). This has been resolved. |
|
| Table Row (tr) |
|---|
| | Table Cell (td) |
|---|
| style | border: 1px solid #dddddd; |
|---|
| 165953963807 165313711431 |
| Table Cell (td) |
|---|
| style | border: 1px solid #dddddd; |
|---|
| The Currency Rates History screen had the title “Sales Activities”. This has been resolved. |
|
| Table Row (tr) |
|---|
| | Table Cell (td) |
|---|
| style | border: 1px solid #dddddd; |
|---|
| 173108885333 173041047841 |
| Table Cell (td) |
|---|
| style | border: 1px solid #dddddd; |
|---|
| A duplicate key error could occur when logging in as a Partner Support user. This has been resolved. |
|
| Table Row (tr) |
|---|
| | Table Cell (td) |
|---|
| style | border: 1px solid #dddddd; |
|---|
| - |
| Table Cell (td) |
|---|
| style | border: 1px solid #dddddd; |
|---|
| In some cases, attempts to upgrade systems to 2019.1 failed with a duplicate entry error. This has been resolved. |
|
| Table Row (tr) |
|---|
| | Table Cell (td) |
|---|
| style | border: 1px solid #dddddd; |
|---|
| - |
| Table Cell (td) |
|---|
| style | border: 1px solid #dddddd; |
|---|
| The “Full User (API)” licence type has been renamed to “Limited API” for consistency with other MYOB Advanced documentation. |
|
| Table Row (tr) |
|---|
| | Table Cell (td) |
|---|
| style | border: 1px solid #dddddd; |
|---|
| - |
| Table Cell (td) |
|---|
| style | border: 1px solid #dddddd; |
|---|
| The following screens would display errors when a user tried to open them, even if the “Automated Warehouse Operations” feature was enabled: - Storage Lookup
- Item Lookup
- Scan and Issue
- Scan and Receive
- Scan and Transfer
This has been resolved. |
|
| Table Row (tr) |
|---|
| | Table Cell (td) |
|---|
| style | border: 1px solid #dddddd; |
|---|
| - |
| Table Cell (td) |
|---|
| style | border: 1px solid #dddddd; |
|---|
| When adding a side panel to a Generic Inquiry, the option to select a custom icon for the panel was missing. This has been resolved. |
|
| Table Row (tr) |
|---|
| | Table Cell (td) |
|---|
| style | border: 1px solid #dddddd; |
|---|
| - |
| Table Cell (td) |
|---|
| style | border: 1px solid #dddddd; |
|---|
| When creating a new Payment Method, the Means of Payment dropdown contained a “Credit Card” option, which is not currently supported. This option has been removed. |
|
|
|
| UI Expand |
|---|
| | HTML Table |
|---|
| cellpadding | 10px |
|---|
| style | border: 1px solid #dddddd; border-collapse: collapse; |
|---|
| | Table Row (tr) |
|---|
| | Table Cell (td) |
|---|
| bgcolor | #f3f4f5 |
|---|
| width | 220px |
|---|
| style | border: 1px solid #dddddd; |
|---|
| Problem ID |
| Table Cell (td) |
|---|
| bgcolor | #f3f4f5 |
|---|
| style | border: 1px solid #dddddd; |
|---|
| Description |
|
| Table Row (tr) |
|---|
| | Table Cell (td) |
|---|
| style | border: 1px solid #dddddd; |
|---|
| 172834621422 172832893801 |
| Table Cell (td) |
|---|
| style | border: 1px solid #dddddd; |
|---|
| Errors were returned by the CustomerLocation Web Service Endpoint. This has been resolved. |
|
|
|
| 