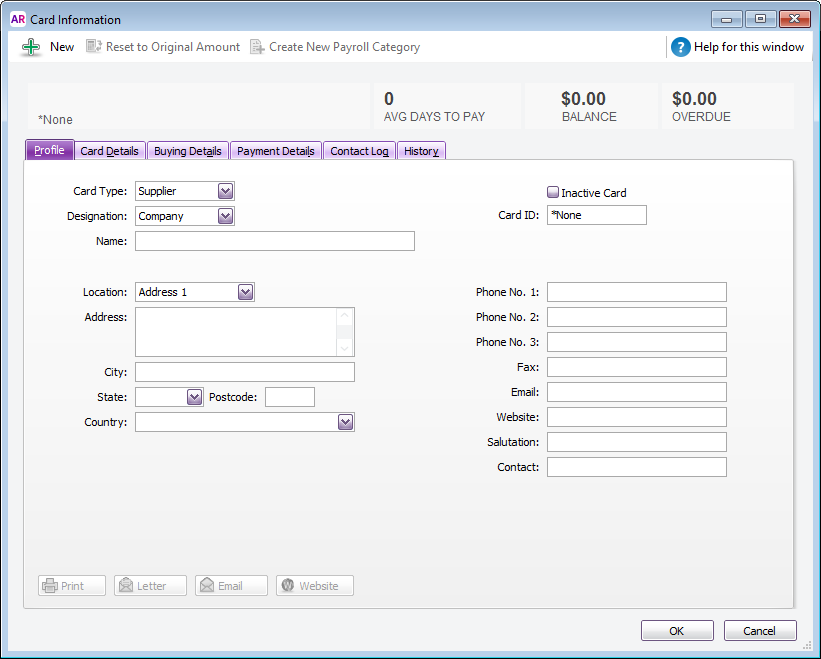
Before you can enter a purchase in AccountRight, you'll need to add the supplier into AccountRight. A supplier's details are stored in a supplier card, and they're easy to create. If you're using AccountRight Basics, some parts of the supplier card shown below won't be available. | UI Text Box |
|---|
| Import supplier details If you have supplier details in another program, like a spreadsheet, use an import template to bring these details into AccountRight. |
| UI Expand |
|---|
| expanded | true |
|---|
| title | To create a supplier card |
|---|
| To create a supplier card- Go to the Card File command centre and click Cards List. The Cards List window appears.
- Click New. The Card Information window appears.
 - For the Card Type, select Supplier.
- For the Designation, select Company or Individual (is it a business or a person?). This selection determines whether you'll enter a company name, or first and last name.
- Enter the name of the supplier (business name or first/last names).
- If you use codes to identify suppliers, enter the supplier's code in the Card ID field. For more information, see Card identification codes.
Enter the supplier's contact details (address, phone, email, etc.). If the supplier has additional contact details, such as a second address, email, contact, etc., select Address 2 from the Location list and enter the additional details. This lets you store up to 5 sets of contact details for each supplier. Click the Card Details tab. | On this tab you can... | To learn more, see... |
|---|
| insert a picture | Card pictures | | assign identifiers to the card | Identifiers | | choose from a list custom attributes that you've set up | Custom lists | | record certain information about your suppliers, but can’t find a suitable card field for it | Custom card fields |
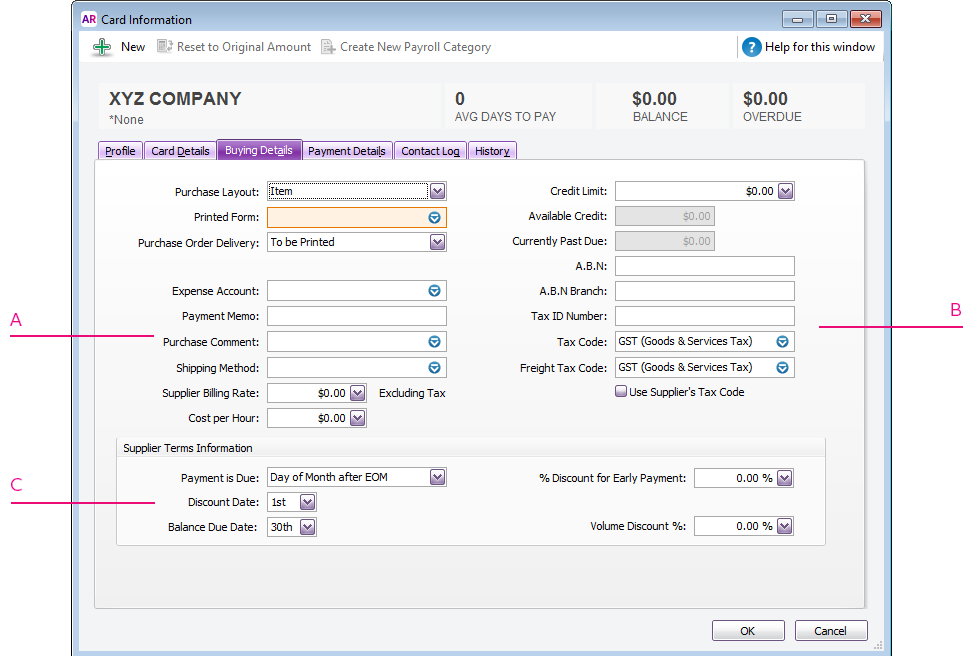
(Not Basics) Click the Buying Details tab.
 | A | Buying information | The selections you make here will be used, by default, on quotes, orders and bills that you create for this supplier. You can override these selections when entering a purchase. To learn more about each field, hover your mouse over it to display the field help (you'll need field help turned on, go to Help > Show Field Help). 
| | B | Tax /GST information | Enter the supplier’s tax/GST information here. (Australia only, support subscription required) When entering an ABN, if you're connected to the internet the ABN will be checked with the Australian Business Register. If the number is valid, a green icon will appear next to the ABN field. If there’s an issue with the number, the icon will be yellow. Hover over the icon to get all the details. (Australia only) If you've set up reportable taxable payments and this supplier's payments are reportable, select the Report Taxable Payments option and enter their ABN. If the supplier’s tax/GST status takes precedence over that of the item or service being sold, click the Use Supplier’s Tax Code (Australia) or Use Supplier’s GST Code (New Zealand) option. This tax code will override the item’s tax code in an item purchase, and the allocation account’s tax code in a non-item purchase. See Setting up tax codes (Australia) or Setting up GST codes (New Zealand). | | C | Credit terms | The credit terms entered here are used as the default terms for all purchases from the supplier, but can be changed at any time. If field help is enabled (Help > Show Field Help), hover your mouse over a field to learn more about it. |
- Click the Payment Details tab to enter your supplier’s bank account details, so you can pay them electronically. You can also specify how you prefer to send remittance advices to the supplier - by print or email (not Basics). Learn more about recording supplier bank details.
- (Optional, Not Basics) Click the History tab and enter the Supplier Since date.
- Click OK to save the supplier's details.
|
| UI Text Box |
|---|
| View your supplier list Run one of the Card List reports to display your suppliers (Reports menu > Index to Reports > Card tab > Card List [Summary] or Card List [Detail] report). Alternatively, display your suppliers on the Cards List window, right-click the list and choose Copy List to Clipboard - ready to be pasted into Excel or any other document. |
|