Your company file data can be exported to a tab or comma-separated text file: - Tab-separated files contain fields that are separated by tab characters. For example, if a tab character appears between Brewster and 300 Roundhill Drive in a file of customer information, the file counts Brewster and 300 Roundhill Drive as two separate fields in a record. Tab-separated files are a common export format in spreadsheet programs.
- Comma-separated files contain records that are separated by commas. For example, if a comma appears between Brewster and 300 Roundhill Drive in a file of customer information, the file counts Brewster and 300 Roundhill Drive as two separate fields in a record. Comma-separated files are often used by popular database programs.
If you’re exporting data for use in another company file, you can choose either comma-separated or tab-separated formats. Note that comma-separated is automatically selected during import and export processes. You can export customised forms from one company file to another. For more information, see Exporting and importing personalised forms. Exporting to Accountants OfficeIf your accountant uses MYOB Accountants Office, you can export financial information (including your accounts list, journal entries, BAS information [Australia only], sales and purchases) directly to MYOB Accountants Office as a tab-separated text file. This file can be sent by email or saved to disk. For more information, see Provide information to your accountant. | UI Text Box |
|---|
| Share your data online If you store your company file online, you can share your data with any user you've set up to access your online company file. For example, your accountant can access your company file and view journal entries without you having to export them. For more information about setting up access to your online company file, see Set up user access. |
| UI Expand |
|---|
| expanded | true |
|---|
| title | To export data |
|---|
| - Go to the File > Import/Export Assistant.
- In the Import and Export Assistant window select Export data and click Next.
Select the type of data you want to export from the Export list. If additional options appear in this window, you can complete them to filter the data that will be exported. Click Next. | UI Text Box |
|---|
| Exporting timesheets (Plus and Premier, Australia only)
When you export timesheets, only the entries that don’t have activity slips associated with them are included. You must export activity slips to complete the process. |
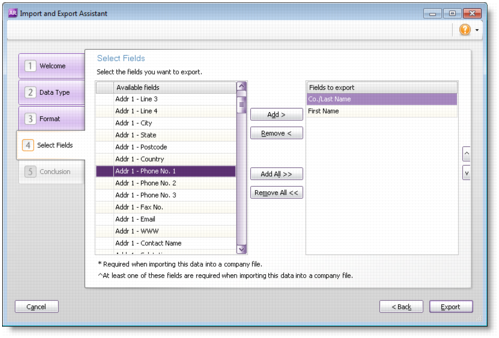
Select whether the data in the exported file should be separated using tabs or commas, and whether the first row in the file should display the field headers. Click Next. Choose the fields you want to export and the order in which you want to export them. To do this, click on the first field you want to export in the Available fields column and then click Add. The field name will appear in the Fields to export column.
 | UI Text Box |
|---|
| Required fields for importing and exporting data When you import or export data, certain data fields must have valid matching fields in the target software. If a field has an asterisk (*) next to it, you must select a matching field to it. If two fields have a caret (^) next to them, you must select a matching field to one or both fields. |
Repeat the previous step for each field you want to export. If you want to remove a field’s name from the Fields to export column, click its name and then click Remove. If you want to export all the fields, click Add All. If you want to change the order in which the fields are exported, select the field you want to move and then click the up or down buttons. When you've selected the fields, click Export. In the Save As window that appears, enter a name and location for the export file and click Save. The data is exported and saved as a text file. When the data has finished exporting, click Close.
|
|