New Zealand only MYOB Business brings together all the information you need to prepare your GST return in one place without you having to run multiple reports. This includes GST collected and paid for all GST codes and the transactions the GST codes were assigned to. You even get to see transactions that were added, edited or deleted since the last return period was completed. These you can add to your current return as late claims so that your end-of-year GST reconciliation balances. You'll first need to to check your GST settings and then use the information in the GST return report to prepare your return. We'll step you through what you need to do. | UI Text Box |
|---|
| You'll be accessing the GST return and GST report as part of a guided GST return process, rather than the separate reports of the same name available in the Reports area. |
Once everything looks good, you can use the Prepare GST return function to file your GST return straight from MYOB Business. Alternatively, you can use the information from the GST return report and Late claims report to complete and lodge your GST return electronically or by post. See the Inland Revenue website for more information about these options. | Checklist |
|---|
| We recommend that you: |
| UI Expand |
|---|
| title | Complete your GST return report |
|---|
| Complete your GST return reportYou'll now be guided to complete your GST return report, using detailed information about your business's GST liability (how much GST you've collected and paid). This information is used when you lodge your GST Return. | UI Text Box |
|---|
| You'll be accessing the GST return and GST report as part of a guided GST return process, rather than the separate reports of the same name available in the Reports area. |
Go to the Reports menu > GST return. Click Create new. If you have a previous GST return in progress and you want to complete it, click Edit existing GST return in the message that appears to open it and complete it, or click Create new to start a new one. - Click GST return.
In the GST return period section, you can see what period you're reporting GST for.
If: - this is your first return, you can choose the GST return period you'd like to report on
- you've previously completed a return, you won't be able to change the GST return period. To carry over late or edited transactions, reports need to be done every period in order. You can't skip the current period to a future period. If you don’t have any GST to report this period, you’ll still need to finalise this report to move to the next period.
Check that your business details are correct. These details are pre-filled from your MYOB Business data. Check if you have a Lock date. A lock date prevents anyone from inadvertently creating, editing or deleting transactions prior to a date you specify. If you need to add or edit any transactions, you might need to remove the lock date. Find out more about lock dates. - Click Next to open the GST report.
Use the GST report to see the amount of GST collected and paid for each of your GST codes and to confirm that the right GST code has been assigned to transactions. To: - see all the transactions that make up the totals in the report, click the dropdown arrow next to each GST code
- view transactions on all GST codes, click Expand all
- view and edit a transaction's details, click its ID No.
If you need to edit a transaction:
- Click Cancel and exit the GST return report.
- If required, remove the lock date on the period so that you can edit the transaction.
- Once you've made your changes, go to the Reports menu > GST return and click Create new to restart your return.
| UI Text Box |
|---|
| In a future release, you'll be able to refresh the GST return report when you make a change to a transaction. |
Click Next to open the Late claims report to see if there were any transactions added, edited or deleted in the previous GST return period. Click Export and choose to export the Late claims report as a PDF or Excel file. | UI Text Box |
|---|
| You'll need to manually add any late claims to your return. In the a future release, you'll be able to automatically add them. |
Click Next to open the Finalise page. This shows the totals you need to enter in each field of your GST return. The amount you need to pay IR (a positive figure), or are to be refunded by IR (a negative figure), appears under Amount owed. Click Finalise GST return. Your completed GST return is listed with any previous returns:
 You can now file your GST return with IR. To prevent any changes to transactions in the period you've just reported, set a lock date.
|
| UI Expand |
|---|
| title | File your GST return |
|---|
| File your GST return- Go to the Accounting menu and choose Prepare GST return.
- In the File with MYOB section, click Get started.
If prompted, enter your MYOB account details. To continue working on an existing return, click the date listed in the Period end column, then skip to step 6. To add a new return: - Click Add return. The Return details page appears.
Enter your IRD/GST number and select your Return type. If prompted, enter your myIR user ID and password. Enter your GST output tax adjustment account and GST input tax adjustment account. Ensure these are not both the same account. Select your GST taxable period, Period end and Accounting basis. | UI Text Box |
|---|
| Can't select a month in Period end? If you've prepared a GST return for a previous period, that period won't appear in the Period end drop down list. |
- Select whether you want to include year-end adjustments in the return.
- Click Create. The return appears, pre-filled with the amounts that have been transferred from MYOB.
- Review the amounts and click Validate to check the formatting. Make any changes that are required. Refer to the Late claims report you exported in 'Complete your GST return', above, to check if you need to include late claims.
- (Optional) To save your changes (if you want to complete the return later) click Save.
- Click Prepare to file, and if all details are correct, click File. A message appears requiring you to confirm that you want to file the return with Inland Revenue.
Click Confirm. Click File to file the return with Inland Revenue. The GST lodgement page reappears showing the submission status of the return.
Once you've lodged your return, pay any outstanding amounts to the IR. After you've paid your GST or received your refund, you'll need to record the payment in MYOB. |
| UI Expand |
|---|
| title | View a completed GST return |
|---|
| View a completed GST return- Go to the Reports menu > GST return. Any completed returns are listed in the GST returns section:
- If required, filter the list of GST returns by Financial year.
In the GST returns section, click the GST return period of a return to see its details.
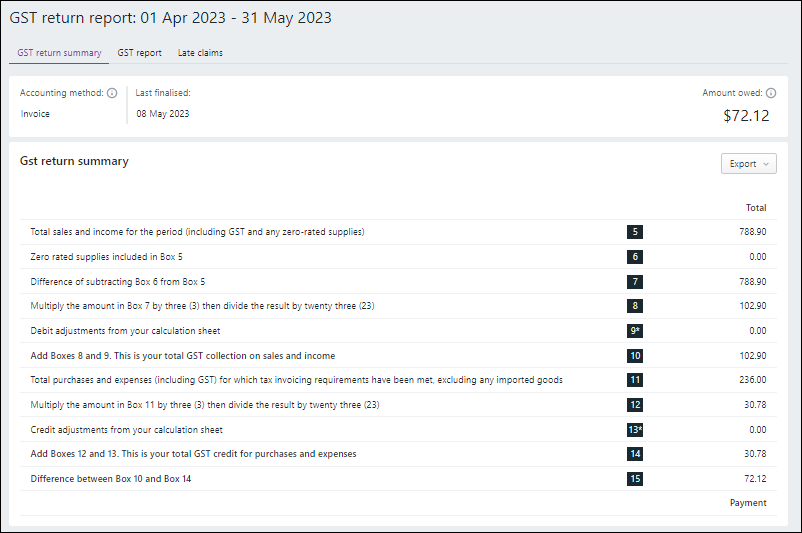
- The GST return summary tab lists the totals you need to enter in each field of your GST return. The amount you need to pay IR (a positive figure), or are to be refunded by IR (a negative figure), appears under Amount owed.
- The GST report tab shows the totals of sales, income, purchases and expenses for the report period. Click Expand all to see the transactions that produced these totals. Click an ID No. to view the details of transactions.
- The Late claims tab shows any transactions added, edited or deleted in the previous GST return period.
- Click Export and choose to export a report as a PDF or Excel file.
|
|

 Yes
Yes
 No
No
 Thanks for your feedback.