
- Created by admin, last modified by BrianQ on Nov 29, 2017
This information applies to MYOB AccountRight version 19. For later versions, see our help centre.
https://help.myob.com/wiki/x/tACc
ANSWER ID:9062
This support note describes how to convert to MYOB AccountRight from other accounting software mid-year. This ensures your financial figures are accurate for the entire financial year. If you've started using the Payroll module after the payroll year has commenced, see Commencing payroll mid year (Australia only).
Example
Brett Easier is the bookkeeper for a panel beater's shop. For the past 8 years Brett has prepared all invoicing and books manually. Brett is ready to move onto a computerised accounting system, bringing with him the first 7 months' details from his manual accounting system.
Setup your new company file using the New Company File Assistant as described in the AccountRight help (Australia | New Zealand). As Brett is moving onto AccountRight in the month of February, make the Conversion Month February. Be sure the correct conversion month is selected.
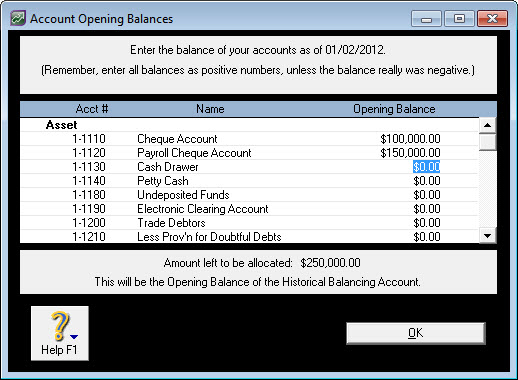
- In your MYOB accounting software, go to the Setup menu and choose Balances then choose Account Opening Balances. The Account Opening Balances window appears.
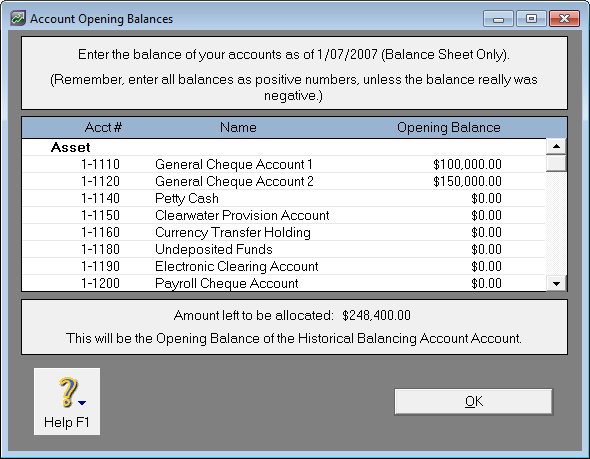
- In the Opening Balances column, click an account's balance and overtype with the correct opening balance.
- Repeat for all relevant accounts.
- Click OK.
- As the conversion month is not the first month of the financial year, AccountRight will allow you to enter figures into Income, Cost of Sales, Expense, Other Income, and Other Expense categories. If the conversion month was the first month of the financial year, the ability to place amounts into these accounts would not be available.
- When running reports, these opening balances will be reported at the date of your conversion month.
To do this, after entering you opening balances at Task 3 above, we break that balance up into the monthly totals in the account history.
- Go to the Accounts command centre and click Accounts List.
- Click the zoom arrow next to the applicable account.
- Click the History tab as shown below. End of month balances for all Profit & Loss and Balance Sheet items can be entered here. Your software will allow you to insert end of month balances for accounts in the current financial year except for the month prior to conversion. The month prior to the conversion month obtains its balances via the Account Opening Balances window.
- Click OK.
The balance of Profit & Loss accounts in the month prior to the conversion month equals the account opening balance discounted by any amounts placed in the preceeding months balances for the current financial year.
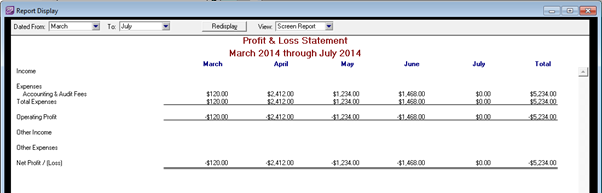
As shown in the example below, we have entered an opening value for the Expense Account 6-1000 as $5234. This is shown in the Account History as the final balance for June.

As we enter values into May, April and March, the value of June is automatically reduced.

Using the multi-period Profit & Loss report on this account, you can now report on the values for each month, where previously you would only have had 1 value of $5234 showing for June.
Your software also allows the user to enter Account Historical Balances up to 12 months prior to the current financial year. By entering historical data prior to the current financial year, This Year versus Last Year Balance Sheet and Profit and Loss reports will become available.
Start by setting up your items in AccountRight. See the AccountRight help for details (Australia | New Zealand).
You can then enter historical sales information for your items.
- Go to the Inventory command centre and click Items List.
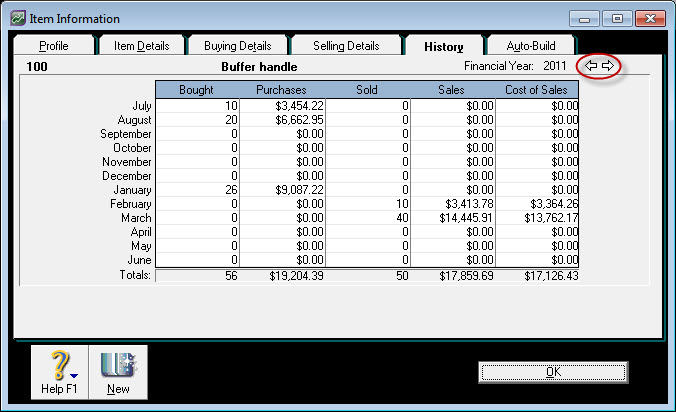
- Click the zoom arrow next to the applicable item.
- Click the History tab.
- Enter sales information for the applicable year and period. Use the back and forward arrows to navigate between financial years as highlighted in the example below.
- Click OK. See example window below.
Start by setting up your customers and suppliers in AccountRight. See the AccountRight help for details (Australia | New Zealand).
You can then use the Easy Setup Assistant to enter your historical sales and purchase information.
Historical sales are the sales that haven't been paid in full as of the first day of your conversion month. This will represent your open receivables.
Historical purchases are the purchases that haven't been paid in full as of the first day of your conversion month. This will represent your open payables.
- Go to the Setup menu and choose Easy Setuip Assistant.
- Click Sales.
- From the options on the left, click Historical Sales.
- Enter your histoical information.
- When you're done, click Next then click Close.
- Click Purchases.
- From the options on the left, click Historical Purchases.
- Enter your historical information.
- When you're done, click Next then click Close.