- Created by BrianQ, last modified by AdrianC on Jan 20, 2017
You are viewing an old version of this page. View the current version.
Compare with Current View Page History
« Previous Version 27 Next »
https://help.myob.com/wiki/x/7RLq
How satisfied are you with our online help?*
Just these help pages, not phone support or the product itself
Why did you give this rating?
Anything else you want to tell us about the help?
Most businesses send statements to customers who have outstanding balances at the end of a month.
Here's how to print or email (or reprint or resend) statements.
- Go to the Sales command centre and click Print/Email Statements. The Review Statements Before Delivery window appears.
- Click the To Be Printed tab.
- In the Statement Type field, select the type of statement you want to print.
- Invoice statements list all invoices aged as at a specified date.
- Activity statements list all sales invoices, payments and orders with a customer deposit within a specified date range. Activity statements include a running account balance.
- Specify the statement period.
- If you selected Invoice as the statement type, enter an ageing date to display invoices outstanding as at that date.
If you want to include only invoices recorded up to the statement date, select the Only include invoices up to Statement Date option. - If you selected Activity as the statement type, enter the statement date range in the From and To fields.
- If you selected Invoice as the statement type, enter an ageing date to display invoices outstanding as at that date.
- Type the number of statements you want to print per customer in the Print field.
- If you want to filter the statement information or change the type of form the statement will be printed on, click Advanced Filters and make your selections. For more information, see Advanced batch filters.
- Click in the select column (
 ) next to the customers you're printing statements for.
 - Click Print. If you need to reprint a statement, repeat the above steps.
Having trouble printing? See Printing from AccountRight.
- Go to the Sales command centre and click Print/Email Statements. The Review Statements Before Delivery window appears.
- Click the To Be Emailed tab.
- In the Statement Type field, select the type of statement you want to email.
- Invoice statements list all invoices aged as at a specified date.
- Activity statements list all sales invoices, payments and orders with a customer deposit for a specified date range. Activity statements include a running account balance.
- Specify the statement period.
- If you selected Invoice as the statement type, enter an ageing date to display invoices outstanding as at that date.
If you want to include only invoices recorded up to the statement date, select the Only include invoices up to Statement Date option. - If you selected Activity as the statement type, enter the statement date range in the From and To fields.
- If you selected Invoice as the statement type, enter an ageing date to display invoices outstanding as at that date.
- If you want to filter the customer list or select a different statement form, click Advanced Filters and make your selections. For more information, see Advanced batch filters.
- Click in the select column (
 ) next to the customers to whom you want to email statements.
 - If you want to change a customer’s email address, select the customer’s name and then select another address from the Email Address list or type a different address in the Email Address field at the top of the window.
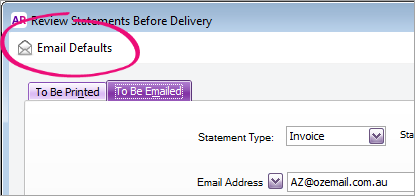
A message appears asking if you'd like to update the employee's card. Click Yes if you want to update it or No if this is a temporary change. - Type the subject and message of the email or accept the default subject and message. If you want to change the default message, click Email Defaults and make the changes as appropriate.
- Click Send Email. If you need to resend a statement, repeat the above steps.
Having trouble emailing? See Sending emails.
FAQs
You can change the default Subject and Message for your emails in the Email Defaults window. If you have the Review Statements Before Delivery window open, click Email Defaults (top left corner). You can also open this window by going to Setup > Preferences > Reports & Forms tab > Emails.

To change the form which is used when emailing, see Set the default forms to use when emailing or printing.
If you send emails directly from AccountRight, see Set up AccountRight to send emails.
If your emails are sent through Microsoft Outlook, see Sending emails using Microsoft Outlook.
If you send emails directly from AccountRight you can track the email delivery status. If you send emails through Microsoft Outlook, there are features in Outlook which can help track email delivery and receipt. Refer to the help in Outlook for more details.
To save statements to disk you'll need third-party software to "print" (save) the statements as PDF documents. Windows 10 has a built-in Print as a PDF option which is available when printing, or you can use a program like Adobe Acrobat or CutePDF to provide the ability to print (save) documents as PDFs.
Once you have the ability to print to PDF, when printing statements in AccountRight and you're prompted to choose a printer, choose the PDF printer from the list of printers. This saves the statements as PDF documents.
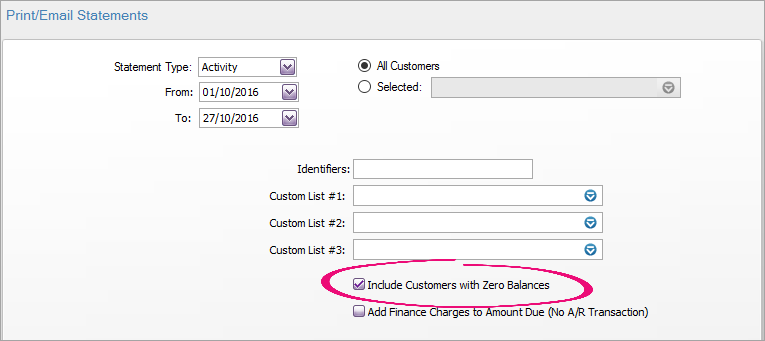
To include statements for customers with zero balances, click Advanced Filters on the Review Statements Before Delivery window and select the option Include Customers with Zero Balances.


 Yes
Yes
 No
No
 Thanks for your feedback.