
- Created by admin, last modified by AdrianC on Jun 14, 2018
You are viewing an old version of this page. View the current version.
Compare with Current View Page History
« Previous Version 28 Next »
https://help.myob.com/wiki/x/Z7nMAQ
How satisfied are you with our online help?*
Just these help pages, not phone support or the product itself
Why did you give this rating?
Anything else you want to tell us about the help?
You can use quotes to provide your customers with a price that’s guaranteed for a specified period. When the customer accepts the quote, you can turn it into an invoice in just one click.
To add a personal touch to your quotes, see Change the look of your invoice and quotes.
To create a quote
- Go to the Sales menu and choose Quotes. The Quotes page appears.
- Click Create quote.
- In the Customer field, choose a customer, or add one by clicking Add customer and entering their details, then clicking Save.
- If you want, edit the number in the Quote number field.
Note that if you change the quote number, future quotes’ numbering will continue on from this new quote number. - Check the date in the Date of issue field.
- Check the Expiration terms and Expired date. This is the length of time the quote is valid for, and the date on which it expires.
- Check the status:
- Open—the quote has not yet been accepted or declined
- Accepted—the quote has been accepted by the customer
- Declined—the quote has been declined by the customer.
- If you account for tax/GST, choose an option from the Amounts are list.
- If you want the prices to include tax/GST, choose Tax/GST inclusive. Note that this is the default tax preference.
- If you want the prices to exclude tax/GST, choose Tax/GST exclusive.
Enter the items you’re quoting In the Item column, choose the item you want to quote, or add one by clicking Add item and entering the item details, then clicking Save.
The item Description, Allocate to, Unit price and Tax rate/GST type appear, based on the details you entered when you created the item.
The Qty and Total also appear. The default quantity is 1. You can change this in the Qty field. If you want, you can also change the type of units to use for this item in the Units column.To remove an item from the list, click the delete icon (
 ) to the right of the item line.
- Repeat from step 9 for each item you want to include on the quote. The totals are calculated at the bottom of the quote:
- Subtotal—the total for the items added to the invoice
- Tax/GST—the amount of tax/GST applied to the invoice
- Total—the subtotal amount plus the tax/GST amount
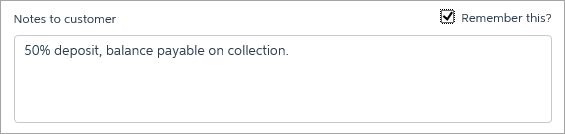
If you want to add a note to the customer, enter it in the Notes to customer box. This will appear on the quote you send to the customer. For example, you could use this area to add additional details about how to accept the quote.
Need to remove notes?
To remove the notes from this quote, delete the text in the Notes to customer box. To remove the notes from all future quotes, also select the Remember this option.
Complete the quote- If you want to:
- save the quote without sending it, click Save. The Quotes page reappears, showing the quote without a tick in the Sent column.
- print the quote and send it to the customer, click Print. The quote appears as a PDF that you can print or save.
- email the quote to your customer, click Email. If an email address hasn't been recorded in the contact's record, enter the customer’s email address, edit the text in the Subject and Message fields if required, and click Send quote.
Email address not showing?
There's a known issue for Internet Explorer and Microsoft Edge users where the email address isn't showing in the To field even if there's an email address recorded for the contact. We're working to fix this.

You'll still be able to click Send quote and the email will send to the email address recorded for the contact. Alternatively, you can use a different web browser (such as Google Chrome or Mozilla Firefox) and the email address will display in the To field.
To view quotes
You can view a list of your quotes, the status of each, and whether it has been sent.
- Go to the Sales menu and choose Quotes. The Quotes page appears.
- To sort the list, click a column heading.
- To view the details of a quote, click the quote number or customer. You can then create an invoice from the quote, print, email or change the quote.
To change the status of a quote
When a customer accepts or declines a quote, you can change its status by editing the quote and changing the selection in the Status field.
- On the Quotes page, click to open the quote you want to change the status of. The Quote page appears, showing the quote details.
- In the Status field, choose the new status for the quote (Declined or Accepted).

- Click Save. The quote is saved and the status is updated.
To turn a quote into an invoice
When a customer decides to buy the items you’ve quoted, you can quickly turn a quote into an invoice, without needing to re-enter the items.
- On the Quotes page, click the quote you want to turn into an invoice. The Quote page appears, showing the quote details.
- Click Create invoice. The Invoice page appears, containing the items and prices from the quote.
- Make any required changes to the invoice, and click Save, or click Email or Print to send it to the customer.
For more information on entering invoices, see Creating, editing and deleting invoices.
To delete a quote
- Go to the Sales menu and choose Quotes. The Quotes page appears.
- Click to open the quote to be deleted. The quote is displayed.
- Click Delete.
- Click Yes to the confirmation message.
Use notes for additional info
If you want to include additional info on your quotes, such as discount or deposit conditions, use the Notes to customer box when creating the quote. If you want the same info on all future quotes, select the Remember this option.
FAQs
Why can't I click Save, Email or Print when entering a quote?
If the buttons are inactive (they're a dull colour and a red circle appears when you hover over it) it means some required information is missing from the quote.

Make sure a customer is selected and the details of the quote are entered, then the buttons will be clickable.
How do I change the default email message?
This is set in your invoice and quote settings. See Set up default invoice and quote emails.
 Yes
Yes
 No
No
 Thanks for your feedback.