
- Created by RonT, last modified by BrianQ on Jan 08, 2019
You are viewing an old version of this page. View the current version.
Compare with Current View Page History
« Previous Version 59 Next »
https://help.myob.com/wiki/x/LqM6Ag
How satisfied are you with our online help?*
Just these help pages, not phone support or the product itself
Why did you give this rating?
Anything else you want to tell us about the help?
If you're planning on upgrading your file, you can get used to your new software by using AccountRight's sample company file, Clearwater.
There's 4 files to choose from (AccountRight Basics, Standard, Plus and Premier) so you can play with all AccountRight's features. This is handy if you're thinking of upgrading, or just want to try out a new feature—like multi-currency.
First, you'll need to download AccountRight then open the sample file.
Use Google Chrome to download the file (download Chrome here). We've seen cases where other browsers, like Internet Explorer, can affect the file extension of downloaded files. What browser am I currently using?
Download the latest version.

Click the installer file you've saved to your computer to install the new AccountRight version.
If you need more information about installing AccountRight, see Install AccountRight .
To open a sample company file
- Display AccountRight's Welcome window by either:
- starting AccountRight from the desktop shortcut, or
- in your company file, go to the File menu and choose Open, then click Cancel.
- On the Welcome window, click Explore a sample company. The Library Browser window appears.

- In the Samples folder, open the folder for your country (AU or NZ).
- Open the folder for the AccountRight version you're using, such as 2018.3. The sample company files for that version are displayed. If no sample files are listed, uninstall then reinstall AccountRight.
- Click a sample file then click Open. If you're interested in trying multi-currency, choose the Clearwater_Premier sample file.
- At the Sign in window, click OK (by default, the Administrator user doesn't have a password).

That's it - you're in. Play, explore and learn. If you get stuck, press F1 on your keyboard for help.
Some things to try
The sample company file is perfect for exploring new features as well as revealing what's different compared to v19. Here's a few things to try:
You might have heard how bank feeds speed up data entry by bringing in transactions straight from your bank account. Take a look at what bank feed data looks like in the sample company file. Learn how matching works and how to create rules for regular transactions.
Go to the Banking command centre and click Bank Feeds. The Bank Feeds window appears.
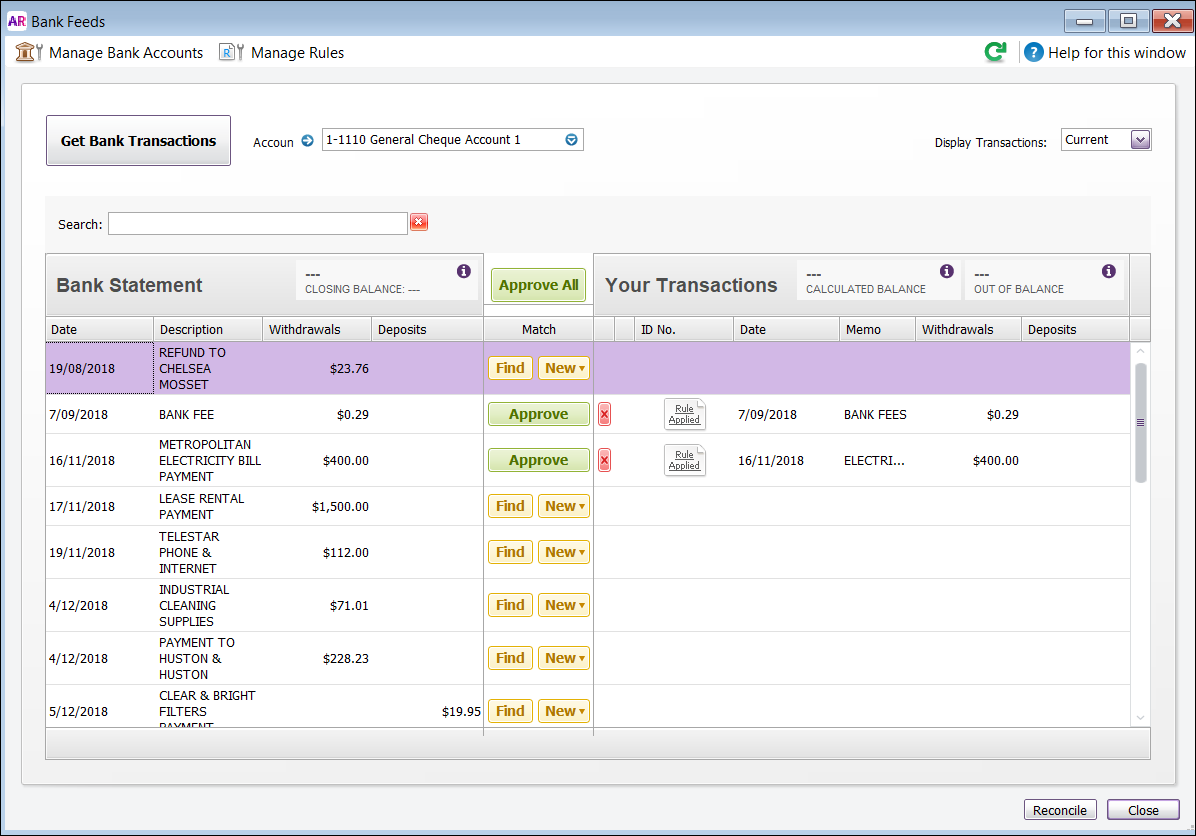
Have a go at:
- approving matched transactions
- finding an AccountRight transaction to match the bank feed transaction
- creating a new transaction to match the bank feed transaction
- setting up a rule to to automatically prepare matching transactions in AccountRight.
See how bank feeds matching works.
Like what you see? Learn how to set up bank feeds in your company file.
You add users to your company file differently in the new AccountRight.
User access is now controlled from the Setup menu, instead of the Preferences window.
Go to the Setup menu and choose User Access. In the User Access window that appears, you can add new users or modify or delete existing ones.

See how to:
- add a user to a file
- set up roles to control access to windows and functions in AccountRight.
Note that the Clearwater sample file is an offline file. For online files you'll need to invite users to use the file.
The way you enter a sale in the new AccountRight is not greatly different to AccountRight Classic – you still go the Sales command centre and click Enter Sale – but there's a few things to note.
Changed button positions
Previously, task buttons such as Print and Send To were positioned along the bottom of windows.

These buttons can now be found on a toolbar at the top of the window. The help button (![]() ) is now located in the top right corner of the window.
) is now located in the top right corner of the window.

Inserting and removing lines
To:
- insert a line item, you now use right-mouse-click Edit > Insert Transaction Line.
- add a blank line, use Edit > Insert Blank Line.
- remove a transaction line, right-mouse-click the line and select Delete Line (previously, you could remove a transaction line from a transaction using the DELETE or backspace key to remove info in each column).
Keyboard shortcut changes
Command | v19 shorcut | New shortcut |
|---|---|---|
Insert Transaction Line | CTRL + SHIFT +I | CTRL+SHIFT+I |
Insert Blank Line | CTRL+SHIFT+L | |
| Date Entry Calendar | = (equals) or SPACEBAR | SPACEBAR |
See our list of keyboard shortcuts in AccountRight.
Entering dates
There are more options when entering dates, for example, you can now directly select the year, as well as the current day.
You can open the date calendar by clicking the arrow next to the date field or putting the cursor in a date field and pressing the Spacebar on your keyboard.

The design tools you use to personalise invoices and other forms have been greatly improved – watch the video:
You can access the form customisation window by going to the Setup menu and choosing Customise Forms, or by clicking Customise in Advanced Filters windows.
Here's some features you can try out:

Learn more about personalising invoices.
Easier report customisation
When you want to create customised reports, you now have more visual, intuitive design tools.
You access reports the same as you did in AccountRight Classic – go to the Reports menu and choose Index to Reports.

To customise a report, you now need to display the report first and then use the design tools (whereas in AccountRight Classic, you customised the report via the Customise button in the Index to Reports window and then displayed the result).
This means that you now have the report open as you customise it and you can instantly see your changes.
You can also now drag and drop and resize columns and fields, giving you a lot more control over the look of the report.

Display a report and give these report customisation features a go:
| Task |
|---|
| Filter and sort data |
| Add and remove data columns |
| Add text and graphics |
| Change the background or add a watermark |
| Edit report elements |
| Save or delete the customised report |
Where's the Session Report?
The Session Report is now called the Journal Security Audit report (listed under Security and Audit in the Accounts report group).
This new report gives you more detail about changes made to transactions during a selected session and can be run at any time, even after closing and reopening the company file.

If you open the Premier Clearwater file, you can see the progress we've made with the new multi-currency feature. It's not finished yet, but we're getting close—that's why it's called a 'beta'.
To explore what multi-currency can (and can't) do, go to the Setup menu > Preferences > System tab and select the option I Deal in Multiple Currencies.
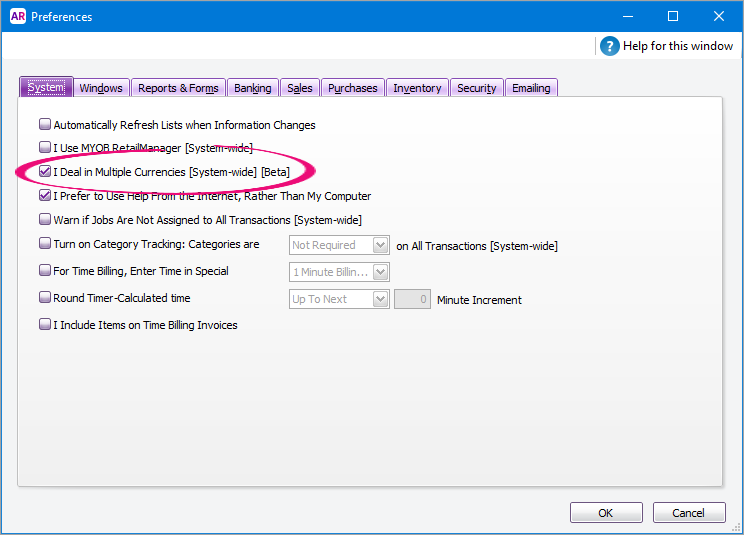
With multi-currency turned on, you can:
- enter multi-currency purchases
- transfer funds into foreign banks
- pay foreign currency bills.
For more information, see Working with multiple currencies.
Upgrade to get the full benefits
The Clearwater sample file only gives you a small taste of what you get in the new AccountRight.
Because it's an offline file, you don't get to experience the benefits of online collaboration, online invoices and other time-saving and cashflow features only available when your file's online.
Learn more about AccountRight's online services.
To go online, you need to upgrade.
For more information on upgrading, see:
 Yes
Yes
 No
No
 Thanks for your feedback.