
https://help.myob.com/wiki/x/dIGFAg
How satisfied are you with our online help?*
Just these help pages, not phone support or the product itself
Why did you give this rating?
Anything else you want to tell us about the help?
Once you've set up electronic payments, you can pay your suppliers and employees directly into their bank accounts. You'll do this by creating a bank file from AccountRight, then uploading it to your bank for processing.
Electronic bank files contain the payment information for your bank to process, including your bank details, your payees’ bank details and the amounts you want to pay. (In Australia, electronic payment files are prepared using the Australian Bankers’ Association (ABA) file format.)
Contact your bank for more information on how to send electronic payment files for processing.
As bank files can be edited outside of MYOB, please store them securely and double-check the data before uploading payments. MYOB is not responsible for any funds transferred by using bank files.
OK, let's show you how to create a bank file:
To identify a payment as being paid electronically
There are a few ways to identify that a payment you're making is to be paid electronically:
- When you record a Spend Money or Pay Bills transaction, select the Electronic Payment option.

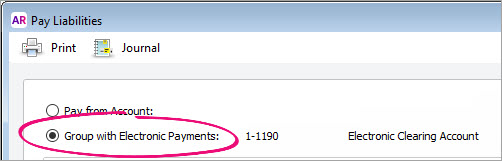
- When you record a Pay Liabilities transaction, select the Group with Electronic Payments option.
- If you've set up your employees to be paid electronically, when you process their pays they'll be identified as electronic payments.
Recorded electronic payments will be listed on the Prepare Electronic Payments window, ready to be processed. See the next task to learn how.

To prepare an electronic payment file
Once you've recorded a payment (as shown above), the payment will be ready for processing.
Here's how to create a bank file containing the electronic payments you want to pay.
- Go to the Banking command centre and click Prepare Electronic Payments. The Prepare Electronic Payments window appears listing all electronic payments waiting to be processed.

- In the Pay From Account field, select the account you're paying from. The banking details of the account you select will be included in the file you send to the bank for processing. Need to change this account? Find out how to record your bank account details.
- (Not AccountRight Basics) If you want to group the electronic payment by payment type—for example, to pay bills only—select a type in the Select Payment by field.
- (Australia only) In the Your Bank Statement Text field, enter the text you want to appear on your bank statement.
In the Bank Processing Date field, enter the date you want the payment to be processed.
Future dates
You can future date the Bank Processing Date when preparing your electronic payment file, providing it's within the current financial year. The Bank Processing Date is the date you want the bank to process the electronic payment, but not all banks adhere to future dating bank files. Check with your bank for clarification.
- (Optional) Enter a Journal Memo to describe this transaction. By default this will display Electronic Payment for each new electronic payment.
- Click in the select column (
 ) next to those payments you want to process.
 - (Australia only) Click Bank File. A window appears, informing you that the payment will be recorded before the bank file is created.
- (New Zealand only) Click Process. A window appears, where you can change the transmission date (which can be any date between the computer date and the processing date), and enter details that you want to show on your statement.
Click OK. The Save As window appears.
Click New folder on the Save As window to create a new folder to save your bank files. This is a great way to keep your bank files organised and easier to find.
Choose where you want to save the bank file. For Australia, the file extension must be ABA.
If you're preparing multiple electronic payment files, make sure you don't overwrite an existing file when saving.
Click Save. The payment information is saved in a file that you can upload to your bank for processing.
If you want to prepare another electronic payment file, repeat from step 2.
Click Cancel to close the Prepare Electronic Payments window.
The bank file can be uploaded to your bank using your bank's online banking portal. Refer to the help in your online banking for instructions on how to do this, or check with your bank. You can also search Google for your bank's instructions, e.g. search for "upload bank file ANZ" or "upload aba file westpac", etc.
Can't find your bank file? If you've searched but come up empty, recreate the bank file as described in 'To recreate a bank file' below.
Deleting an electronic payment and other tasks
Need to find or delete an electronic payment transaction? Maybe you need to recreate a bank file? Here's how:
To find electronic payment transactions
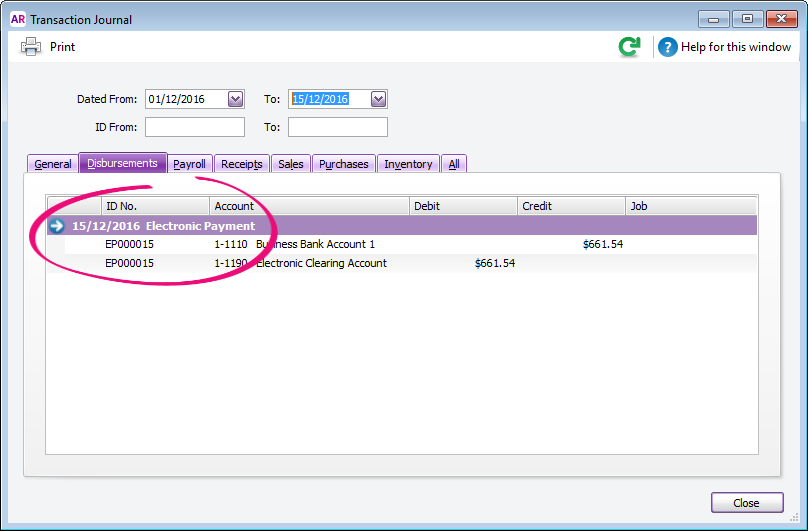
There are two ways to find an electronic payment. This can be done using the Transaction Journal or the Electronic Payments Register report.
| Transaction Journal |
|
| Report |
|

Looking for your bank file? If you've searched but come up empty, recreate the bank file as described in 'To recreate a bank file' below.
To delete a grouped electronic payment
If an electronic payment was recorded incorrectly, it can be deleted. Note that this only deletes the electronic payment transaction in AccountRight and has no effect on the electronic bank file.
Once it's deleted, the individual transactions that were within the grouped electronic payment will be listed again on the Prepare Electronic Payments window.
To delete a grouped electronic payment:
- Go to Banking > Transaction Journal > Disbursements tab.
- Specify the date range to display the electronic payment (these have 'EP' in the transaction ID).
- Open the electronic payment to be deleted.
Go to the Edit menu and choose Delete Electronic Payment Transaction.
Can't see the delete option?
Open the preferences (Setup > Preferences > Security tab) and deselect the preference Transactions CAN'T be Changed; They Must be Reversed.
To change a transaction within a grouped electronic payment
If you've prepared an electronic payment file (but haven't uploaded it to your bank) then realise one of the payments is wrong, you'll need to:
- Delete the electronic payment.
- Go to Banking > Transaction Journal > Disbursements tab.
- Specify the date range to display the electronic payment (these have 'EP' in the transaction ID).
- Open the electronic payment to be deleted.
Go to the Edit menu and choose Delete Electronic Payment Transaction.
- Change the transaction which needs fixing.
- Prepare the electronic payment again.
To recreate a bank file
To recreate a bank file you'll need to reprocess the electronic payment. Before you can do this you'll need to either:
- delete the original electronic payment transaction (if it hasn't been reconciled), or
- reverse the original electronic payment transaction (if it has been reconciled)
You'll need to make sure your security preference allows you to delete or reverse (Setup menu > Preferences > Security tab > Transactions CAN'T be Changed; They Must be Reversed).
To recreate the bank file:
- Open the original electronic payment transaction.
- Go to Banking > Transaction Journal > Disbursements tab.
- Look for the ID No. starting with EP on the date you prepared the electronic payment.
Click the zoom arrow to open the transaction.
If you need to re-use a transaction in the new bank file, note down its transaction number to help you find it later. You can also print the Journal Security Audit report (Reports > Accounts > Security and Audit > Journal Security Audit) to show transactions you've deleted or reversed.
- Go to the Edit menu and choose Delete (or Reverse) Electronic Payment Transaction.
- Process the electronic payment (and create the bank file) again as described above.
To remove transactions from the Prepare Electronic Payments window without recording them
A transaction will be listed in the Prepare Electronic Payments window when it's recorded as an electronic payment, like this Spend Money example:

To remove a transaction from the Prepare Electronic Payments window without selecting it to be included in a bank file, you'll need to:
- Reverse or delete the transaction.
- Record it again without selecting the Electronic Payment option. If it's a payroll transaction, you'll need to change the employee's payment details if they're no longer being paid electronically.
To report on electronic payments
You can run reports on your electronic payments to see unprocessed electronic payments or the electronic payments register.
- Go to the Reports menu (at the top of the AccountRight window) and choose Index to Reports. The Index to Reports window appears.
- Click the Banking tab. A list of report headings appears.
- Click the report you want to display.
- Enter any report filters such as date.
- Click Display Report.

To handle negative transactions in the Prepare Electronic Payments window
You can select a negative transaction, either by itself or with other transactions, in the Prepare Electronic Payments window. If the total of selected transactions is zero or a negative value, a bank file won't be created. However, the Electronic Payments (clearing) account balance will be adjusted accordingly.
This is a similar approach to the way you'd handle a rejected electronic payment.
To change the bank account details in a bank file
A bank file contain the banking details for:
- your business bank account (where the payment will come from), and
- your suppliers and employees accounts (where the payment will be disbursed to).
To change any of these banking details, you'll need to update the information in AccountRight. Any new bank files you create after this will contain the updated banking information. It won't be updated in any bank files you've already created.
Find out how to edit your business bank details, or edit the bank account details of your suppliers and employees.
 Yes
Yes
 No
No
 Thanks for your feedback.