
- Created by TaliS, last modified by admin on Feb 11, 2020
You are viewing an old version of this page. View the current version.
Compare with Current View Page History
« Previous Version 69 Next »
https://help.myob.com/wiki/x/KYHtAg
How satisfied are you with our online help?*
Just these help pages, not phone support or the product itself
Why did you give this rating?
Anything else you want to tell us about the help?
Working outside of the office shouldn’t affect your processes. Now with the MYOB Invoice app, you can record time billing activity slips and create quotes, invoices, customers and suppliers on your mobile device. The best part? It's all linked to AccountRight, for faster and more flexible access to your business data.
Download MYOB Invoice from the App Store AU, App Store NZ or Google Play.
Before you get started:
- You need to have an existing online file with AccountRight.
- You need to download the MYOB Invoice app from Google Play or the App Store.
- Activities can't be created in the app – they’ll be taken from your existing AccountRight file.
- This app isn't for payroll timesheets—but check if there's an MYOB add-on that'll suit your needs (Australia | New Zealand).
- Tap the MYOB Invoice app on your device.

- Sign in using your MYOB login details.
- Enter a pin for fast and secure access. In the future, you'll use your pin to sign in on your device.

- Tap the company file that you want to work with.

- If prompted enter your company file sign in details. You're good to go!

If you use time billing in AccountRight, you can use the MYOB Invoices app to log your activity slips in two ways:
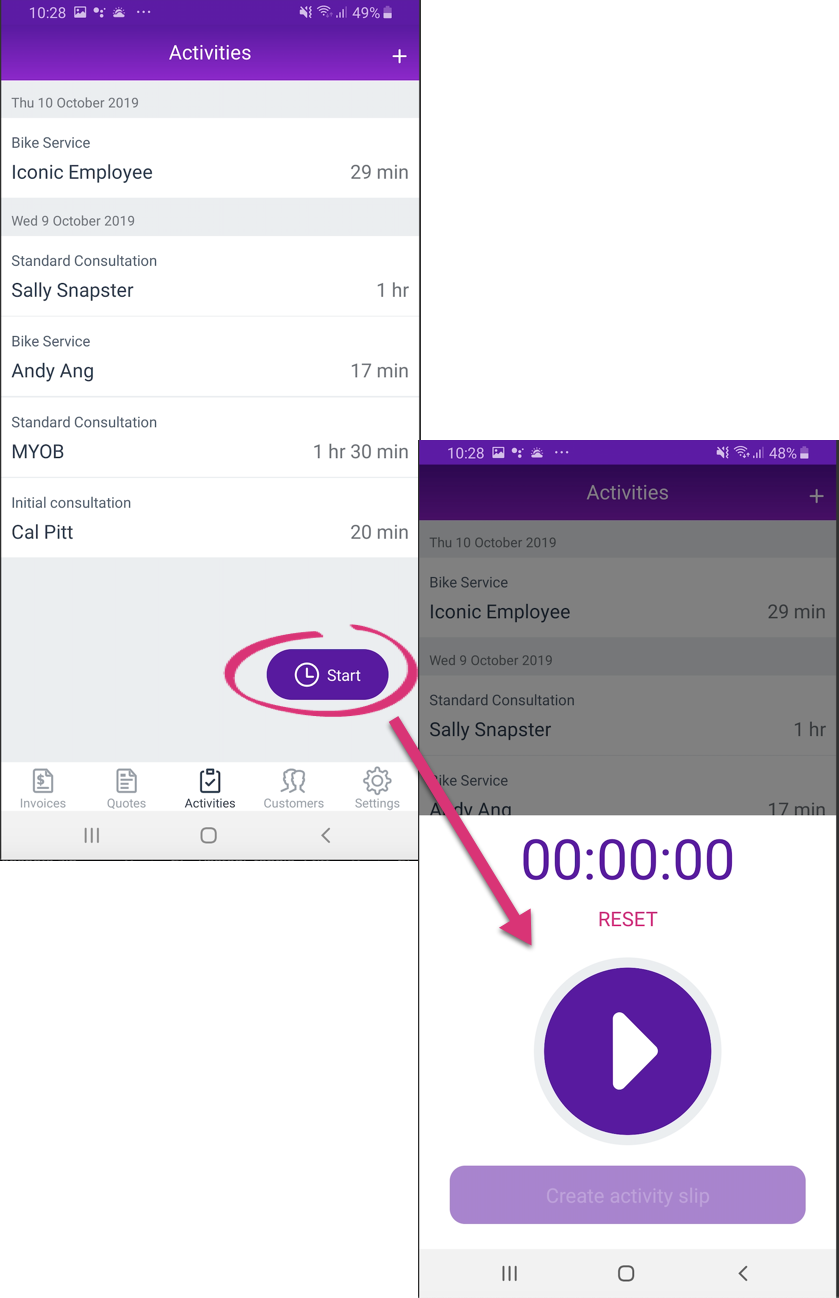

Either way, MYOB Invoices will send your activity slip to your AccountRight file.
You can also see activity slips created or modified within the last 7 days in the Latest activities page.
Plus you can log non-chargeable activities (like internal admin work) and you can change your units of measure too. If you’ve got multiple businesses in AccountRight, switch between them by logging out of your current account and logging into another one.
Adding a customer or supplier
When you add a customer or supplier from the app, it'll also appear in your AccountRight file. Here's how:
- On the bottom panel, select Contacts.
- Tap the + icon in the top right-hand corner of the screen.
- Choose whether the contact is a customer or a supplier.
- In the Designation field, select whether you'd like to create an individual or a company.
- Fill in all the details of your contact.
- Tap Save in the top right-hand corner.
This contact will be saved in your app as well as in AccountRight.
Creating an invoice
You can view, add and edit invoices in the app. To create an invoice:
- In the bottom panel, tap Invoices.
- Tap the + icon in the top right-hand corner of the screen.
- Enter the details of your invoice.
- Tap Save.
Your invoice will be saved in the app as well as AccountRight.
You can also check the details of an invoice, take payments, email or send invoice PDFs by tapping into the invoice of your choice.

Creating a quote
When you create a quote from the app, it'll also appear in your AccountRight file. Here's how:
- On the bottom panel, select Quotes.
- Tap the + icon in the top right-hand corner of the screen.
- Fill in the details of your quote.
- Tap Save in the top right-hand corner.
Now this quote will be saved in your app as well as in AccountRight.
You can also check the details of a quote, convert it into an invoice, email or send quote PDFs by tapping into the quote of your choice.
Convert a quote to an invoice
- Open your quote.
- Tap the More icon in the bottom of the screen, and select Convert to invoice.
A New invoice screen will appear, with all the details filled in from your quote. - Check the details of the invoice.
- Tap Save in the top right-hand corner.
You can also email or send the invoice as a PDF.
Email your quote or invoice
- Open your invoice or quote.
- Tap the Email icon in the bottom panel.
- If you need to, change the Form template.
- In the To field, check or enter the email address of the recipient
- Tap Send in the top right-hand corner.
Send your quote or invoice as a PDF
- Open your invoice or quote.
- Tap the More icon in the bottom of the screen, and select Preview.
The invoice or quote will open as a PDF, with the default template. - If you need to, change the Form template.
- Tap the share icon in the top right hand corner, and select which app you'd like to share the PDF to. For example, you could use the email app on your phone, or you could use a messaging app.
Don't forget to let us know your thoughts!
Tap Provide feedback in the settings screen and leave us a message.
 Yes
Yes
 No
No
 Thanks for your feedback.