- Created by BrianQ, last modified by AdrianC on Aug 22, 2023
https://help.myob.com/wiki/x/aIBW
How satisfied are you with our online help?*
Just these help pages, not phone support or the product itself
Why did you give this rating?
Anything else you want to tell us about the help?
Not available in AccountRight Basics
Just bought something? Maybe you've received a bill for electricity or another expense? Or do you need to order something from a supplier?
To help you keep track of what you're purchasing, who you need to pay, and when the payment is due—record it in AccountRight as a bill, quote or order.
And don't worry, if you make a mistake (like entering the wrong amount or double-entering it), you can edit or delete it.
For a quicker way to create a bill, add your supplier invoices to the AccountRight In Tray. Using AccountRight Basics? Enter your expenses using Spend Money transactions.
You'll choose the Purchase Type at the top of the purchase transaction. Each type represents a different stage in the purchase process, from quote or order to a bill.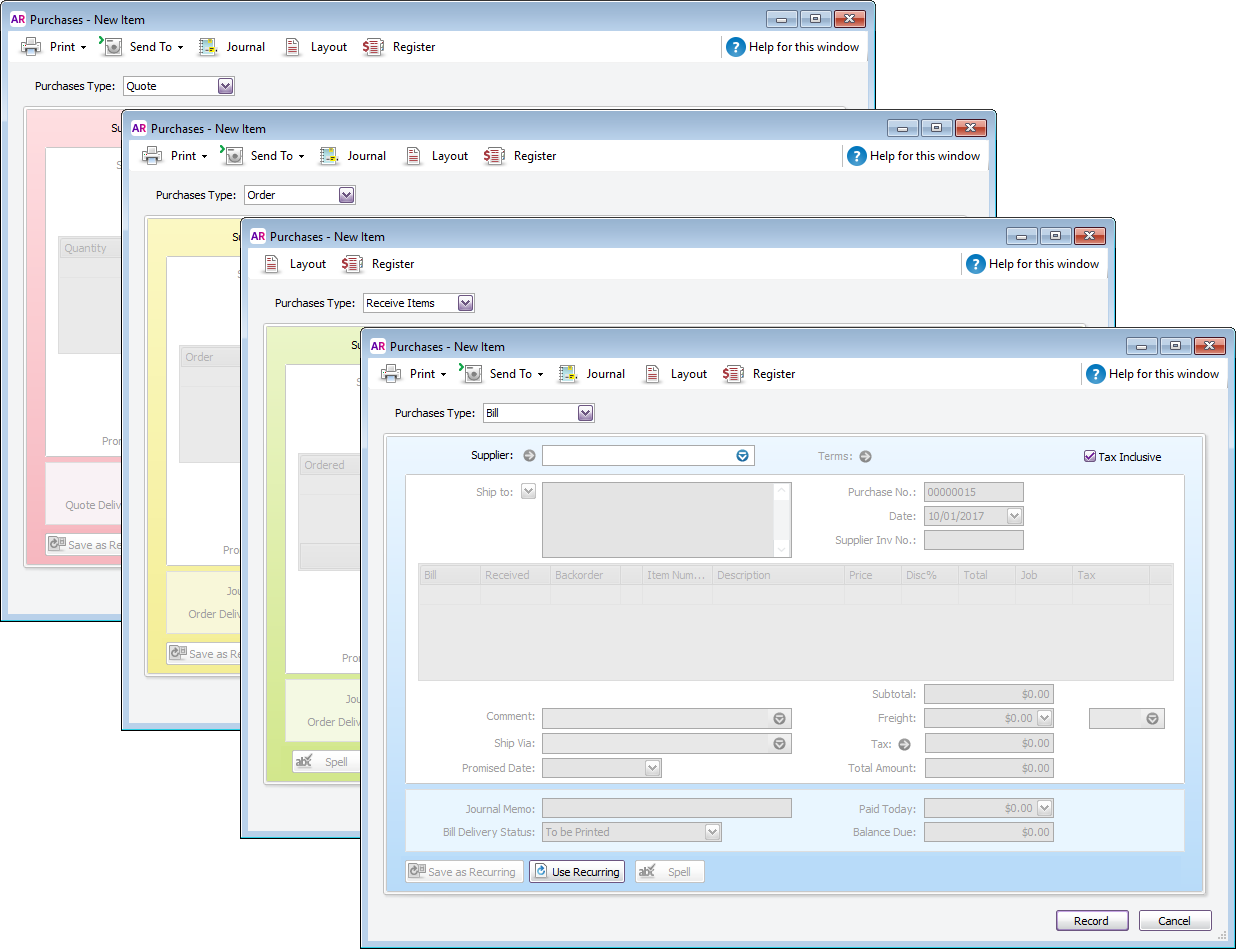
- Quote—Enter a quote to store an estimate or quote you received from one of your suppliers. A quote has no impact on your inventory levels and can be changed to an order or a bill when you are ready to purchase.
- Order—An order is a purchase where no goods or services have been received yet. While orders don't affect your financial figures, they do affect your inventory levels. Orders don’t create transactions unless you have paid a deposit to the supplier. An order can be changed to a bill but not a quote.
- Receive Items—If you receive items you've ordered but haven't yet been billed for them, you can record a 'receive item' transaction. When you record items received, the item is added to your inventory and the cost of the item is added to an accrual account for inventory items until you record a purchase for it. An accounts payable transaction is not recorded at this time. You can only record a received items transaction in the item layout, and only against an order.
- Bill—A bill is used when you receive the goods or services from a supplier, or they've sent you their invoice, i.e. you've been charged for the purchase. Recording a bill will update the appropriate accounts, including the account for tracking payables. Bills can be open (unpaid), closed (paid) or debit (negative purchase). A bill can't be changed to a quote or an order.
When a purchases progresses from one stage to another, for example an order is fulfilled and you receive the supplier's bill, you can change the purchase type.
To enter a purchase
- Go to the Purchases command centre and click Enter Purchases.
- Select the supplier, or add a card for them. Note that you can't change the supplier once you've recorded the purchase.
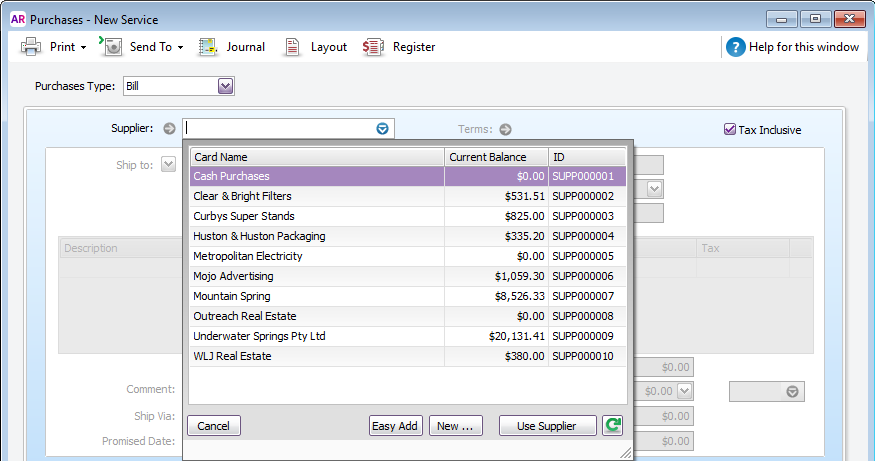
- Are the credit terms right? Click the Terms arrow to change the supplier's default credit terms for this purchase only.
If you're entering prices that include tax or GST, select the Tax Inclusive (Australia) or GST Inclusive (New Zealand) option. The selection you make will be remembered for your next purchase. Don't change this setting after you start entering amounts.
The Purchase No. field shows the next available number. If you click in the Purchase No. field, Auto # appears to confirm that the number has been automatically selected for you. You can type a different number into the field if you want. Subsequent purchase numbers will then increment from the new number. If your purchase number includes letters, the letters won't automatically appear in subsequent purchase numbers (you'll need to enter these each time).
You might want to use the preferences below to have more control over your purchase numbers.
- to prevent duplicate purchase numbers being used (Setup > Preferences > Purchase> Warn for Duplicate...Numbers on Recorded Purchases).
- to keep the same purchase number when converting a quote or order to an invoice (Setup > Preferences > Purchases> Retain Original PO Number when Changing a Purchase between Quotes, Orders or Bills).
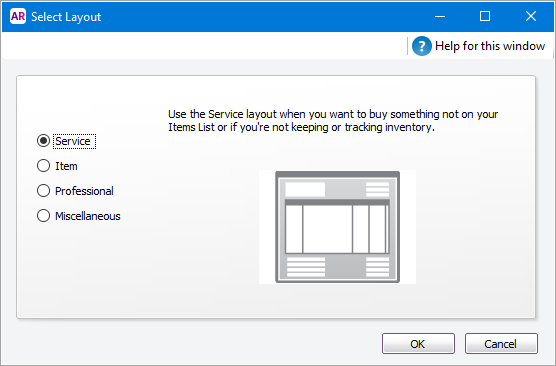
Want to change the purchase layout to suit the type of goods or services you're purchasing? Click Layout. Note that purchases using the Miscellaneous layout can't be printed or emailed.
Set a default purchase layout
Use the the Purchases Easy Setup Assistant to set a default purchase layout (Setup menu > Easy Setup Assistant > Purchases > Layout). Or you can set a supplier-specific default layout in the Buying Details tab of the supplier’s card.
- Select whether you're recording a quote, order or Receive Items (Not Basics), or bill from the Purchase Type list in the top-left corner. The Receive Items option only appears for the Item purchase layout. If you record a quote or order, you can change the purchase type later when the status of the purchase changes.
Enter details of what you're buying, as well as headings, subtotals and blank lines. The fields that are available depend on the purchase type and layout you've selected.
Need to remove a line? Right-click it and choose Delete Line.Item purchase fieldsItem purchase fields
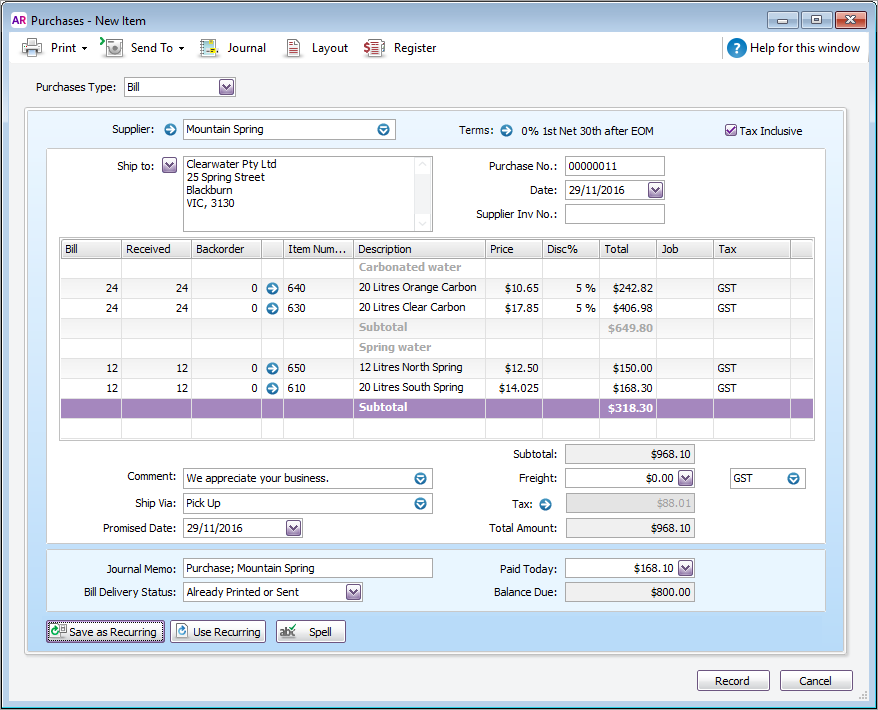
Field Description Order/Quantity/Bill Enter the quantity to be delivered. The field name depends on whether you’re recording a quote, order or bill. Received
This field is read-only. It displays the quantity of items received against an order.
If you're using the Receive Items layout, a To Date and Receive columns appear instead.
Item Number Enter an item from your item list. Backorder Enter the quantity of the item to be placed on backorder. An order for this amount will be created automatically when you click Record. Description A description of the item appears automatically. You can change this if you want. If you want to check spelling in this field, click Spell. Location [AccountRight Premier 2019.2 and later only] If you store this item in more than one location, select the location where the item will be received. For more information, see Multiple inventory locations. Price The price of the item appears automatically. You can change this if you want. Disc% [Optional] If you've been given a discount, type it as a percentage. If you've been given a dollar discount, enter the updated price in the Total column, and the discount percentage will be calculated for you. Total The total price of the items is calculated automatically. If you change the total, the Disc% field is updated to show the discount applicable. Job [Optional] Select a job number here to assign a line item to a specific job. This line item can be reimbursed later. Tax/GST The default tax (Australia) or GST (New Zealand) code for an item appears here. If you want to change it, enter the required tax/GST code. Service, Professional, and Miscellaneous purchase fieldsService, Professional, and Miscellaneous purchase fields
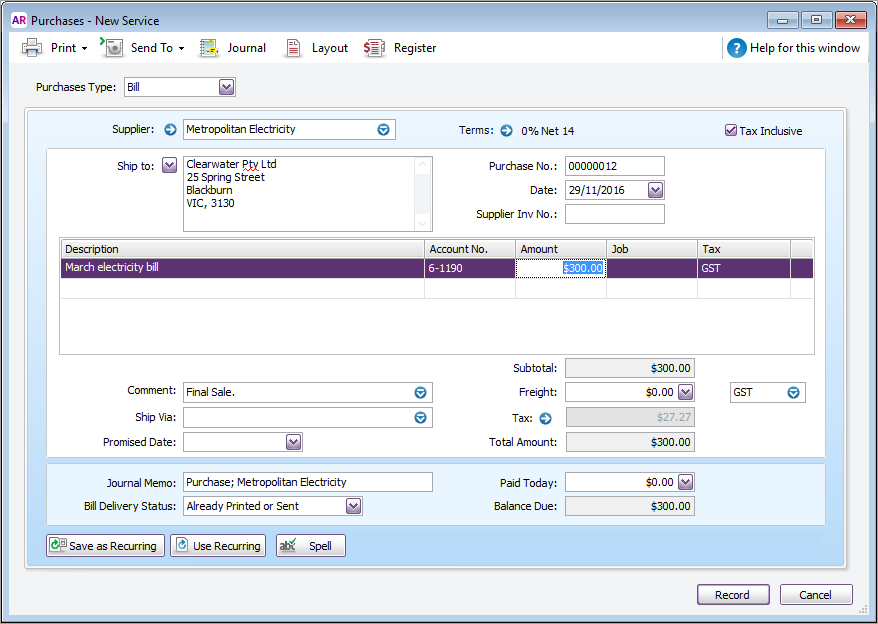
Field Description Description Enter a description of the goods or services being purchased. If you want to check spelling in this field, click Spell. Acct No. or Account Name Enter the account to which to allocate the purchase. This should be an expense or cost of sales account. You should not select your accounts payable account for supplier purchases.
There's a preference which controls if the account name or number is displayed (Setup > Preferences > Windows tab > Select and Display Account Name, Not Account Number).Amount Enter the amount you've been billed for. Job [Optional] Select a job number here to assign a line item to a specific job. This line item can be reimbursed later. Tax/GST Select a tax code (Australia) or GST code (New Zealand) for the purchase. Enter any charges for Freight, and if required, select the right Tax/GST code. If you can't enter Freight, make sure you've specified a linked account for freight.
Calculated tax/GST
Click the zoom arrow next to the Tax / GST field to view or change the tax (Australia) or GST (New Zealand) amounts assigned to the purchase. Be aware that changes to a transaction's calculated tax/GST won't be reflected in BASlink or GST Return calculations.
Enter an amount in the Paid Today field to record the amount you've paid at the time of the purchase. If you are creating an order, record the amount you gave you as a deposit.
Enter any additional purchases information:
Field Description Comment A comment you want the supplier to see on the purchase form Ship Via The method the purchase will be shipped to you You can set up a default list of comments and shipping methods, that can be selected when recording purchases. See Sales and purchases information. Promised Date The date you expect delivery Journal Memo A description of the purchase that will appear in the journal entry for it Bill Delivery Select whether you want to print or email the form later, or if you don't want to print or email it, select Already Printed or Sent Click Record (or Save Quote for quotes) to just save the purchase, or click Print to also print a form. If you want to email the purchase or save it as a PDF (not available for Miscellaneous purchases), click Send To.
Do you regularly record similar purchases? Save time by saving the purchase as a recurring transaction.
FAQs
What is the Supplier Inv No. field used for?
If the supplier gave you an invoice for this transaction, you can enter that quote, order or invoice number in the Supplier Inv No. field. You can search for purchases by the supplier's invoice number. You can also add the field to your purchases reports.
Can I display tax/GST on each line of a purchase?
Yes. You can personalise the purchase form to add the Line Tax field. Then when you email or print the purchase order it will display tax/GST on each line.
Here's how:
- Go to the Setup menu and choose Customise Forms.
- Select the form to be customised then click Customise.
- Right-click on the form where the transaction lines are displayed and choose Show/Hide Columns.
- In the Available Columns list, click Line Tax then click Show.
- Click OK.
- Click Print Preview to see what the form will look like.
- Make any necessary changes.
- When you're happy with the changes, save the form.
How do I turn off the 'no ABN' warning when recording purchases?
If you want to turn off the 'No ABN/TFN' warning message that appears when recording purchases of more than $75 (for example, if you buy from an overseas supplier with no ABN), go to the Setup menu > Purchases tab and deselect the option:

How do I record a note about the purchase for my records?
You can enter a brief description in the Journal Memo field. You can search for purchases using the text you enter in this field. If you don't want this information to appear on printed/emailed purchases, ensure that the Memo field is not included on the form.
How do I edit the list of comments and shipping methods?
To add, edit or delete the list of comments and shipping methods, go to the Lists menu > Sales and Purchases Information window.
Why is the item number blank when I print purchases?
The default field on the purchase form is Supplier Item Number, this is entered in the item information under buying details. If you don't use this field then the item number will print blank.
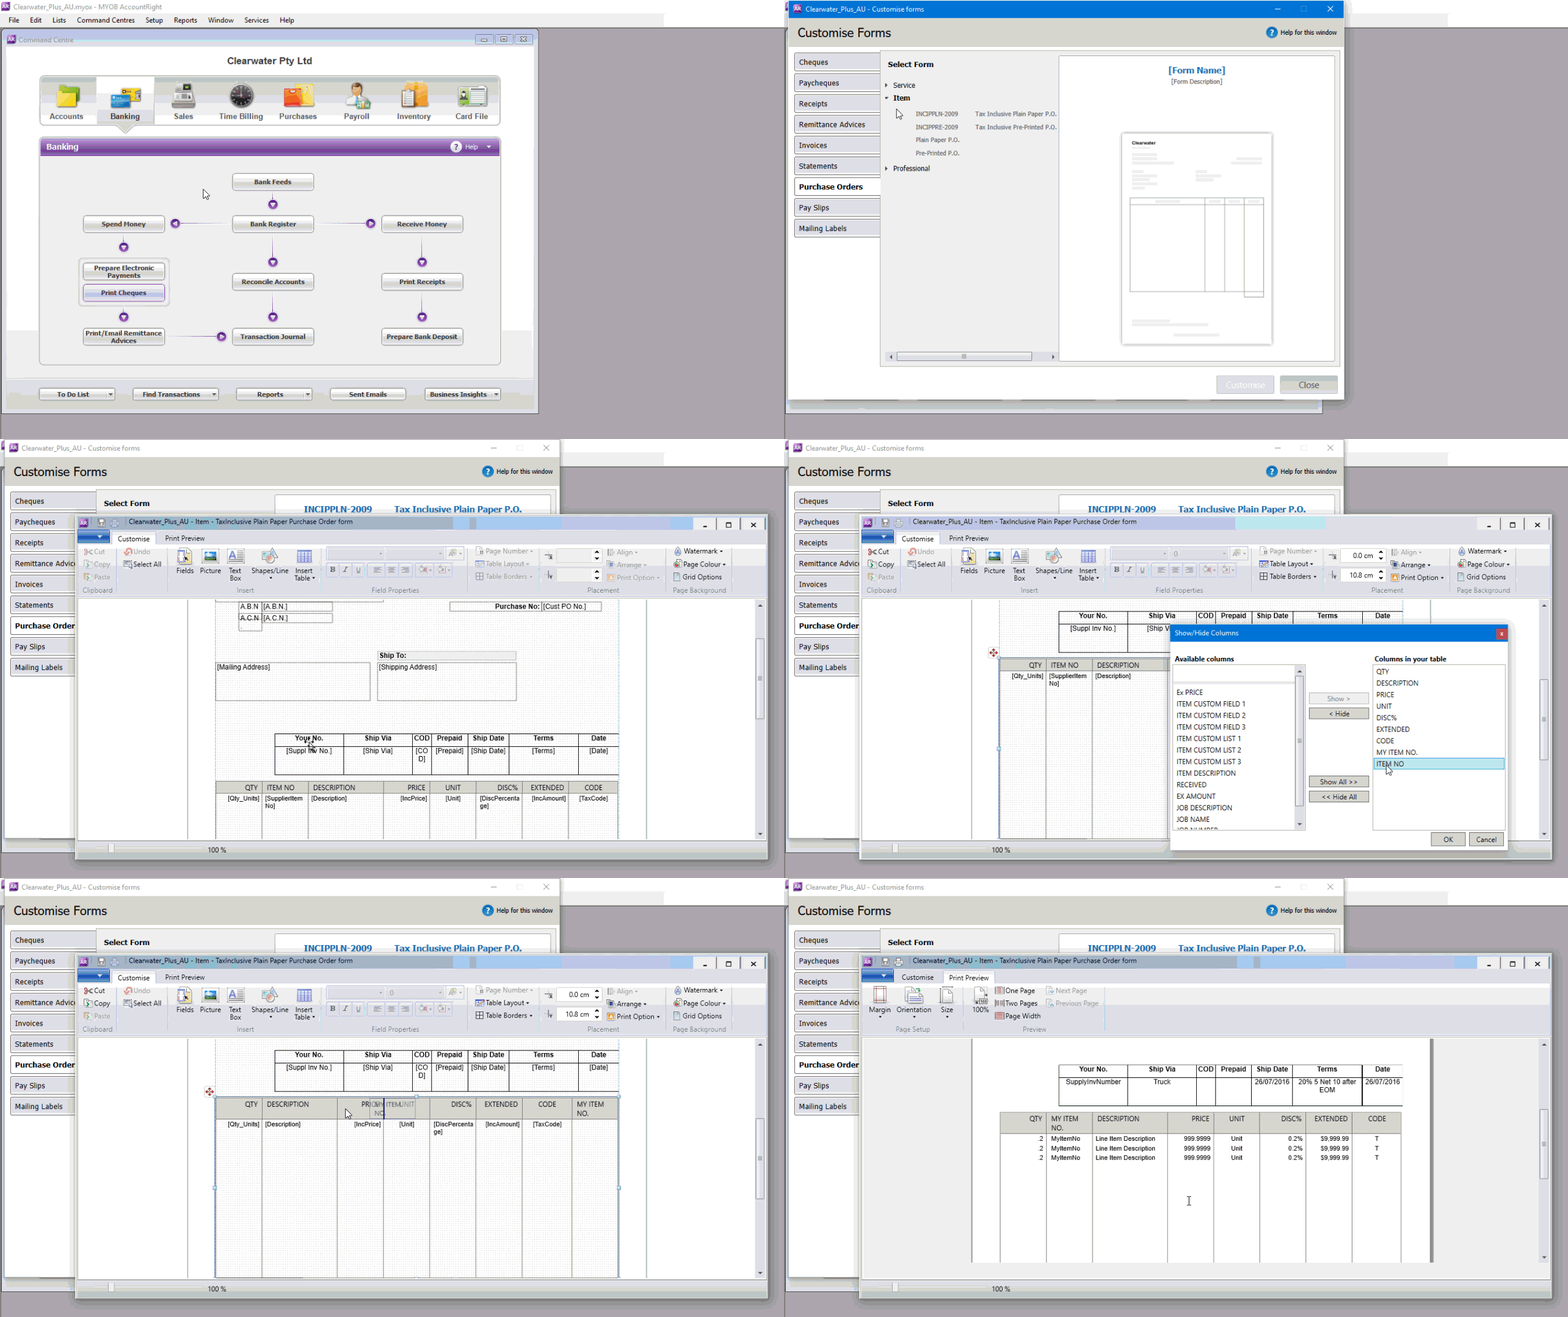
You can personalise the purchase form to remove Supplier Item Number and add My Item Number. Then when you email or print the purchase it will display the Item Number entered under the Profile tab of your item.
Here's how:
- Go to the Setup menu and choose Customise Forms.
- Select the form to be customised then click Customise.
- Right-click on the form where the transaction lines are displayed and choose Show/Hide Columns.
- In the Available Columns list, click My Item NO. then click Show.
- In the Available Columns list, click Item NO then click Hide.
- Click OK.
- (Optional) If you want to change the column order, click and drag the column headings.
- Click Print Preview to see what the form will look like.
- Make any necessary changes.
- When you're happy with the changes, save the form.
See this in action
Why does the freight amount disappear after I enter it?
If you enter an amount in the Freight field and the amount disappears after you tab out of the field, this indicates that you need to specify a linked account for freight.
How do I turn automatic spell checking off or on?
- Go to the Setup menu and choose Preferences. The Preferences window appears.
- Click the Windows tab.
- If you want to automatically check spelling select the Automatically Check Spelling in Text Fields Before Recording Transactions option.
To turn off automatic checking, deselect this option.
For more information on the spelling checking feature, see Check spelling

 Yes
Yes
 No
No
 Thanks for your feedback.