
- Created by BrianQ, last modified by StevenR on Jun 25, 2015
You are viewing an old version of this page. View the current version.
Compare with Current View Page History
« Previous Version 40 Next »
https://help.myob.com/wiki/x/bIKO
How satisfied are you with our online help?*
Just these help pages, not phone support or the product itself
Why did you give this rating?
Anything else you want to tell us about the help?
This information applies only if you're upgrading from AccountRight Classic (v19 or earlier), and don't want to put your file online. Want us to upgrade your file and put it online for you?
If you choose not to put your company file online, there are three steps to upgrading: upgrade your file, confirm your file, and then complete any additional upgrade tasks.
To avoid issues while upgrading, make sure you've read the tips on our Things you should know before upgrading page.
Choose the file to upgrade
Are you upgrading a backed up company file (.zip)? If you want to upgrade a backup from an earlier version of AccountRight, you first need to unzip it.
- Open AccountRight.
- In the Welcome window that appears, click Upgrade a company file.
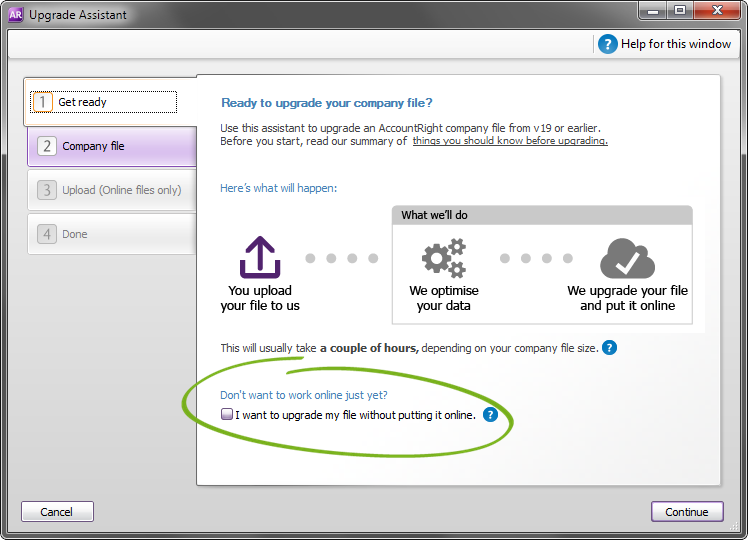
- The Upgrade Assistant opens. Select the I want to upgrade my file without putting it online option and click Continue.
- Click Browse to locate and select the file you want to upgrade, then click Open.
- If a password has been specified in the file you're upgrading, type the password in the Password field.
(Optional) Rename or move the file If you want, change the name of the file in the Name field.
Special characters in existing company file names
If your existing file contains characters that aren't allowed in the new file format, such as an ampersand (&), an asterisk (*) or a period (.), these characters will be replaced by an underscore (_) when you upgrade the file.
By default, the file will be saved in the AccountRight library that’s on your computer. Only files saved in an AccountRight library can be opened. The default location for the library is
My Documents\MYOB\My AccountRight Files(you can change the library location later).To save the company file on a network computer that has AccountRight Server Edition installed, click Browse and select the Network Libraries option to set up the network library.
Upgrade and open the file
- Click Upgrade to start the upgrade process. This can take up to a few minutes.
- When the upgrade's complete, click Open Upgraded File. The Sign-on window appears.
- Click OK to open the company file. The Confirmation Assistant appears.
What is confirmation?
You're prompted to activate when you create a new company file, and you're prompted to confirm when you upgrade a company file from a previous version. Click the links in the confirmation window for more information.
- In the Confirmation Assistant, click I use this company file to record or edit my business transactions.
- Choose how you want to confirm and follow the relevant onscreen instructions. Note that we recommend confirming online as the quickest, easiest way.
Depending on which features you use in your software, you may need to complete additional upgrade tasks. For detailed information, see Additional upgrade tasks.
FAQs
If you see the message "The company file cannot be upgraded", try the following:
- Make sure you're trying to upgrade the company file in the latest AccountRight version. Each AccountRight update provides performance enhancements, and can help make upgrading a smoother process.
- Make sure the company file contains no unprocessed electronic payments, bank deposits, or pay liability transactions. For help with processing or clearing these transactions in your previous software version, see the support note Processing transactions before upgrading to the new AccountRight.
 Yes
Yes
 No
No
 Thanks for your feedback.