
You are viewing an old version of this page. View the current version.
Compare with Current View Page History
« Previous Version 63 Next »
https://help.myob.com/wiki/x/a4eO
How satisfied are you with our online help?*
Just these help pages, not phone support or the product itself
Why did you give this rating?
Anything else you want to tell us about the help?
Make sure you've completed the tasks outlined in the Things to do before your first upload page
A contribution file contains information required to make super contributions for your employees. You create a contribution file in the Pay Superannuation window of your MYOB software. For help creating the contribution file, see your MYOB software's help:
Once you have a contribution file, you can upload it to MYOB's super portal.
Log in to the MYOB super portal and go to the Dashboard (the home page).
You can access the dashboard by clicking the navigation button at the top-right of the portal's page, and selecting Home (or Dashboard).
In the Contributions panel, click Contribute today and then select Upload a new file.

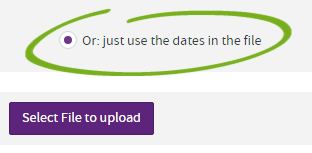
Ensure the Or: just use the dates in the file option is selected, and then click Select File to upload.
Find and select the contribution file you want to upload. The default name of the file that's saved from your MYOB software is SuperContribution.csv.
Ensure you select the correct file. You won't get a warning if you try uploading a file that has already been uploaded.
Click Next.
The contribution file is uploaded and some checks are done on the data contained in the file. If there are any exceptions (issues), you'll need to fix them.
If your business' ABN is not in the file you're uploading, or is different to the one in the file you're uploading, you'll be asked to confirm the business you're uploading the file for. Make sure that the employer you select is correct and then click Apply to All.
If you upload a file for the wrong employer, the employees will still be added in the super portal, but later you won't be able to delete those employees for that employer.
To avoid this issue again, enter your ABN in your MYOB software.
In AccountRight you can add the ABN in the Setup menu > Company Information window.
If you haven't specified an employee's super fund, or the fund details were incomplete or incorrect in your MYOB software, you'll need to specify the fund to make the payment to. Click Save once you've selected the correct fund for the employee. The employee is removed from the list of exceptions when the issue is fixed.
If the employee already existed, and their details have changed, you'll need to choose whether to add a new employee with the new details, or update the existing record with the new data.
If other required information is missing for an employee, select the employee name and then click on the information section that has the issue (indicated in red). Fill in any information that's missing or that's formatted incorrectly.
To avoid these issues again, update the contact records in your MYOB software with any of the changes you make in the super portal for the employee.
If you want to change other employee details, you can do this when you reach the Review step below. Click the member icon  to access and change the employee's details.
Click Next when you've finished entering the employee details.
Now you can see all contributions that you're about to process.
If there's still a problem with the contribution information, you'll see an alert icon  in the Action column and the fields that need your attention have a red border. Click in these fields to see a description of what the issue is.
If a field is highlighted in yellow, it means there might be an issue, but you can still submit the details. However, you should review this information too.
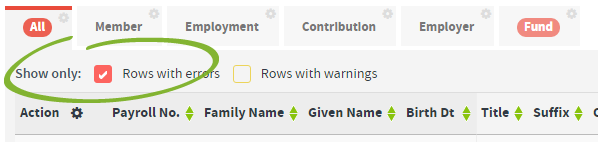
If you have lots of contributions, use the Show only filters to show only rows that have errors or warnings.
If you want to review or edit an employee's contact or fund information, click the member icon in the Action column to view or make changes.
If you need to add a employee's contribution that wasn't in the file you uploaded, click Add Member. You can then select an employee that's already been set up in the portal, or add a new employee. You'll need to manually complete their contribution details in the Review window's grid.
Once all contribution details are correct, click Next.
The summary page shows the contributions that will be made to each fund. Ensure that you're sending the contributions to the correct fund (some funds have very similar names).
The Payment Reference is what you'll see on your bank statement to identify the payment that's being made. You can change it if you want.
If the Confirm and Send button is available and you want to make the payment now, click it and you're done. If the file is submitted before 3:30pm AEST, the payment will be processed on the same business day, otherwise it will happen on the next business day.
If you're not ready to make the payment, or aren't authorised to submit the payment, click Save and Hold. Note that changes can't be made once you click this button.
After uploading
If you want to view the status of a payment, open the Historic Contributions page (click the navigation button and select Contributions or Contribution History).
Look for this icon , which indicates it's been submitted and is being processed.
You can also choose to download the ORIGINAL csv file (click the icon), or view the details of the contributions you made (click the
icon).
 Yes
Yes
 No
No
 Thanks for your feedback.