
- Created by ErikV, last modified by AdrianC on Aug 06, 2015
You are viewing an old version of this page. View the current version.
Compare with Current View Page History
« Previous Version 23 Next »
https://help.myob.com/wiki/x/YIuO
How satisfied are you with our online help?*
Just these help pages, not phone support or the product itself
Why did you give this rating?
Anything else you want to tell us about the help?
Some businesses accept customer trade-ins to reduce the selling price of goods sold. For example, a car dealer might accept a vehicle trade-in and deduct the trade-in value from the price of a new car.
The steps below can be used for most trade-in situations, but you should also check with your accounting advisor about your tax/GST reporting obligations associated with trade-ins for your business.
Before recording a trade-in, there's a couple of things you need to do.
- Create an asset account with the Account Type set to Bank. This account will be used as a clearing account to hold the value of the trade-in.

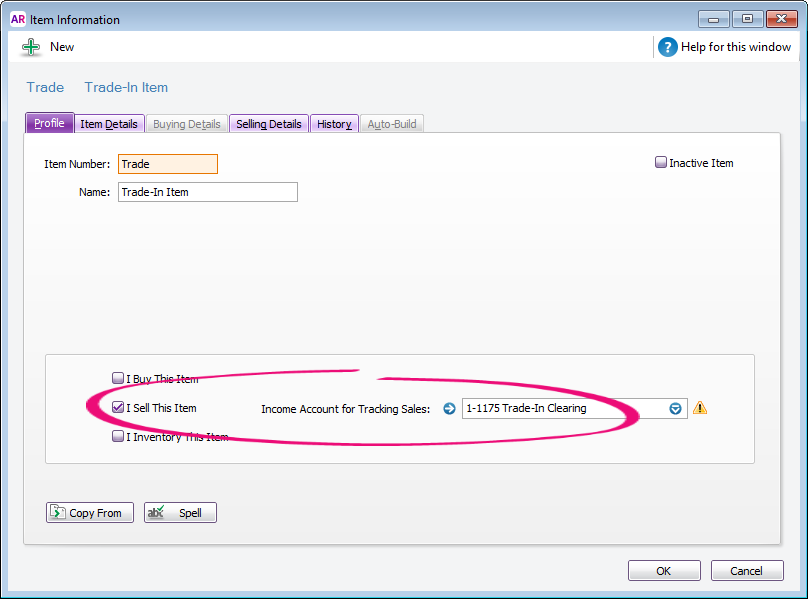
- Create an inventory item to represent a default trade-in item. You'll use this item when recording sales which include a trade-in to deduct the trade-in value from the sale price.
- Select the option I Sell This Item
- For the Income Account for Tracking Sales, select the asset account created above (ignore the warning about this account usually being an income account)
- On the Selling Details tab, select the relevant Tax/GST Code When Sold.
You're now ready to record sales which include trade-ins.
If the trade-in is from a new customer, create a customer card for them.
You can then enter an invoice to record the sale.
- On the first line, enter details of the item being sold.
- On the second line:
- enter a negative one (-1) in the Ship field
- select the Trade-In item created earlier
- enter the trade-in value in the Price field
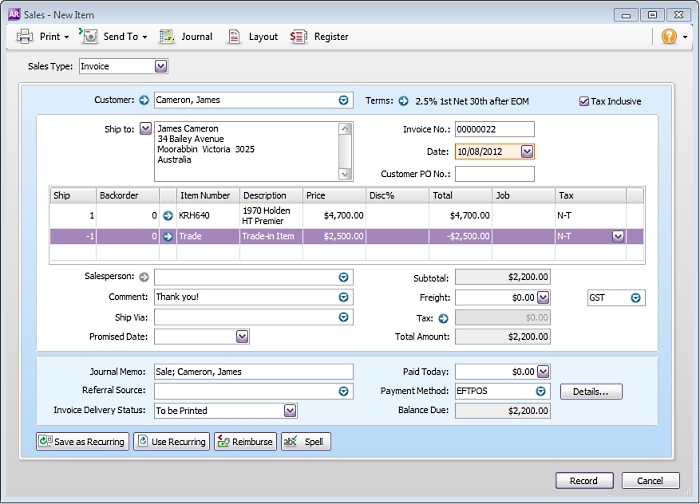
Recording this sale will:
- deduct the value of the trade-in from the amount the customer needs to pay, and
- deposit the value of the trade-in into the Trade-in Clearing account.
When you receive a trade-in, you're effectively buying that item from the customer. Here's how you can record that purchase:
- Create a supplier card for the customer. This will allow you to select this supplier when recording the purchase.
- Create an inventory item for the trade-in item.
- Select the option I Buy This Item. Depending on what you do with your traded-in items, you can also select I Sell This Item and I Inventory This Item.
- Select the applicable Expense Account for Tracking Costs.
- On the Buying Details tab, select the relevant Tax/GST Code When Bought.

- Enter a bill for the trade-in item.
- In the Supplier field, select the supplier card you created for the customer.
- Select the trade-in item in the Item Number field.
- Enter the trade-in value in the Price field.
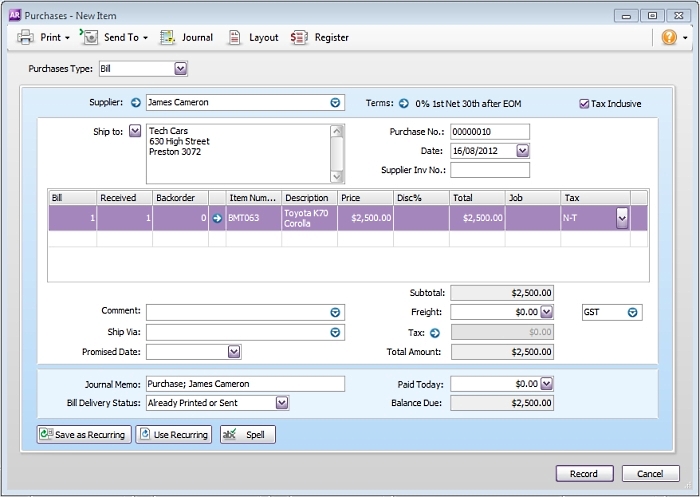
Recording this purchase will account for the receipt of the trade-in item.
You can now close the bill using the funds which were allocated to the Trade-in Clearing account when you recorded the sale.
On the Pay Bills window:
- Select the Pay From Account option and select the Trade-in Clearing account.
- In the Supplier field, choose the supplier card you created for the customer. Their open bill will be listed.
- In the Amount field, enter the trade-in value.
- Apply this amount against the bill.

Recording this payment will:
- close the bill, and
- clear the balance of the Trade-in Clearing account.
 Yes
Yes
 No
No
 Thanks for your feedback.