
You are viewing an old version of this page. View the current version.
Compare with Current View Page History
« Previous Version 13 Next »
https://help.myob.com/wiki/x/bZCO
How satisfied are you with our online help?*
Just these help pages, not phone support or the product itself
Why did you give this rating?
Anything else you want to tell us about the help?
If you sell goods using lay-by, it's easy to track these sales in AccountRight. Just create a lay-by stock item for the goods being sold, create a sales order for the goods, then apply payments against that order until the lay-by is paid off.
The example we'll use is selling a bicycle on lay-by, but the same approach can be used for most lay-by scenarios.
We'll also step you through what to do if a lay-by is cancelled.
To track the quantity and value of stock on lay-by, you need to create a lay-by item and an associated asset account.
Here's how:
- Create an asset account to track the value of lay-by stock.
- Set the Account Type to Other Asset.
- Enter an Account Number that suits your account list.
- Enter a suitable Account Name, such as Layby Inventory.

- Create an inventory item for the stock being put on lay-by.
- Add "LB" to the Item Number to distinguish it from other stock items.
- For the Asset Account for Item Inventory, select the Layby Inventory asset account created earlier.

Transfer stock from the trading stock item to the lay-by stock item.
Use the Build Items function (Inventory > Build Items).
Enter a positive Quantity for the lay-by stock item. This increases the stock quantity for this item.
Enter a negative Quantity for the trading stock item. This decreases the stock quantity for this item.
Enter the Unit Cost for the lay-by item (to match the trading stock item).

You're now ready to create a sales order for the lay-by.
- Select Order as the Sales Type.
- Select the Customer.
- Select the lay-by item and specify the Ship quantity and Price.
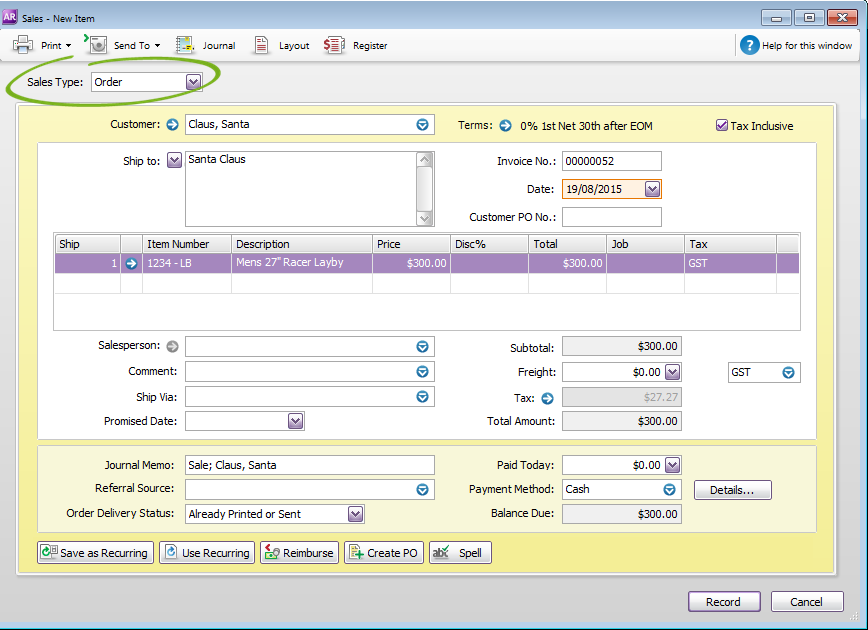
Lay-by terms
You might want to change the terms for this order to reflect the date the lay-by needs to be picked up.
When a lay-by payment is made
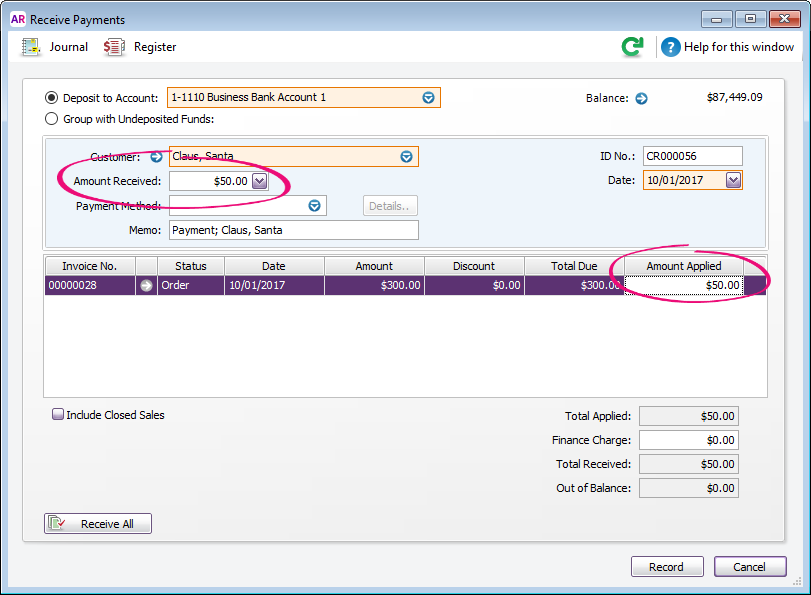
Record the payment against the sales order (Sales > Receive Payments).
- Select the Customer to display their lay-by order.
- Enter the payment in the Amount Received and Amount Applied fields.
After the final lay-by payment is made
When the lay-by is paid off, change the order to an invoice to provide to the customer.
- Find the order (Sales > Sales Register > Orders tab).
- Click the order then click Change to Invoice.

- Check the details of the invoice then click Record.
Cancelling a lay-by
Typically when a lay-by is cancelled, the customer's payments are refunded and a lay-by cancellation fee is charged.
When the cancellation is processed, the cancellation fee is applied to an income account, the refund is paid to the customer, and the lay-by stock item is returned to normal trading stock.
Let's use the example where a $300 lay-by is cancelled after $100 has been paid against it. A $20 cancellation fee is charged and $80 is refunded to the customer.
Here's how you set up an income account and inventory item to cater for the cancellation fee.
- Create an income account to which you can allocate cancellation fees.
- Set the Account Type to Income.
- Enter an Account Number that suits your account list.
- Enter a suitable Account Name, such as Layby Default Charge.

- Create an inventory item for the cancellation fee and link it to the income account.
- Enter a suitable Item Number and Name.
- Select the option I Sell This Item.
- For the Income Account for Tracking Sales, select the Layby Default Charge income account you just created.

Refunds are processed by creating a customer credit, then refunding that credit. When creating the credit you can deduct the cancellation fee.
Here's how:
- Record an invoice to create a customer credit.
- Select the Customer being refunded.
- On the first line of the invoice, enter the Layby Default Charge item with a Ship quantity of 1 and the Price of the fee.
- On the second line, enter the lay-by item with a Ship quantity of -1 and the Price of the item. This results in a negative Balance Due (the credit amount).

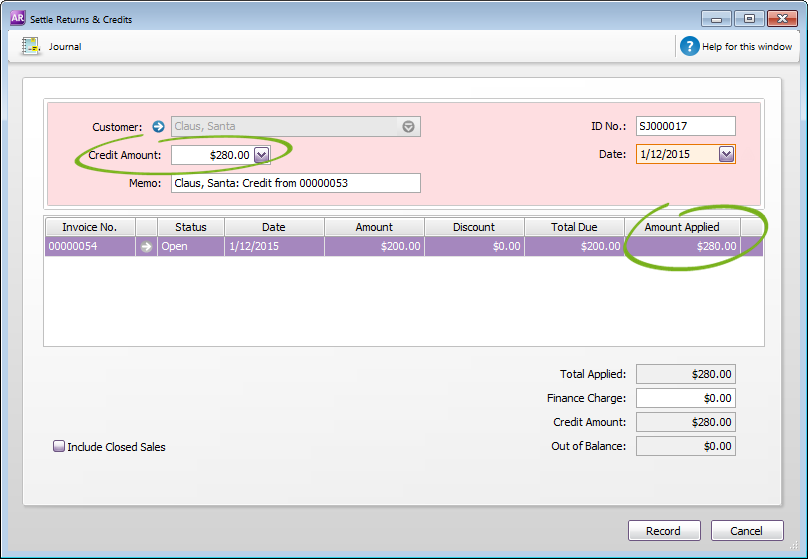
- Apply the credit to the customer's lay-by order.
- Go to Sales > Sales Register > Returns & Credits tab.
- Click the customer's credit then click Apply to Sale.
- Enter the credit amount in the Amount Applied field. This should match the Credit Amount.
Recording this will create a new credit for the amount to be refunded to the customer. - On the Returns & Credits tab, click the credit created in the previous step then click Pay Refund.
- Check the details of the refund and click Record.

Because the lay-by is now cancelled, you need to transfer the lay-by item back into trading stock.
Use the Build Items function (Inventory > Build Items).
Enter a negative Quantity for the lay-by stock item. This decreases the stock quantity for this item.
Enter a positive Quantity for the trading stock item. This increases the stock quantity for this item.
Enter the Unit Cost for the lay-by item (to match the trading stock item).

FAQs
The GST rules for lay-by sales vary depending on your country and GST accounting basis.
In Australia |
|
In New Zealand | Regardless of your GST accounting basis, GST is realised upon the final lay-by payment when the goods are invoiced and delivered. |
 Yes
Yes
 No
No
 Thanks for your feedback.