
You are viewing an old version of this page. View the current version.
Compare with Current View Page History
« Previous Version 14 Next »
https://help.myob.com/wiki/x/JYfeAw
How satisfied are you with our online help?*
Just these help pages, not phone support or the product itself
Why did you give this rating?
Anything else you want to tell us about the help?
This page explains the upgrade process for an organisation that uses multiple versions and databases in one Hr.ini file, which is the recommended setup (best practice).
PayGlobal does not allow you to install two builds of the same version on the same machine. For example, you could not install 4.14.0.0 and 4.14.0.1 on the same machine, but you could install 4.13.0.1 and 4.14.0.2 or 4.18.0.0.
This manual assumes that:
- You're already using a PayGlobal database.
- You use multiple versions and databases in one Hr.ini file, which is the recommended setup.
- You have a supervisor user profile and you can run the entire PayGlobal upgrade procedure.
- You're a member of the sysadmin fixed server role, with security permissions to restore an SQL database.
If you use multiple versions and databases with one Hr.ini file, then your file structure will be like the following example.
C:\PayGlobal \Companies \Live
\Test
\Training
\Versions \4_18_0_0
StartPayGlobal.exe
Hr.ini
In the Hr.ini file, each database will have a CompanyPath (path to the company data folder) and a RunVersion (the PayGlobal version that the database is using).
Databases
[COMP0001]
CompanyPath=C:\PayGlobal\Companies\Live\
CompanyName=Live
RunVersion=4_18_0_0
[COMP0002]
CompanyPath=C:\PayGlobal\Companies\Test\
CompanyName=Test
RunVersion=4_18_0_0
[COMP0003]
CompanyPath=C:\PayGlobal\Companies\Training\
CompanyName=Training
RunVersion=4_18_0_0
	Versions
[RUNVERSION_4_18_0_0]
RootPath=C:\PayGlobal\Versions\4_18_0_0\
The RunVersion value must have a corresponding [RUNVERSION_value] entry. The [RUNVERSION_value] entry contains the RootPath to the Hr.exe and all other associated files for that version of PayGlobal.
The shortcut on your desktop will point to StartPayGlobal.exe in your primary Exolvo folder. StartPayGlobal.exe opens the PayGlobal splash screen and if Hr.ini contains multiple companies, then it lists them alphabetically.
Creating a new test database
Always upgrade your test database before you upgrade your 'live' database so you can check that everything works correctly in the new version, such as your designer reports. However, the test database must reflect the status of the 'live' database so you need to create a new test database for every upgrade. In Back up Databases, you took a backup of your current 'live' database and now you will restore from this backup to create a new test database.
Only members of the sysadmin fixed server role can restore a database.
When you restore from a backup file, the MDF and LDF files are extracted from the backup and copied to the default Data and Log folders in your SQL Server folder.
- Copy the backup file to a folder on the SQL Server machine or a UNC shared folder that the SQL Server account has Read access to.
UNC pathing requires the folder to be a network share. The service account used to run the SQL Server service must have full Modify rights to the shared folder. To check the which service account is in use, you can go to SQL Server Configuration Manager. - Click the Windows Start button.
- Use one of the following options to add the path of the current PayGlobal Hr.exe:
- In Windows Explorer, navigate to the PayGlobal Hr.exe, and then drag-and- drop it into the Open field in the Run box.
- Type the Hr.exe path into the Open field in the Run box.
If the Hr.exe path contains spaces, then you must enclose it in double quotes.
For example:
"C:\PayGlobal\Versions\4_14_0_2\Hr.exe" After you add the Hr.exe path, type a space, and then /initsql. For example:
"C:\PayGlobal\Versions\4_14_0_2\Hr.exe" /initsqlClick OK. The Company Setup form appears.
Enter the following details:
Field Details Company Name (Blank) Path Type the path to the Test folder in your Companies directory, such as C:\PayGlobal\Companies\Test\ Serial Number (Blank) Client Number (Blank) Database type SQL Server Country Select the relevant country, such as <_Country>. Server name SQL Server machine where the database will be created and stored. Database name Name of the test database, such as Test.
You cannot use a number as the first character in the database name. The database will not be created, and the following message will appear in the audit log: Line 1: Incorrect syntax near [database name].
If you already had a test database, then you would have to use a different name or delete the original test database in Microsoft SQL Server Management Studio.
PayGlobal user Accept the default, which is PGUser_(Database name).
The PayGlobal user must be unique to each database. You are creating a test database so the PayGlobal user will be PGUser_Test.
Restore login Accept the default, which is PGRestorer_(Database Name) because each database on your SQL server needs a unique Restorer login. 
Authentication
The data that you enter in the PayGlobal user field depends on the SQL Server Authentication type (either Windows Authentication or Mixed Mode) that was selected when SQL Server was installed. Mixed Mode allows users to connect using SQL Server Authentication or Windows Authentication.
SQL Server Authentication
By default, a login is created on the server and a corresponding user is created in the new database. PayGlobal will use this system user to log into the SQL Server to access the database and to set the application role. PGUser has very limited access to SQL Server and cannot access data in any database. The user is added to the Db_Denydatareader and Db_DenyDataWriter roles.
The setup program will not allow an existing user to access the new database.
If you have multiple databases, then you must assign each database a different PayGlobal user. For example:
Live database: PGUser_Live
Test database: PGUser_Test
After the user is created in the new database, the setup application configures the datalink file with the server, database, and user name and password.Windows Authentication
If the SQL Server uses Windows Authentication, then leave the PayGlobal user field empty. The setup program will configure the datalink file to connect using Windows Authentication. The Server and database names are also stored in the datalink file.
Click Restore. The Open dialogue box appears.
Browse to the backup file.
If the file is on a network share on the local machine, then use Network Neighbourhood to locate the file.SQL Server cannot use mapped folders to access files.
Click the required BAK backup file.
Click Open. The Admin login prompt appears.
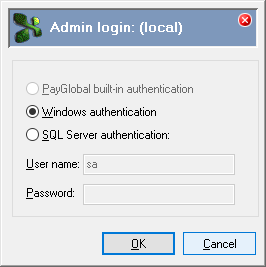
Select the authentication option that was used when SQL Server was installed:
Windows authentication or SQL server authentication.
If you select SQL server authentication, then complete the User name and Password fields.Click OK.
The backup file that you selected appears in the Restore from Backup File form.Click Restore.
The SQL Server Restore Options form appears.'Enter the following details:
Field Details Backup File Name Collation Backup Set Position You cannot change these values because they are derived from the BAK backup file that you selected. Database Name The default Database Name is derived from the BAK backup file.
You must change it to the Database name that you used on the Company Setup form, such as Test.
Data file Logical Name You cannot change this value because it is derived from the BAK backup file that you selected.
You assign a Logical Name when you create a database and it does not change when you upgrade the database. In this example, the Logical Name reflects the original database, not the database that you backed up in Back up Databases.
Folder Check that the path goes to the default Data folder in your SQL Server directory, or you can specify an alternate location.
SQL backup files contain the original data path, which is shown in the Backup File Name field. When you restore an SQL backup, ensure that you are restoring to the correct data path. Otherwise SQL could try to restore the MDF and LDF files to the original data path, which may not exist.
File Name The default File Name is derived from the BAK backup file.
You must change it to the Database Name that you used on the Company Setup form. In this example you change it to Test.mdf.
Log file Logical Name You cannot change this value because it is derived from the BAK backup file that you selected. Folder The SQL transaction Log File folder uses the same path as the Data File folder.
Exception: When the SQL data and transaction log files are on different physical drives (usually to enhance performance).
File Name The default File Name is derived from the BAK backup file.
You must change it to the Database Name that you used on the Company Setup form. In this example you change it to Test_log.ldf.

Click OK. An Information message appears when the backup is successfully restored.
Click OK to return to the Company Setup form.
You must secure the database after you restore from a backup.
In this example, when you secure the database, the Test company folder and default sub- folders are created in the Companies folder. The PG.udl and SQL.dat file associated with the database are created in the Perm folder.
After you restore a database, you must secure it before you can access it.
- Make sure that the Database name on the Company Setup form, such as Test, matches the Database Name you used on the SQL Server Restore Options form.

- Click Secure existing. A warning message appears.

- Click Yes to continue securing the database. If the specified database directory does not exist, then a Confirm box appears.

- Click Yes to create the directory. The Admin login prompt appears.

Select the authentication option that was used when SQL Server was installed:
Windows authentication or SQL server authentication.
If you select SQL server authentication, then complete the User name and Password fields.Click OK.
- If a Confirm message appears, click Yes to continue. An Information box appears.
Click OK to return to the Company Setup form.
Click Close. A Confirm box appears.
Click Yes to close the Company Setup form.
After you upgrade or restore an SQL server database, we recommend that you restart the SQL Server Service to free resources.
You have created the following:
A database folder called Test in the Companies folder.
Test does not contain any database files.A database called Test on your SQL Server.
Test stores the database files. You can view the new database using SQL Server Enterprise Manager.
Install PayGlobal in your Versions directory.
- Close all applications, including PayGlobal.
Navigate to the new PayGlobal release version file on your computer.
We recommend saving the PayGlobal MSI installation file in the Versions root folder so you can use the Patch Tool if required.
Double-click InstallPayGlobal v4.xx.0.x.msi.
The Welcome page appears with the installation version number.Click Next. The End-User License Agreement page appears.
Read the license agreement.
If you accept the agreement, then click I accept the terms in the License Agreement
to enable the Next button.Click Next. The Select Installation Folder page appears.
Click Browse and navigate to your Versions folder.
In the Folder name field, add the version number you are installing to the path. For example, C:\PayGlobal\Versions\4_XX_0_X
The installation wizard can automatically create the 4_XX_0_X folder.
Click OK to return to the Select Installation Folder page.
Click Next. The Ready to Install page appears.
Click Next. The Installing PayGlobal [version] page appears, and the progress bar shows the wizard installing the components in the installation folder.
The Completing the PayGlobal [version] Setup Wizard page appears.Click Finish. The PayGlobal Installation Wizard closes.
You have installed the new PayGlobal version and now you need to update the Hr.ini file so you can upgrade your test database.
After you install the new PayGlobal version into its own folder, you need to update the Hr.ini file to upgrade your test database.
- Open your Hr.ini file.
Add a RUNVERSION section for the new version. For example:
[RUNVERSION_4_XX_0_0]
RootPath=C:\PayGlobal\Versions\4_XX_0_0\
To start upgrading a database, you simply need to change the company's RunVersion
value to match the new [RUNVERSION_value] entry.Always upgrade your test database before you upgrade your 'live' database so you can check that everything works correctly in the new version, such as your designer reports
Update the RunVersion value for your test database.
The RunVersion value for the test database must match the [RUNVERSION_value] entry, as shown below:Databases
[COMP0001]
CompanyPath=C:\PayGlobal\Companies\Live\
CompanyName=Live
RunVersion=4_29_0_0[COMP0002]
CompanyPath=C:\PayGlobal\Companies\Test\
CompanyName=Test
RunVersion=4_31_0_0[COMP0003]
CompanyPath=C:\PayGlobal\Companies\Training\
CompanyName=Training
RunVersion=4_29_0_0Versions
[RUNVERSION_4_31_0_0]
RootPath=C:\PayGlobal\Versions\4_31_0_0\[RUNVERSION_4_29_0_0]
RootPath=C:\PayGlobal\Versions\4_29_0_0\Save and close Hr.ini.
Now you need to copy across additional files, such as rpm_hr.ini, into the new version folder.
To ensure that your installation of PayGlobal can submit data for Single Touch Payroll, you must install the latest certificate. The latest certificate is available from PayGlobal Support upon request.
The stpSetting.default.config file has been replaced by PayGlobal.Business.Net.dll.config. It’s used to contain the Host and Thumbprint settings for both Payday and STP.
- Payday Filing “Host” must be set to: https://nz.agencyapi.myob.com
- STP Settings “Host” must be set to: https://stp.agencyapi.myob.com
The “Thumbprint” is contained with the associated Payday Filing/ STP Certificate.
After you install the new version, you need to copy additional files into the new version folder.
rpm_hr.ini
Each version folder must have a copy of rpm_hr.ini. This file contains the path to the Hr.ini. If the version folder that PayGlobal is using does not contain a copy of rpm_hr.ini, then your reports will not process (in Schedule Info, Status remains as "Waiting").
- Copy the rpm_hr.ini in an existing version folder and paste it into the new version folder.
Open rpm_hr.ini and check that the path to Hr.ini is correct. For example:
[HR_INI_PATH]
Path=C:\PayGlobal\Hr.ini
bank.ini
You must copy the bank.ini file from your current version folder and paste it into the new version folder.
ads.ini
SQL Server databases use ADS virtual tables to run reports. If the version folder that PayGlobal is using does not contain a copy of ads.ini, then you may receive the following error when you attempt to run a report: "Error 5185: Local server connections are restricted in this environment". The ads.ini file is not used when you are running PayGlobal locally.
payglobal.jpg
If you have a custom logo, then you need to copy payglobal.jpg from the Image folder in an existing version folder to the Image folder in the new version folder.
PayGlobal.Business.Net.dll.config
This file controls your ability to use the MYOB Agency API for completing Payday Filing in New Zealand and Single Touch Payroll (STP) in Australia.
For each upgrade from v4.41 to a newer version, you must copy this file from your existing version and replace the one in the new version application directory.
The database directory contains customised files that you need to copy from the live database to the test database.
Perm
The Perm folder contains files used for user and layout settings, such as DailyViewLayoutDefault.ini. You need to copy these files from your live database into the Perm folder in the test database. However, the Perm folder also contains PG.udl and SQL.dat files that are database-specific.
Do not copy the PG.udl and SQL.dat files from your live database to the test database. If you overwrite the new PG.udl and SQL.dat files in the test database with the live database files, then you will connect to the live database specified in the PG.udl file instead of the new test database
Rept
PayGlobal uses two Rept folders:
- The main Rept folder in the version directory contains the original report definitions that were imported as part of installing or upgrading PayGlobal.
- The Rept folder in the company database directory contains customised report definitions.
When you run a report, PayGlobal checks the company database Rept folder for the report definition, and it does not find that definition, it uses the original definition in the version Rept folder. If you have customised reports, then you need to copy these files from your live database into the Rept folder in the test database. You would then run the customised reports in the test database to ensure that they run correctly in the upgrade version.
If you copy across all report definitions and your database Rept folder contains a standard report that is updated in the upgrade version, then PayGlobal will run the old version of the report, not the updated report in the version Rept folder. You should delete standard reports in the data Rept folder.
SpreadSheets and Workflow
PayGlobal treats SpreadSheets and workflows in the same way as reports. If you have customised SpreadSheets or workflows, then you need to copy these files from your live database into the corresponding folder in the test database. You would then use the customised files in the test database to ensure that they run correctly in the upgrade version.
You have installed the new PayGlobal version and set up a new test database so now you can upgrade your test database.
- Start PayGlobal for the test database.
A message appears asking whether you wish to upgrade. If the message does not appear, then your upgrade procedure may have been unsuccessful. In Confirm Upgrade Version, you will confirm the upgrade version. Click OK.
When PayGlobal completes the update, an audit log message appears. When you acknowledge this message, PayGlobal will update the version number.You must ensure that no other user can access the PayGlobal executable during the upgrade. If another user logs on to PayGlobal at this point, the database upgrade will start again and you will have to restore the database.
Press Enter or click Yes to view the audit log.
Reviewing the audit log will help you understand the nature and extent of the conversion process. When you upgrade, liabilities are refreshed automatically. The audit log may contain lines that begin with an exclamation mark (!). The exclamation mark highlights liabilities that have been refreshed. You can ignore these notifications.Do not ignore any warnings in the audit log. Warnings are important. For example, “Corruption detected” means that you have to find the cause of the data corruption and correct it.
Press Esc to exit the audit log. A message appears.

Press Enter or click OK to exit PayGlobal.
When you restart PayGlobal, it will automatically email Customer Support to inform them of your database upgrade (if your messaging is set up to send and receive mail).You have successfully upgraded your test database.
After you upgrade your database, you cannot run it on an earlier version of PayGlobal. If your PayGlobal application is an older version than your company database, then the following message appears when you restart PayGlobal: "Your database is a newer version than your executable version. Please call PayGlobal Ltd for further assistance." You can click OK to close the message, but PayGlobal will not start.
The upgrade process checks that the VirtualPayslip table has a value less than 2000, and the following information appears in the audit log:
6 Checking Virtual Payslip field count.
If the VirtualPayslip table exceeds this value, the following message appears in the upgrade log:
7 Virtual Payslip field count too high. Total must be less than 2000, please change in Company Settings, Virtual Payslip tab.
After you complete the upgrade installation, you can confirm that it was successful by checking the version number.
- Log on to PayGlobal.
- Select Help > About in the main menu.
The About > General tab appears containing the full PayGlobal version number.
If the General tab does not contain the PayGlobal version number that you installed, then the upgrade was unsuccessful. Download the upgrade installation again and repeat the upgrade process or contact Customer Support for help. - Click OK to return to the main PayGlobal window.
Use the following procedures to check your test database.
- Complete the After the Upgrade steps, including importing reports.
- Run an entire payroll process in parallel with your current version live run.
Test all business-critical reports to ensure that they run correctly in the upgraded version. You must test designer reports and reports that use UDFs (User-Defined Fields).
If you have customised SpreadSheets or workflows, then you would test them too.
When you are satisfied that your database performs as expected, you can upgrade your live database.
Upgrading the live database
If you use Self-Service, then you need to complete some extra procedures for all your live company databases. See Changes for self-service.
After you have completely checked the test database on the upgrade version, you can upgrade your live database.
- Open your Hr.ini file.
Update the RunVersion value for your live database.
For example:Databases
[COMP0001]
CompanyPath=C:\PayGlobal\Companies\Live\
CompanyName=Live
RunVersion=4_24_0_0[COMP0002]
CompanyPath=C:\PayGlobal\Companies\Test\
CompanyName=Test
RunVersion=4_24_0_0[COMP0003]
CompanyPath=C:\PayGlobal\Companies\Training\
CompanyName=Training
RunVersion=4_18_0_0Versions
[RUNVERSION_4_24_0_0]
RootPath=C:\PayGlobal\Versions\4_24_0_0\[RUNVERSION_4_18_0_0]
RootPath=C:\PayGlobal\Versions\4_18_0_0\Save and close Hr.ini.
Run the StartPayGlobal.exe for the live database to upgrade it and move it to the new version.
You can then uninstall the previous version of PayGlobal, if required.