
- Created by SamA, last modified by MatthewW on Jul 14, 2023
You are viewing an old version of this page. View the current version.
Compare with Current View Page History
« Previous Version 7 Next »
https://help.myob.com/wiki/x/ngAQBg
How satisfied are you with our online help?*
Just these help pages, not phone support or the product itself
Why did you give this rating?
Anything else you want to tell us about the help?
Before you and your employees can start using the Employee Self Service (ESS) module, there are a few one-off setup tasks you need to complete.
Enabling ESS features
To be able to access ESS screens and set up ESS features, start by enabling the Employee Self Service feature on the Enable/Disable Features screen (CS10000).

Company tree
Go to the Company Tree screen (EP204061).
In the Company Tree pane, click Manager.

In the Workgroup Details pane, change the Description to the highest workgroup name. This is usually Payroll Manager, as this lets the payroll manager to approve all leave if it has not been actioned by their direct line manager.

In Contact field of the Members section, select the employee you want to be the workgroup owner.
Select the Owner checkbox.

Optionally, you can add a second approver by clicking the Add Row icon (
 ). This second approver won't be a workgroup owner.
On the form toolbar, click the Save icon (
 ).
).To create the next workgroup, click the Add WorkGroup icon (
) in the Company Tree pane.
Repeat steps 3–5 until you've added all manager workgroups.
To add the employee workgroups, the manager in the company tree and click plus icon ().
Repeat steps 3–5 until you've added each employee workgroup to the relevant manage group. No employees will be set as owners.
Ignore the "user is not active" error, as you'll set them up as an ESS user in a later setup task.
Approval Maps
MYOB recommends setting up an ESS approval map, even if it is a simple map with a single approver.
If you don't have an ESS approval map – or if an employee isn't included in the map when they request leave – then all requests are approved automatically as soon as they're submitted.
Navigate to the Assignment and Approval Maps screen (EP205500)
Click Add Approval Map
Name - Submit a Leave Request
Add a Step
Remain on the Conditions Tab
Description - Name of the relevant Manager Workgroup
Entity - Employee
Value - relevant employee workgroup this manager will be approving requests for
Operator - And - Or if managers have sub groups
Navigate to the Rules Actions Tab
Search and Select the corresponding Workgroup
Employee - Should self populate, if it’s blank you may be missing an owner in your company tree setup, or there could be multiple managers listed in this manager workgroup, if this is the case leave blank if you want ANY manager able to approve
Reason for Approval - Select from Is Optional, Is required, Or Is not Prompted based on customer requirements (most common is not Prompted)
Reason for Rejection - Select from Is Optional, Is required, Or Is not Prompted based on customer requirements (most common is not Prompted)
Click Save
Repeat Steps 4-14 until all Manager workgroups have been created
Click Save
For example, to set up a simple map that uses the employee’s Reports To field, on the Assignment and Approval Maps screen (EP205500), add a new map with the following properties:
- For the Entity Type, select “Submit a Leave Request”.
- On the Conditions sub-tab, enter a Description.
- On the Rule Actions sub-tab:
- For the Approver, select “Employee from Document”.
- For the Employee, open the Employee node, then scroll down to find and select “Reports to”. This will appear in the Employee field as “((EPEmployee.SupervisorID))”.
Self service preferences
Settings on the Self-Service Preferences screen (MPPP1010) affect how the Employee Self Service module as a whole. For example, you can choose how leave requests are numbered, how they look in calendars and whether they need to be approved by a manager or not.
The Default Request Colour and Team Scheduler Employees Source options determine how leave requests will appear on the Employee and Team Calendars (see Employee and team calendars).
By default, no Leave Request Approval Map is selected

At present, the Settings tab contains one option, which determines whether employees can update their own pay distribution details in the Self-Service module (see Pay distribution).
Self Service Preferences
Navigate to the Self Service Preferences screen (MPPP1010)
Leave Request Notification Template - Click to search and select Leave Request Notification
Default Request Colour - Default is always Gray, this can be changed to customer specific if required.
Team Scheduler Employee Source - Select Company Tree (for customers using the company tree based setup of ESS) or Employee Supervision (if using the Reports to based setup of ESS)
Remain on the Request Type Colour Tab
Click +
Search and Select all relevant leave types that employees are requesting via ESS
Give each leave type a colour or leave all as the default
Navigate to the Settings tab
Pay Distribution - Set as per customer requirement (Allow Employee to Update should only be ticked on if the customer has advised they want their employees to be able to change their own bank account details)
Click Save
Setting up leave types
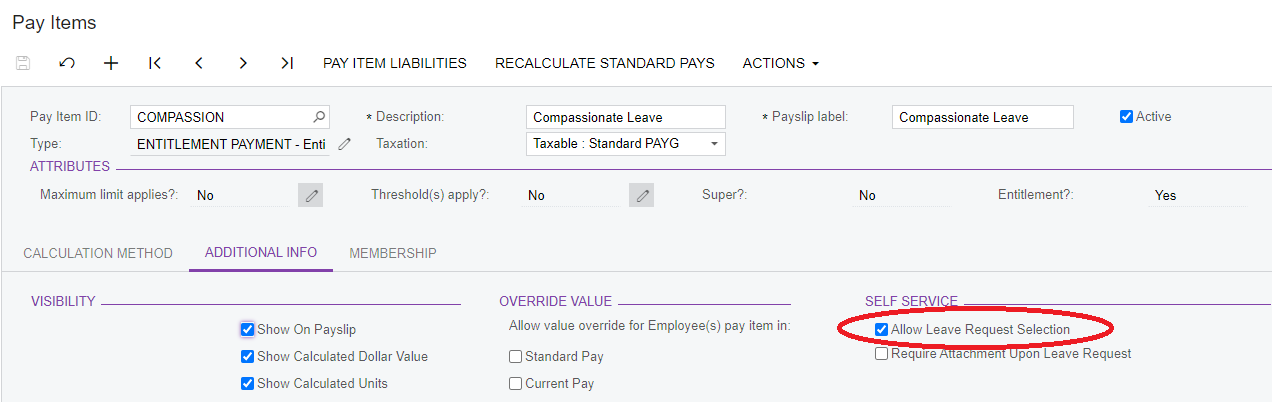
To make leave types visible in the Employee Self Service module, tick the Allow Leave Request option on the Additional Info tab of the Pay Items screen (MPPP2210) for each entitlement payment pay item that should be available to employees when making a leave request (see making leave requests). If you want to require employees to attach a document when they request leave, tick the Require Attachment Upon Leave Request option.
To make leave balances visible on the Leave Balances or Projected Leave Balance screens (see employee leave balances), tick the Show Leave Balances and/or Show Projected Leave Balances options on the Rules tab of the Entitlements screen (MPPP3300) for each leave entitlement that you want to display.
- Open the Pay Items screen (MPPP2210) and choose the entitlement you wish to enable in ESS.
- In the Additional Info tab, select the Allow Leave Request Selection option under the Self Service section. This will allow employees to submit a leave request of this type in the ESS.
Automation Notifications
Navigate the the Automation Notification screen (MYGI1000) - note this is a hidden screen so you will need to use the screen id in the URL to get to it
Click the relevant Leave Request notifications hyperlink
Tick the Active tickbox on
Save
Repeat steps until all Leave Notifications are active
Leave request notification templateA default Leave Request Notification template is provided—this is used to notify a manager that a leave request has been generated by a team member. You can review this template and make any necessary edits on the Notification Templates screen (SM2040PL).
Two notifications are provided in on the Automation Notifications screen (MYGI1000): Leave Request Approved and Leave Request Declined. These notify employees when their requests are approved/declined. Use the Automation Notifications screen to ensure that these notifications are active, and to make any necessary edits to them.
Imports
Import Users
Import Using Z_UserLogins xml
Import User Roles
Import using Z_UserRoles xml
Update Passwords
Import using EBS_PWords xml
What's next?
After setting up ESS, you can give users access to start making the most of its features.