
- Created by MatthewW, last modified by PS Guest Editor on Feb 15, 2023
You are viewing an old version of this page. View the current version.
Compare with Current View Page History
« Previous Version 2 Next »
https://help.myob.com/wiki/x/uQLFBQ
How satisfied are you with our online help?*
Just these help pages, not phone support or the product itself
Why did you give this rating?
Anything else you want to tell us about the help?
Changes for 2023–2024
Here's a summary of the IRD changes for the 2023–2024 financial year, effective 1 April 2023:
Was | Now | |
|---|---|---|
ACC earners levy | $1.46 | $1.53 |
ACC maximum liable earnings | $136,544.00 | $139,384 |
Student loan annual threshold | $21,268.00 | $22,828.00 |
Year-end tasks
You can load the updated tax tables at any time before the year end. The changes take effect from 1 April 2023.
- Save the TaxScaleNewZealand_2023_04_01.csv file to your PC.
- Open Greentree Desktop and go to HR > System > Payroll > Import/Export > Tax Scales Import. The Import Tax Scales window opens.

- In the Source File field, select the tax scales file that you saved to your workstation.
- For any new tax codes you need to set up, complete the following fields. Greentree creates the new tax codes:
- Authority – Select the authority you have set up for the IRD.
Accumulator – Select the accumulator used to calculate tax.
This is normally called Taxable Income. If you’re updating an existing site, check the current tax transaction type. The accumulator to select here is the same one that is selected in the Based on field of the transaction type.Clearing Account – If you are using the Greentree General Ledger module, enter the tax clearing account code.
- Click OK.
- In the Confirmation window, choose whether to update the transaction type descriptions:

- Clicking Yes automatically updates the transaction types to the description contained in the import file.
- Clicking No means you need to manually change the transaction type descriptions.
- Ensure that you have an accumulator for gross plus employer super contributions. This should be the total amount of salary or wages plus the gross amount of employer superannuation contribution (before ESCT) in the previous tax year. KC - I have adjusted this sentence as it is only one accumulator normally called "gross + employer super contributions"
- Ensure ESCT transaction types are not included in the accumulator.
- Go to HR > Payroll > Reports > ESCT Threshold Review.
- On the ESCT Threshold Review Report form, set the Year field to 2023.
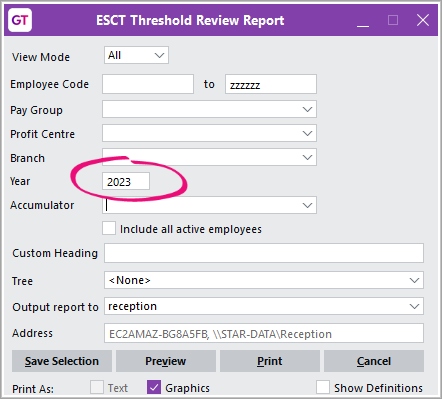
- In the Accumulator field, select the accumulator from step 1.
- Click Preview or Print. Which one outputs the report? - KC - Both do
Analyse the report’s output.
For more details on the ESCT Threshold Review report, see the online help.
- If the report includes a suggested ESCT rate and ESCT transaction type, either:
- Change this for an employee by going to Employee > Payroll > Employer Costs.
Use the FREE function gtHREmployeeChangeEsctTT to update in bulk. This function replaces ESCT transaction types that exist on the Employer Costs tab on the Payroll form with a different ESCT transaction type of the same type. For example, you can replace ESCT KiwiSaver TT (XK2) with KiwiSaver TT (XK3).
For more details on the gtHREmployeeChangeEsctTT FREE function, see the online help.
- Set up KiwiSaver for any new employees.
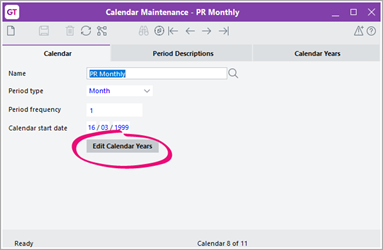
- In Greentree Desktop, go to System > System Setup > Calendar Maintenance. The Calendar Maintenance - New Calendar form opens.
- In the Name field, select the calendar used for payroll – for example, PR Monthly.
- Click Edit Calendar Years.
- On the Calendar Years tab, check if the 2023/2024 tax year is listed.
- If the 2023/2024 tax year isn't listed:
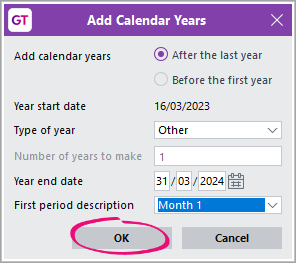
- Click Add year. The Add Calendar Years window opens.
- Select After the last year.
- Set the Type of year to select Other.
- For the Year end date, enter the pay end of the last pay period for the new financial year.
- Change the First period description to be the first period of the new year – for example, Month 1.
- Click OK.
- Click the Save icon on the form toolbar.
Closing previous years ensures that no pays are accidentally processed to a past date.
- Go to HR > System > Payroll > Posting Period Maintenance. The Human Resources Posting Periods form opens.
- In the Calendar field, select your payroll calendar.

- Double-click the new year – for example, 2023/2024. A window opens that displays pay periods for new year.
- Right-click the first period listed and choose Set as Last Open Period.
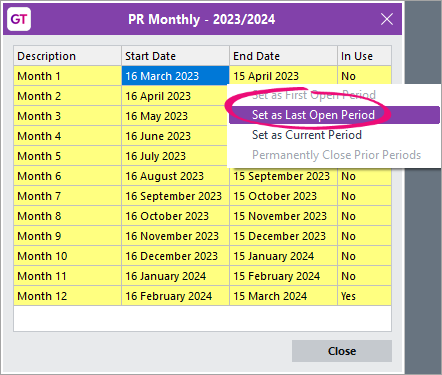
- Right-click the same period and choose Set as Current Period.
- Click Close.
- On the Human Resources Posting Periods form toolbar, click the Save icon.
- To close any future periods, highlight the last open period, right click, and select Set as Last Open Period.I found this a bit confusing because we already told them to close and save the window. Do they need to double-click on the 2024/2025 year to open an equivalent window?
Close and save.
To delete the last calendar year if it has been set up incorrectly and no transactions exist in that year, run the HR Script Validate HR Periods. This script removes any 0 value period summaries.