
You are viewing an old version of this page. View the current version.
Compare with Current View Page History
« Previous Version 3 Next »
https://help.myob.com/wiki/x/ygAQBg
How satisfied are you with our online help?*
Just these help pages, not phone support or the product itself
Why did you give this rating?
Anything else you want to tell us about the help?
Requesting leave
The self-service features integrate with the Payroll module to allow employees to request leave. Leave requests made in the self-service functions flow through to the Payroll module for processing; leave requests’ statuses are then reported back to the self-service features so employees can track the progress of their requests.
Employee leave balances
Employees can view their current leave balances on the Leave Balances screen (MPES3022):

Clicking one of the Leave Request links next to a leave type makes a new leave request for that type (see making leave requests).
The Projected Leave Balance screen (MPES4012) lets employees enter a future date to check how much leave they will have by then, so that they can plan their leave requests more easily:

Leave projections are based on the employee’s default Pay Group.
Employees can create a new leave request from this screen by clicking the New Leave Request toolbar button (see making leave requests).
The Employee Calendar screen shows a calendar month, with any leave requests made by the employee highlighted. Hovering the mouse over a leave request shows additional details in a popup.
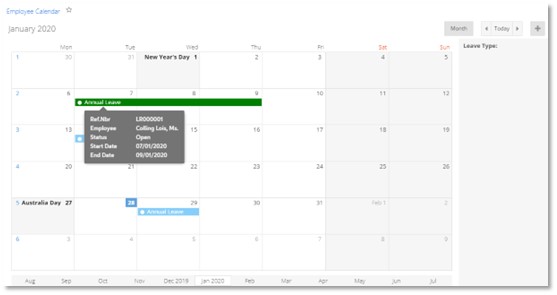
Employees can double-click on a day to request leave on that day, or click and drag across a range of days to request leave for the range. See making leave requests for more information on the process of making and submitting leave requests.
Making leave requests
Employees can make a new leave request using the Submit a Leave Request screen (MPES3020). Managers can also use this screen to make leave requests for the employees they manage. The screen can be accessed in several ways:
- On the Employee Calendar screen, by double-clicking on a day, or clicking and dragging across a range of days (see Employee and team calendars).
- On the Leave Balances screen, by clicking one of the Leave Request links in the main table (see Employee leave balances).
- On the Projected Leave Balance screen, by clicking the New Leave Request toolbar button (see Employee leave balances).
- On the Leave Requests screen, by clicking the + toolbar button (see Reviewing leave requests).

The screenshot above shows the Submit a Leave Request screen as it appears for Australian companies. For NZ companies, the Units Requested field is replaced by separate Hours , Days and Weeks Requested fields.
Using this screen, a user (employee or manager) can enter all of the details for the leave request, including the leave type, and leave start and end dates. The user can also attach documents to the request (this may be required, depending on the leave type’s configuration—see Setting up leave types).
Once the user clicks Submit, the request is submitted for approval, as per the Approval Map specified for leave requests (see Self service preferences). If the user is an employee, an email notification is sent to their manager as soon as the request is submitted.
If no approval map has been specified (see Leave request approval map), the request is approved automatically as soon as it is submitted.
Requesting leave
The Employee Self-Service module integrates with the Payroll module to allow your Employees to request leave. Leave Requests made through the Self-Service functions flow through to the Payroll module for processing; leave requests’ statuses are then reported back to the Self-Service module so Employees can track the progress of their requests without having to contact the Payroll team.
Leave balances
Allows your Employees to view their current leave balances on the Leave Balances screen.

Clicking on one of the Leave Request links next to a leave type starts a new leave request for that type.
Leave requests
Your employees can make a new leave request using the Submit a Leave Request screen. Managers can also use this screen to make leave requests on behalf of the employees they manage. The Leave Request screen can be accessed in several ways:
- On the Leave Balances screen, by clicking one of the Leave Request links in the main table.
- On the Projected Leave Balance screen, by clicking New Leave Request toolbar button.
- On the Employee Calendar screen, by double-clicking on a day, or clicking and dragging across a range of days.
- The Leave Requests option under the Self-Service menu.

Using the Submit a Leave Request screen, a user (Employee or Manager) can enter all of the details required for a leave request; this includes the leave type, leave start, and end dates. The user can also attach documents to the request; this may be required depending on how the leave request type has been configured.
Once the user clicks the Submit button to send the leave request for approval. The approval flow is controlled by Approval Maps configured in Advanced Payroll. If the user is an Employee, an email notification is sent to their manager as soon as the request is submitted. If no Approval Map has been specified, the request is approved automatically as soon as it is submitted. Payroll still have control through the Leave Administration function as to when the leave will be paid via the Payroll module.
When viewed by a Manager, the team Calendar shows all the details of all the team member’s leave requests. When viewed by a team member, only the details of their leave requests are shown – other team members’ requests appear on the calendar, but without any details.