You can print a purchase (bill, quote or order) when recording the transaction. Or, you can print or email your purchase documents later, in a batch. Once you've set up AccountRight to send emails, you're good to go.
Made a payment to a supplier? Learn how to print or email a remittance advice.
When you print or email, you can choose the form template you want to use. If you like, you can personalise these forms to suit your business needs.
Print or email automatically
You can set a preference to automatically print or email purchases (Setup > Preferences > Purchases tab > Automatically Print / Email Purchases When They are Recorded).
To print or email a purchase when recording
When recording a bill, quote or order choose if you want to print or email.

To print
Click Print.
Choose the form you want to use.
Print the purchase.
To email
Click Send To and choose Email.
Check the details of the email and update if required.
(Optional) Click Attach to select an additional file to attach to the email.
(Optional) Click To if you have additional email addresses in a contact’s card which you want to use. Or type email addresses directly into the To field, separated by semi-colons (;).
Click Send. The purchase will be emailed as a PDF attachment.
The transaction will be recorded before the purchase is previewed or printed.
To print or email purchases after recording
Instead of printing or emailing each purchase when you record it, you can print or email them later, in a batch. They'll be waiting to be printed or emailed based on the choice you make in the Delivery Status field when recording the transaction.

To print or email purchases
Go to the Purchases command centre and click Print/Email Purchase Orders.
Click the To Be Printed or To Be Emailed tab.
Select the Purchase Type based on the layout you used to record the transaction. The purchases waiting to be printed or emailed will be listed.
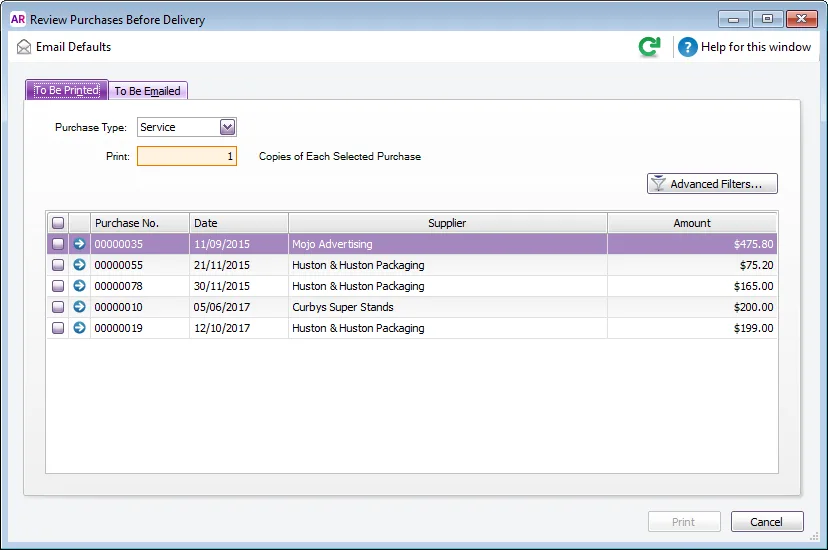
If you want to view the details of a transaction, click the zoom arrow ( ) next to it. If you can't find a purchase, it might have already been printed or emailed. Click Advanced Filters and deselect the option Unprinted or Unsent Purchases Only.
(Optional) To filter the list of purchases or choose the form template you want to use, click Advanced Filters. Also see To set the default purchase form below
If you're printing purchases:
Type the number of copies you want to print in the Print field.
Select the purchases you want to print.
Click Print. The purchases will be sent to your printer.
If you're emailing purchases:
Select the purchases you want to email.
If you want to change a recipient’s email address, subject or message, click to highlight the purchase and update the email details at the top of the window. Learn how to change the email defaults.
(Optional) To email a purchase to multiple email addresses, enter the addresses in the Email Address field, sparated by semi-colons (;).
Click Send Email. The purchases will be emailed as PDF attachments.

To reprint or re-email purchases
If you've already printed or emailed a purchase, here's how to do it again:
Go to the Purchases command centre and click Print/Email Purchase Orders.
Click the To Be Printed or To Be Emailed tab.
Select the applicable Purchase Type.
Click Advanced Filters.
Deselect the option Unprinted or Unsent Purchases Only.
Click OK. The purchases you've previously printed or emailed will be listed again.
If you're printing purchases:
Type the number of copies you want to print in the Print field.
Select the purchases you want to print.
Click Print. The purchases will be sent to your printer.
If you're emailing purchases:
Select the purchases you want to email.
If you want to change a recipient’s email address, subject or message, click to highlight the purchase and update the email details at the top of the window. Learn how to change the email defaults.
(Optional) To email a purchase to multiple email addresses, enter the addresses in the Email Address field, sparated by semi-colons (;).
Click Send Email. The purchases will be emailed as PDF attachments.
To set the default purchase form
AccountRight has default purchase forms you can use, and you can customise these forms to suit your business needs.
If you want to change the default form that's used for a purchase type, here's how:
Go to the Purchases command centre and click Print/Email Purchase Orders.
Click Advanced Filters.
Choose the Purchases Type (this is the layout used for the purchase: Service, Item or Professional).
Choose your customised form as the Selected Form for Purchase.
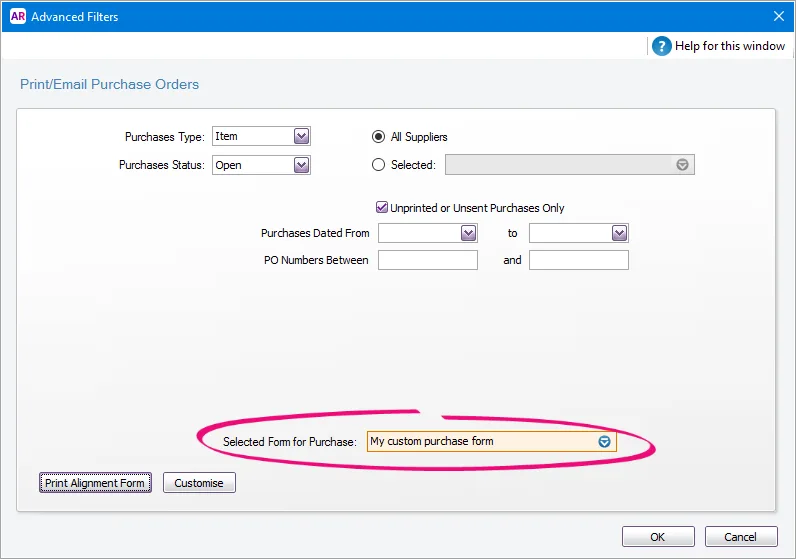
Click OK.

The selected form will now be used when printing or emailing purchases for that purchase type.
FAQs
How do I remove a purchase from the print or email queue?
If it's just one or two purchases you need to remove, open the purchase and change the Delivery Status to Already Printed or Sent.

If there are lots of purchases to be removed, see Removing transactions from the print or email queue.