
- Created by admin, last modified by AdrianC on Oct 24, 2016
https://help.myob.com/wiki/x/pQec
ANSWER ID:9080
This page explains how to record, track and deposit various customer payment types. This involves setting up a clearing account into which various payment types received through Customer Payments or Receive Money transactions can be allocated. A bank deposit can then be created allowing you to group payment types, cheque, cash, visa, etc. which can then be printed as a bank deposit slip.
For processing electronic payments, see the AccountEdge help (Australia | New Zealand).
- undeposited funds account
- payment methods, such as cash, cheque, EFTPOS, etc.
An undeposited funds account exists to pool all received payments prior to those payments being cleared to the bank. Once an undeposited funds account is set up in your software, this account must be linked to ensure all received payments are allocated to the correct account.
Task 1 - Create an undeposited funds account
- Go to the Lists menu and choose Accounts.
- Click the Assets tab.
- Click New. The Account Information window appears.
- Select the Detail Account option.
- Set Account Type to Bank.
- Enter the Account Number and the Account Name, such as Undeposited Funds. The Edit Accounts window should look similar to the following example:

- Click the Details tab and set the Tax Code to N-T. If desired, enter an account Description.
- Click OK.
Task 2 - Link the undeposited funds account
- Go to the Setup menu and choose Linked Accounts then choose Accounts & Banking Accounts.
- In the Bank Account for Undeposited Funds Account field enter the Undeposited Funds account created above.
- Click OK.
Payment methods
To access the list of existing payment methods, go to the Lists menu and choose Sales and Purchases Information then choose Payment Methods.

To create a new payment method:
On the Sales and Purchases Information window shown above, click New.
Enter the Payment Method and set the Method Type as shown in the following example.
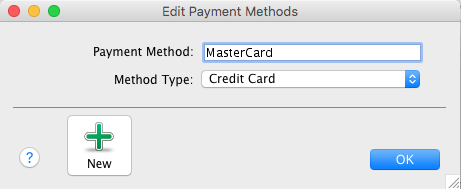 The Payment Method can only contain letters and numbers - don't use special characters such as dashes, commas or asterisks.
- Click OK.
To link a payment method to a customer's card to specify the method of payment for that customer:
- Go to the Card File command centre and click Cards List.
- Click the Customer tab.
- Click the zoom arrow next to the applicable customer.
- Click the Payment Details tab.
Set the customer's Payment Method. Depending on the selection, a set of fields may be displayed for additional information, such as credit card details as shown below.

- Click OK.
The steps below show how to record a customer payment, thus depositing their payment into the linked Undeposited Funds account.
- Go to the Sales command centre and click Receive Payments. Alternatively, a payment can also be recorded via the Banking command centre and clicking Receive Money.
- Select the Group with Undeposited Funds option at the top of the window.
- In the Customer field, click the dropdown arrow to select the customer who is making the payment.
- Enter the payment Amount.
- Select the applicable Payment Method.
- [Optional] Click Details and enter additional information relating to the payment method, such as credit card information.
- Enter the transaction details.
- Click Record.
The window below shows a Receive Payment customer payment that is to be grouped with the undeposited funds, and also has a Payment Method selected.

Once there are multiple payments which have all been allocated to the linked Undeposited Funds Account, these funds can be cleared (deposited) to your bank account. This can be done for all received payments, or only for those received by specific methods, such as all cash and cheque deposits, or perhaps all credit card payments, etc. The steps below will transfer the customer receipts from the linked Undeposited Funds account to your software's General Bank account.
- Go to the Banking command centre and click Prepare Bank Deposit.
In the Deposit to Account field, ensure the correct account is displayed and change if required.
- Enter the Date and an applicable Memo for this deposit.
- Click the dropdown arrow next to the Select Receipts By field and select Payment Method. Note: If using the Deposit Adjustment feature to record items such as credit card merchant fees, you will need to set the Select Receipts By option to All Methods.
- Click the dropdown arrow next to the Payment Method field and select the Payment Methods to be deposited.
- Click OK to return to the Prepare Bank Deposit window where only payments received by the specified methods will be displayed.
- Select the payments to be included in the bank deposit.
- [Optional] Click Deposit Adjustment to enter and record credit card merchant fees.
- Click Record.
The window below shows 3 credit card transactions and 1 credit card merchant fee selected for the bank deposit.

The Bank Deposit Slip report can be used for a bank deposit advice.
- Go to the Reports menu and choose Index to Reports.
- Click the Banking tab.
- Click the Bank Deposit Slip report (under the Cheques and Deposits sub-heading) then click Customise.
- Set the report parameters to display the applicable deposits then click Display.
- Click Print.
The window below shows an example Bank Deposit Slip report. It shows the bank account details and the total credit card payments that have been deposited.

- Where a deposit includes more than one Payment Method, such as cash and cheques, the Payment Methods will be listed and totalled separately.
- To automatically group all customer payments with your undeposited funds:
- Go to the Setup menu and choose Preferences.
- Click the Banking tab.
- Select the option When I Receive Money, I Prefer To Group It With Other Undeposited Funds.
- Click OK.
Once you create a bank deposit, the individual payments are "locked", so you'll need to delete the bank deposit before the individual payments can be modified. This also allows you to change the details of a bank deposit, such as a different date or to modify which payments are included in the deposit.
Here's how you do it:
- From any command centre, click Find Transactions.
- In the Find Transactions window, click the Accounts tab.
- In the Search by Account field, select your undeposited funds account.
- In the Dated From and To fields, specify a date range in which the bank deposit was first created.
- Find the bank deposit - this will be a credit and will generally have a "CR" number. See our example below where the bank deposit contains 3 individual payments

- Click the zoom arrow to open the deposit transaction.
- Go to the Edit menu and choose Delete Bank Deposit Transaction. The deposit will be deleted and the individual payment transactions will once again be listed on the Prepare Bank Deposit window.
- You can now delete or modify the individual payment transactions as required, then prepare the bank deposit again.