- Created by admin, last modified by AdrianC on Jan 24, 2020
This information applies to MYOB AccountRight version 19. For later versions, see our help centre.
https://help.myob.com/wiki/x/gQGc
ANSWER ID:9220
If you've upgraded to AccountRight v19 from an older software version, like Accounting, Accounting Plus, or Premier, you might have customised templates you'll want to use in AccountRight. This support note explains how to copy these templates into AccountRight.
If you're moving your software to a new computer, see Moving AccountRight v19 to a new computer.
What is a customised template?
A customised template is something you've customised to suit your business needs, such as:
- a form (invoice, statement, receipt, etc.)
- a personalised letter (for mail merge)
- a custom report
- BASlink information (Australia only)
This support note assumes you've already installed AccountRight v19.
Using File Explorer
To be able to find the folder containing your customised templates, you'll use File Explorer (previously called Windows Explorer). To open File Explorer, simultaneously press the Windows and E keys on your keyboard:

- Close your MYOB software.
- Open File Explorer by simultaneously press the Windows and E keys on your keyboard.

- Double-click your C drive. This might be called Local Disk (C:) or Hard Disk (C:).
- Double-click your previous MYOB software folder, for example Myob18, Premier12, etc.
Double-click the folder containing your customised templates. This will depend on which templates you want to copy.
If you have customised double-click this folder forms Forms
(e.g. C:\Premier12\Forms)letters Letters
(e.g. C:\Premier12\Letters)reports Custom
(e.g. C:\Premier12\Custom)The templates within the folder will be displayed.
- Select all templates within the folder (go to the Organize menu and choose Select All).
- Right-click the selected templates and choose Copy.
Double-click to open your AccountRight installation folder. The default location is shown below. If you've installed AccountRight in a different location, go to that location instead.
If you're using The installation folder will be here (v19.12 or earlier) The installation folder will be here (v19.13 or later) AccountRight Standard C:\Standard
N/A AccountRight Plus C:\Plus
C:\PlusClassic
AccountRight Premier C:\Premier
C:\PremierClassic
AccountRight Enterprise C:\Enterprise
C:\EnterpriseClassic
Paste your templates into the applicable folder (right-click the folder and choose Paste).
If you copied paste the files in this folder forms Forms
(e.g. C:\PremierClassic\Forms)letters Letters
(e.g. C:\PremierClassic\Letters)reports Custom
(e.g. C:\PremierClassic\Custom)- If a message displays about replacing files, click Yes to all.
- Repeat steps 4 - 10 to copy all required templates.
Your customised templates will now be available for use in AccountRight.
If you used BASlink in your previous MYOB software, you probably have BASlink setup information and data from previous reporting periods that you want in AccountRight.
Here's how to copy this information.
- Close your MYOB software.
- Open File Explorer by simultaneously press the Windows and E keys on your keyboard.

- Double-click your C drive. This might be called Local Disk (C:) or Hard Disk (C:).
- Double-click your previous MYOB software folder, for example Myob18, Premier12, etc.
Double-click the BASlink folder. In this folder there will be a Setup folder and, if you have saved BAS reports from specific periods, there will be a Data folder.
- While holding the CTRL key, click the Setup folder and, if present, the Data folder. This will select these two folders.
- Right-click the selected folders and choose Copy.
Double-click to open your AccountRight installation folder. The default location is shown below. If you've installed AccountRight in a different location, go to that location instead.
If you're using The installation folder will be here (v19.12 or earlier) The installation folder will be here (v19.13 or later) AccountRight Standard C:\Standard
N/A
AccountRight Plus C:\Plus
C:\PlusClassic
AccountRight Premier C:\Premier
C:\PremierClassic
AccountRight Enterprise C:\Enterprise
C:\EnterpriseClassic
- Right-click the BASlink folder and choose Paste.
- If a message displays about replacing files, click Yes to all.
Your BASlink information will now be available in AccountRight.
You can set a copied form as the default form to use when printing and emailing. Here's how to do this for invoices, but the same approach can be used for any form.
- Go to the Sales command centre and click Print/Email Invoices.
- In the Sales Type field, select your applicable invoice type.
- Click Advanced Filters. The Advanced Filters window is displayed.
- In the Selected Form for Sale field, select the applicable form to use as the default then click Use Form.
- Click OK to the Advanced Filters window.
Now when you print or email that invoice type, the selected form will be used.
Being prompted to upgrade a form?
Forms from previous MYOB software versions may need to be upgraded for use in AccountRight. If you're prompted to upgrade a form the first time you use it, click OK to complete the upgrade. It only takes a moment.
FAQs
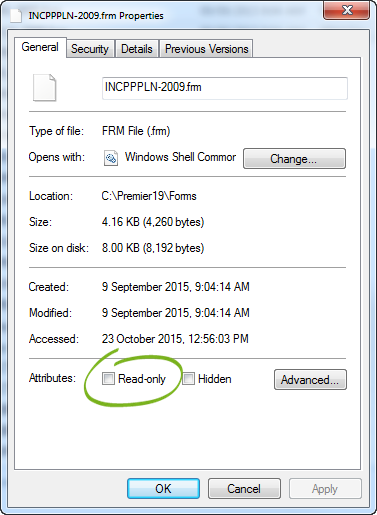
If you can't see a form after copying it into AccountRight, it could be because the form's properties are set to "Read-only".
Here's how to check:
- Open File Explorer by simultaneously press the Windows and E keys on your keyboard.

Double-click your AccountRight installation folder.
If you're using The installation folder will be here (v19.12 or earlier) The installation folder will be here (v19.13 or later) AccountRight Standard C:\Standard
N/A AccountRight Plus C:\Plus
C:\PlusClassic
AccountRight Premier C:\Premier
C:\PremierClassic
AccountRight Enterprise C:\Enterprise
C:\EnterpriseClassic
- Double-click the Forms folder to display its contents.
- Right-click the applicable file (the form which is not displaying) and choose Properties.
- Deselect the Read-only option.

- Click OK.
Still can't see the form? See Unable to see a customised form
