
- Created by Suchi Govindarajan, last modified by KimP on Oct 29, 2018
https://help.myob.com/wiki/x/ix_EAQ
How satisfied are you with our online help?*
Just these help pages, not phone support or the product itself
Why did you give this rating?
Anything else you want to tell us about the help?
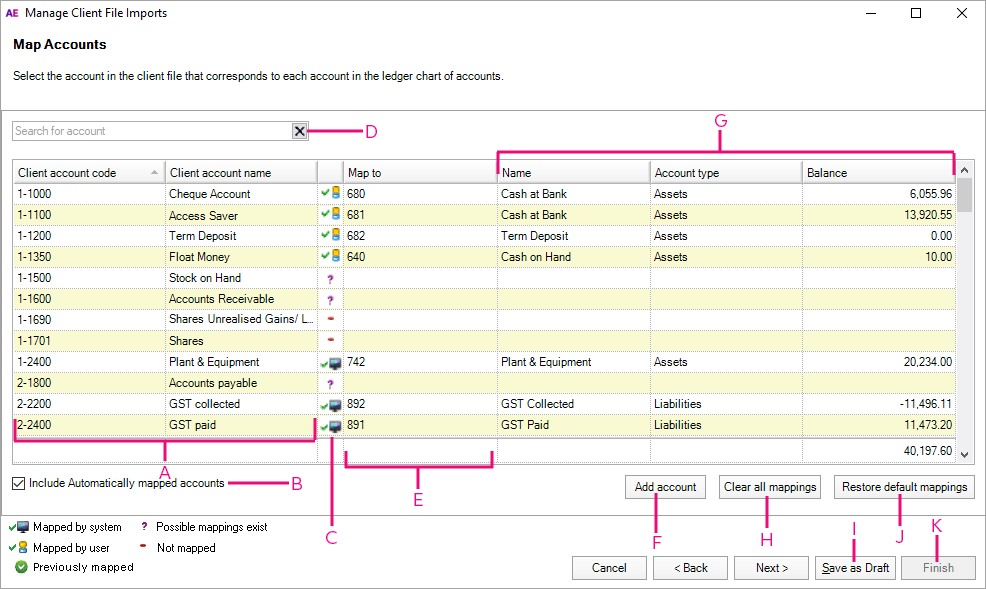
If you ticked the checkbox to map the client accounts, the Map Accounts window will open. The Map Accounts window enables you to select the account(s) on the Practice ledger chart that correspond to each account on the accountant's chart. You can make adjustments to the ledger accounts, where required, to align the balances with the equivalent accountant's accounts.
Any GST columns in the imported file will be ignored. Make sure to add any GST data manually.
Map accounts window
Button / Field | Description | |
|---|---|---|
| A | Client account code / name | These columns represent your client's chart of accounts. They're populated with the data in the Account code and Account name columns of the file you've selected to import in stage 1 of the import wizard. |
| B | Include Automatically mapped accounts | Select this checkbox to display all accounts automatically mapped by the system (indicated with If the system has mapped the account incorrectly, choose the correct account by clicking in the Map to column for the account, and choosing the correct account. |
| C | Status | Displays the mapping status for each account. A legend for these icons is available on the bottom-left of the window. |
| D | Search for account | Enter an account code or name to search the client chart of accounts. |
| E | Map to | Click in the Map to column for each row and choose an account from your chart of accounts to allocate the balance of the client's account to. See To map an accounts below for a demonstration. |
| F | Add account | If you can't find the account you're looking to map to, create a new account by clicking the Add account button. In the Add account window, specify the Account type, Account type group, Account number, Account name and Tax Code for the new account. When finished, click OK to create the account. |
| G | Name, Account type, Balance | These columns represent the chart of accounts in your MYOB ledger. These fields are populated automatically when you select an account in the Map to column for the row. |
| H | Clear all mappings | Click this button to clear all mappings, including automatic system mappings and any manual mappings you have made. A confirmation window displays requesting confirmation to clear the mappings. Click Yes. |
| I | Save as Draft | Save your current mappings as a draft. When you reopen this window, your saved mappings will appear so you can continue where you left off. |
| J | Restore default mappings | Click this button to clear any changes you've made when mapping your accounts. This will restore the account mappings to their original state and any changes you've made will be lost. You confirmation window displays requesting confirmation to restore the default mappings. |
| K | Finish | This button becomes active once all accounts have been mapped. |
In the Map Accounts window, click in the Map to column for each account and choose an account to import your client's transactions to.

The Account name, Account type and Balance are updated automatically. Repeat this step for each account code.
Once all accounts have been mapped, click Next.
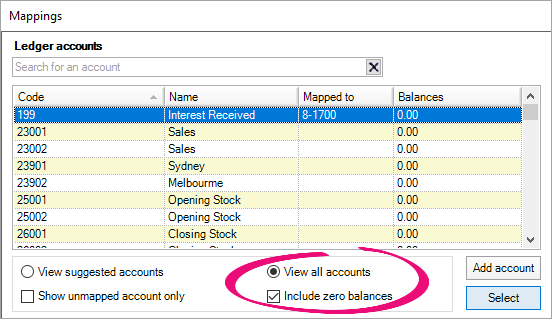
Can't find the account you're looking for?
Before adding an account, select the View all accounts and Include zero balances options, then try searching for the account.
You may notice the account you're looking for already exists!
- Click Add account.
- Specify the Account type, Account type group, Account number, Account name and Tax Code for the new account.
- Click OK.
The mapping template displays the most recently imported client accounts that are mapped to ledger accounts.
You can select to View/Edit mapping template from the Select File screen, which means you can view and modify account mappings without having to choose a client file to import.
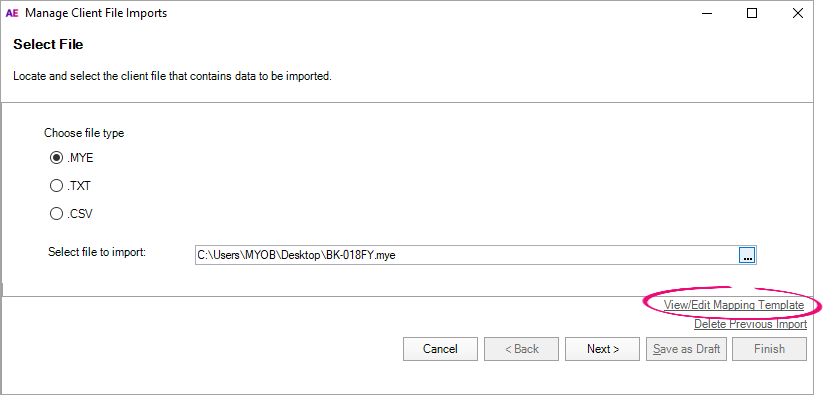
The View/Edit mapping template window is identical to the Map Accounts window
- To change a mapping, click the drop-down menu in the Map to field.
- To add an account, click Add Account.
The Save button will be enabled once a change has been made. Click Save to save your changes.
Existing mappings cannot be cleared or restored from default mappings.
Mapping FAQs
The system maps some of the accounts automatically based on the account name and account balance:
- where the account name on your chart of accounts is the same as an account name in your client's chart, and no other accounts exist with the exact same name.
- where the balance of an account in your chart of accounts is exactly the same as the balance of an account in your client's chart, where no other accounts exist with the same balance.
These mappings are displayed on the Map Accounts window with a ![]() icon in the status column. To re-allocate a system mapped account, select the account and click the drop-down arrow in the Map to column.
icon in the status column. To re-allocate a system mapped account, select the account and click the drop-down arrow in the Map to column.
If the system can't find an exact match, you'll need to map the account manually. The system may suggest accounts that you may want to map to instead. Accounts with suggested mappings are displayed on the Map Accounts window with a  icon in the status column.
For example, where the account name on your chart of accounts is similar to an account name in your client's chart, or is exactly the same as more than one account in your chart of accounts, the system will suggest
If the account has not been mapped or no suggested mappings exist, a ![]() is displayed in the status column.
is displayed in the status column.
Icon | Mapping status |
|---|---|
| Automatically mapped by the system to the chart of accounts |
| Possible mappings exist to the chart of accounts |
| Has no mapping to the chart of accounts |
| Mapped by the user to the chart of accounts |
| Was previously mapped to the chart of accounts |

Yes! Click in the Map To field for that row and choose another account.
The Mappings window has a number of display options:
| Option | Description |
|---|---|
| View suggested accounts | Displays a list of suggested mappings for the account. If the status column displays an |
| View all accounts | Displays a full list of accounts. |
| Show unmapped accounts only | Hides accounts that have already been mapped to an account on your client's chart. |
| Include zero balances | Displays accounts on your chart with a balance of $0.00. |
If you can't find an account, select View all accounts and Include zero balances, then type any part of the account code or name in the Search for an account field.
If the account you're looking for doesn't exist, click Add account to create a new account and add it to the chart.
 Yes
Yes
 No
No
 Thanks for your feedback.