If you have transactions that you record regularly—for example, a rent invoice—you can set them up as recurring transactions and get them to record automatically. Why you should use recurring transactionsRecurring transactions save you a lot of repetitive manual data entry. For example, if you issue invoices for exactly the same amounts to your customers, month after month, then you can set up recurring invoices to be automatically recorded on a specific day each period, with all of the information about the invoice already filled in. This is ideal if your business offers ongoing subscriptions, leases, or service contracts. You can create and edit recurring transactions for the following transaction types: Scheduling recurring transactionsSpecify how often you want the transaction to be recorded, and for how long you want to schedule it. For example, you can schedule a recurring invoice for a product a customer needs to restock monthly for the next 12 months. 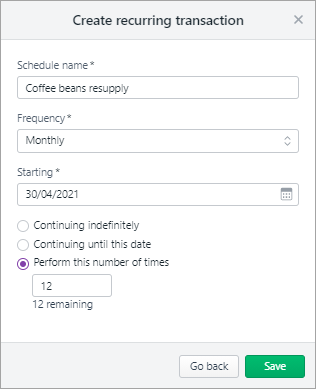
Or, you can just save the recurring transaction as a template to use whenever you like, without a set frequency. If a recurring transaction changes (such as when the customer pays you or the amount), you can easily edit the the recurring transaction. | UI Expand |
|---|
| title | Create a recurring transaction |
|---|
| You can create a recurring transaction from scratch, from an existing transaction, or from another recurring transaction. | UI Expand |
|---|
| title | Create a recurring transaction |
|---|
| Create a recurring transactionGo to Recurring transactions (available in the following menus: Sales, Purchases, Banking, or Accounting). - Click Create recurring transaction and choose the transaction type you want to create.
- Enter the Schedule name.
Choose the Frequency, such as Daily, Weekly or Monthly. | UI Text Box |
|---|
| If the frequency of the transaction will vary or if you want to save the recurring transaction as a template to use whenever you like, choose a Frequency of Never. You can then create a transaction whenever you need it. |
Choose the date you want recurring transactions to start from. Indicate how long you want the recurring transaction to continue. | If you want to... | Then... |
|---|
| schedule the transaction for an unlimited period | Select Continue indefinitely. | | schedule the transaction until a set date | Select Continue until this date and type the date in the adjacent field. | | schedule the transaction for a set number of times | Select Perform this number of times and type the number of times in the adjacent field. |
- Complete the details of the invoice that will be created from the recurring transaction. Need a refresher on entering invoices?
- Click Save to save the recurring transaction and invoice details.
|
| UI Expand |
|---|
| title | Create a recurring transaction from an existing transaction |
|---|
| Create a recurring transaction from an existing transaction - Find the transaction you want to make a recurring transaction. For example, go to the Sales menu > Invoices.
- Click the number of the invoice you want to make a recurring transaction.
Click Save as recurring. - Enter the Schedule name.
Choose the Frequency, such as Daily, Weekly or Monthly. | UI Text Box |
|---|
| If the frequency of the transaction will vary or if you want to save the recurring transaction as a template to use whenever you like, choose a Frequency of Never. You can then create an invoice from the recurring transaction from this template whenever you need it. |
Choose the date you want recurring transactions to start from. Indicate how long you want the recurring transaction to continue. | If you want to... | Then... |
|---|
| schedule the transaction for an unlimited period | Select Continue indefinitely. | | schedule the transaction until a set date | Select Continue until this date and type the date in the adjacent field. | | schedule the transaction for a set number of times | Select Perform this number of times and type the number of times in the adjacent field. | Click Save. Recurring transactions will now be automatically created based on the original transaction according to the frequency and period you've specified. You can send these transactions based on your current process.
|
| UI Expand |
|---|
| title | Create a recurring transaction from another recurring transaction |
|---|
| Create a recurring transaction from another recurring transactionIf you have previously created a recurring transaction, you can create another recurring transaction from it. You might do this if the new recurring transaction has similar frequency, transaction details, etc. When you create a recurring transaction from another recurring transaction, the details from the original recurring transaction are automatically filled in (you can change them if you want). For example, if you offer the same monthly service to a number of customers, you can create a recurring invoice for one customer and then create additional recurring invoices for other customers, just changing the customer each time. - If you haven't already done so, create the first recurring transaction, following the steps in 'Create a recurring transaction' above.
- Start to create a transaction as you normally would, for example, go to the Sales menu and click Create invoice.
- Click Prefill from recurring:
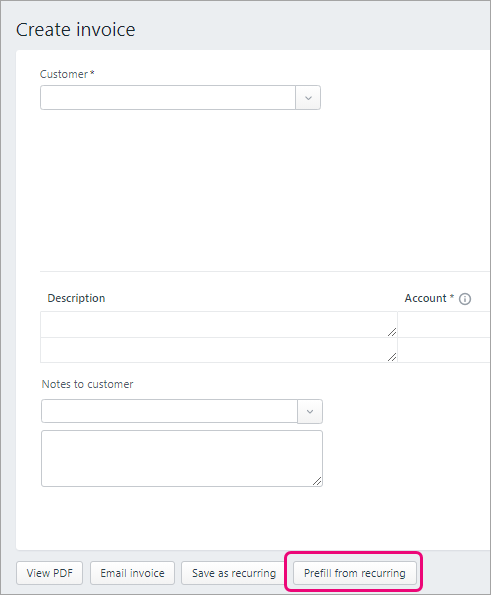 - Select a recurring transaction and click Prefill. The transaction is filled in with the details of the recurring transaction you've selected.
- Change any details you need to, for example the Customer.
- Click Save as recurring.
|
|
| UI Expand |
|---|
| title | View, edit or delete recurring transactions |
|---|
| View, edit or delete recurring transactionsGo to Recurring transactions (available in the following menus: Sales, Purchases, Banking, or Accounting). - Click the Schedule name of the recurring transaction.
- If you want to:
|
| UI Expand |
|---|
| title | Using a recurring transaction to manually record a transaction |
|---|
| Using a recurring transaction to manually record a transactionOnce you've set up a recurring transaction (as described above), you can create a transaction from it. For example, if you've set up a recurring invoice to record automatically once per month, you can also use that recurring transaction to record the invoice whenever you need to. - Start to create a transaction as you normally would, for example, go to the Sales menu and click Create invoice.
- Click Prefill from recurring:
- Select a recurring transaction and click Prefill. The transaction is filled in with the details of the recurring transaction you've selected.
- Change any details you need to, for example the Customer.
- When you're ready, click Save.
|
Sending recurring invoicesMYOB automatically creates transactions based on the recurring transaction schedule you've chosen. You can see these listed with other transactions, for example, in the Sales menu > Invoices. These transactions are generally created between 7am and 9am on the day the recurring transaction is due. | UI Text Box |
|---|
| If you have a recurring transaction with a Frequency of Never, you'll need to manually create the transaction. Just go to Recurring transactions, click the Schedule name of the recurring transaction, complete any transaction details and click Save. |
You then can decide how you handle that transaction based on your current business process – for example, you can email an invoice, or create a PDF of it to print or add as an email attachment. Need a refresher? See Emailing, printing or downloading invoices. |

 Yes
Yes
 No
No
 Thanks for your feedback.