
- Created by admin, last modified by AdrianC on Sep 27, 2022
https://help.myob.com/wiki/x/UKBqAg
How satisfied are you with our online help?*
Just these help pages, not phone support or the product itself
Why did you give this rating?
Anything else you want to tell us about the help?
When you receive a bill from a supplier for a purchase you’ve made, first you need to enter the purchase as a bill in MYOB. Then, you can pay the bill.
If you need to enter payments that aren’t associated with a supplier (for example, a telephone bill or bank charges), enter these as spend money payments. For more information see Spend money .
To speed things up, why not upload supplier invoices to your in tray and let MYOB help create the bill for you?
Setting up suppliers and items
You can set up suppliers and items at any time—before you begin entering a bill (using the Contacts menu or the Items link in the Purchases menu) or while creating it (using the + Create supplier and + Create item list options).
OK, grab the bill you want to enter into MYOB and we'll step you through it.
To enter a bill
Go to the Purchases menu and choose Create bill. The Create bill page appears.
Speed up data entry by pre-filling the bill details from a document in your In tray—just click Prefill from a source document at the top of the bill. Tell me more...
In the Supplier field, enter the supplier’s name, or click the dropdown arrow and choose the supplier from the list.
If you want to:
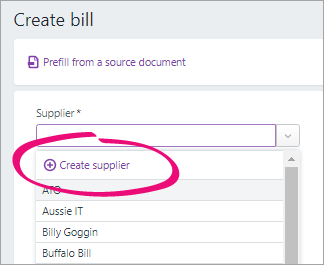
Add a new supplier:
Click the Supplier dropdown arrow and choose Create supplier. Enter as much (or as little) info as you like and click Save. You can always go back later and fill in additional details.
Add missing details to an existing supplier:
Type the supplier's name in the Supplier field and hit Enter. Click the dropdown next for the information you want to add, such as the ABN or billing or shipping address, add the details and click Save.

(Australia only) The status of the ABN you've entered in the supplier's record will checked, and the status shown. Click the status to see more details.
(Australia only) If the bill is a reportable payment, select the option Report to ATO via TPAR. Learn more about Reportable contractor payments.
If necessary, change the Bill number. This number is automatically generated, based on the last number used.
If you change the bill number, you’ll change the automatic numbering. For example, if you change the number to 000081 , the next time you create a bill, the new bill number will be 000082 .
If you have one, enter the Supplier invoice number.
Check the date in the Issue date field.
- Choose the Due date for the bill (when the bill needs to be paid).
- Select whether the amounts in your bill are Tax inclusive or Tax exclusive.
- Click Field layout and select the applicable option based on what you're being billed for.

If you're being billed for items:
in the Item ID field, click the dropdown to choose an item or search for an item by entering all or part of the Item ID or Supplier item ID. As you type, matching items are shown.
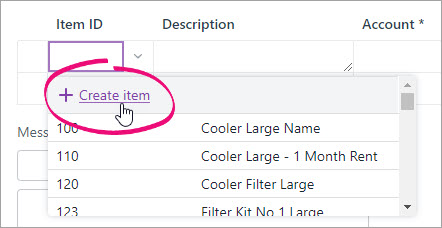
Entering a new item?
Click the dropdown arrow in the Item ID column and choose + Create Item. Enter the item details and click Save. Learn more about Creating items.
When you choose an item, its Description, Account for tracking inventory, Unit price and Tax code appear automatically, based on what you entered when you created the item (you can edit these details if you want).In the No of units field, enter the quantity to be delivered. The calculated Amount is displayed.
There's a built-in calculator in the No of units, Unit price, Discount and Amount fields. Just enter a calculation in the field and tab out of it:

Repeat step a for each item on the bill.
If you're being billed for services:
In the Description column, enter a description of the service you're providing.
- Choose the Account the expense from this service will be allocated from. If you're not sure, check with your accounting advisor.
Enter the Amount of this service.
If required, change the Tax code. If you're not sure, check with your accounting advisor.
Repeat step 10 for additional services. If you need to delete a line from your bill, click the delete
 icon to the right of the item line.
If you want, enter a note to appear on the bill.
If you're making a payment against the bill, enter it in the Amount paid field.
Enter any charges for Freight, and if required, change the default Tax/GST code. If you can't enter Freight, you'll be prompted to specify a linked account for freight. (What is a linked account?)
The totals are calculated at the bottom of the bill:
Subtotal—the total for the items added to the bill
Tax—the amount of tax applied to the bill
Total—the subtotal amount plus the tax amount
- Amount paid—the dollar amount that's already been paid to the bill.
- Balance due— the amount owing.
- (Optional) Choose a Job if the line item relates to a specific job. Tell me more about jobs.
Check that all the information in the bill is correct.
When you're done, use the buttons across the bottom of the page to choose an action.
If you want to... do this... Print or save a PDF copy Click View PDF. The bill appears as a PDF in a new tab where you can print or save it. See Previewing and printing bills. Cancel without saving Click Cancel. Save it as a recurring bill Click Save as recurring. Enter the recurring transaction Schedule name and choose the Frequency, such as Daily, Weekly or Monthly. Learn more about recurring transactions. Prefill the bill from a recurring transaction Click Prefill from recurring. Select a recurring transaction and click Prefill. The bill is updated with information from the recurring transaction. Learn more about recurring transactions. Save the bill and create a new one Click Save and new then choose Save and create new . The bill is saved and a new, blank bill appears. Save the bill and create a duplicate Click Save and new then choose Save and duplicate. The bill is saved and a new bill with the same details and new bill number is created. Save the bill Click Save. Here's our example bill:

Ready to pay the bill? See Entering payments made to suppliers.
FAQs
How can I record cash purchases?
If you want to keep track of cash purchases, set up a contact called "Cash Purchases" and choose this contact when making a cash purchase.
My business isn't registered for GST - why is GST appearing in my bill?
In older versions of MYOB Essentials, the tax code that appears in a bill is based on your GST settings.
In this version of MYOB, the bill's tax code is based on the tax code assigned to the item or account:
- In item bills, the default tax code is based on the tax code assigned to the item. If your business is not registered for GST, you should edit the item to set its default tax code to N-T.
- In service bills, the default tax code is based on the tax code assigned to the account. If your business is not registered for GST, you should edit the account to set its default tax code to N-T.
Why am I seeing the error "You must specify a category"?
If you use categories in AccountRight, there's a preference you can turn on which requires a category to be selected for every transaction.
Until we implement category functionality in the web browser version of AccountRight, if you're seeing this message in the browser you'll need to record the transaction in your desktop AccountRight software.
(AccountRight browser users) Why has the default Freight tax code changed?
If you access an AccountRight company file in a browser, you might notice that the default Tax/GST code for the Freight field is different when you enter a purchase in the browser.
This is because the default Tax/GST code in the browser is set in the linked account for freight (Accounting menu > Manage linked accounts > Purchases > Expense or cost of sales account for freight), whereas in the desktop app it's set in the supplier's card (Card Information window > Buying details > Freight Tax Code).
You can easily change the Tax/GST code in the transaction or set a new default Tax/GST code in the browser by editing the freight linked account.
Why is the ITEM NO column blank on my bill PDF?
This is because you need to enter a Supplier item ID in an item listed on the bill.
With the release of the new inventory features in MYOB Business, you now get the ability to add a Supplier item ID in the Buying section of your inventory items.

You can use the Supplier item ID to check against supplier bills or to help you to find the item when buying or selling it.
The Supplier item ID also appears in the ITEM NO column of your bill PDF (this column previously displayed the Item ID). This makes it easier for the supplier to look up the item in their inventory and close your order.
How do I change the line account in item bills?
To ensure the right account is used for your item bills, the asset account for tracking inventory that you've set for the item will be used. If you want to change this account you'll need to do it in the item.

 Yes
Yes
 No
No
 Thanks for your feedback.