| HTML |
|---|
<!--Product families-->
<div style="display: none;" data-swiftype-name="productFamily" data-swiftype-type="enum">Accountants Office Suite</div>
<div style="display: none;" data-swiftype-name="productFamily" data-swiftype-type="enum">Accountants Enterprise Suite</div>
<!--Countries-->
<div style="display: none;" data-swiftype-name="country" data-swiftype-type="enum">Australia</div>
<!--Product capabilities-->
<div style="display: none;" data-swiftype-name="productCapability" data-swiftype-type="enum">AO Tax (AU)</div>
<div style="display: none;" data-swiftype-name="productCapability" data-swiftype-type="enum">AE Tax Series 6 & 8 (AU)</div>
<div style="display: none;" data-swiftype-name="productCapability" data-swiftype-type="enum">AE Tax (AU)</div> |
| div |
|---|
| ARTICLE LAST UPDATED: | Page Information Macro |
|---|
| modified-date |
|---|
| modified-date |
|---|
|
|
If you use MYOB Tax with PLS for lodgment, you can pre-fill your client's tax return from an ATO report.
This works for Individual Tax returns from 2017 onwards. Follow these four simple procedures to get up and running. 
Click on each step to see the workflow with screenshots. | UI Expand |
|---|
| title | 1. Access the Pre-fill Manager homepage |
|---|
| Manage all your pre-filling tasks from the Pre-fill Manager homepage. The Pre-fill Manager homepage displays the incomplete current-year Individual tax returns. There are two options for accessing the Pre-fill Manager homepage. | Option 1 | Option 2 |
|---|
| Click the Tax drop-down and choose Pre-fill Manager. | Go to the client's record > Tax returns tab > TASKS bar > Launch Pre-fill Manager. | | |
| UI Text Box |
|---|
| If your Pre-fill Manager homepage is missing, call Support on 1300 555 666. If you want to set pre-fill permissions for employees, see Changing Pre-fill Manager settings. |
|
| UI Expand |
|---|
| title | 2. Set up the pre-fill file location |
|---|
| | Excerpt |
|---|
There are two ways you can set up the pre-fill file location: with or without Document Manager. Use the option to set up without Document Manager if you want to save reports directly to your hard drive (or if you don't have Document Manager!) Follow the instructions for the option that applies to you. | UI Expand |
|---|
| title | I don't have Document Manager |
|---|
| - On the TASKS bar, click Report File Settings.
- In the Pre-fill Report File Settings window, select Use File System.
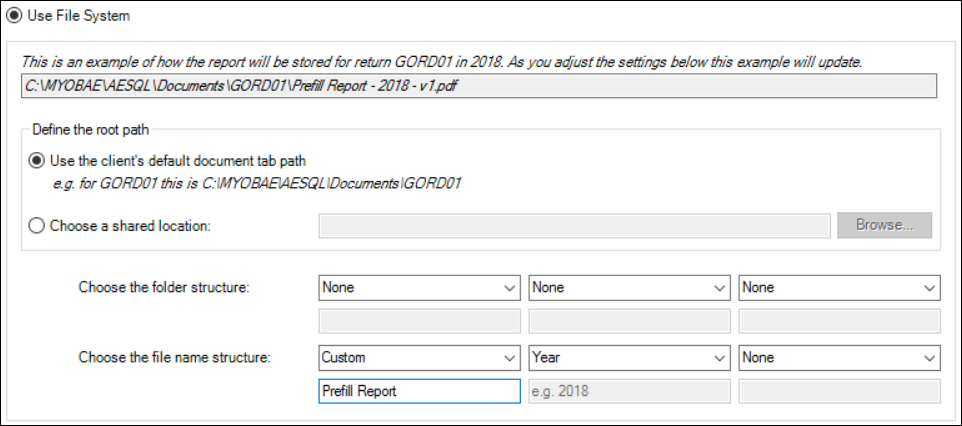 In Define the root path, select the folder path where the saved pre-fill reports will be stored. Select either: If you want to specify the folder structure and name structure, use the Choose the folder structure and Choose the file name structure fields. The fields control different parts of the path or file. | UI Text Box |
|---|
| In the Define the root path section, if you selected: Use the client's default document tab path, the file name must contain the year.
Choose a shared location, the file name must contain the year and the Return Code. |
- Click Save.
|
| UI Expand |
|---|
| title | I have Document Manager |
|---|
| - On the TASKS bar, click Report File Settings.
- In the Pre-fill Report File Settings window, select Use Document Manager.
- Click Edit.
 - In the Details tab, enter a Title for your reports, and select the Author.
- Click Next.
In the Profiling tab, select the Filing Cabinet. | UI Text Box |
|---|
| | Ensure that there is a category that contains the pre-fill year/s. Otherwise you'll see an error when you click Finish. |
Click Finish. In the Pre-fill Report File Settings window, the Filing cabinet and File name fields are populated with your settings. Click Save.
|
|
|
| UI Expand |
|---|
| title | 3. Download the pre-fill data |
|---|
| - On the Pre-fill Manager homepage, select the checkbox/es of the returns you want to pre-fill.
- On the TASKS bar, click Download & Save.
 Click Yes. On the Pre-fill Manager homepage, the Pre-fill Status column says Downloading. The file is downloaded to the location you set in the previous procedure.
Seeing something in the Pre-fill Manager homepage table and wondering what it means? These descriptions should help clear things up. | Column | Value description |
|---|
Pre-fill status | Not requested—No action taken by the user. Downloading—The report has been requested and is being downloaded from the ATO. Ready to pre-fill—The download is complete and the report is available for viewing. See the next procedure. Download Error—There was an issue during download. Click the link to view details of the error. Pre-fill Complete—The tax return has been successfully pre-filled. Prefilling—The tax return is currently being populated with the pre-fill data. Pre-fill Error—The pre-fill import has failed. | Pre-fill Report | Contains a link to the pre-fill report after clicking Download & Save and the download was completed successfully. | Date Downloaded | The date of the last successfully downloaded pre-fill report. | Date Pre-filled | The date of the last successful pre-filling of the tax return using pre-fill data. |
|
| UI Expand |
|---|
| title | 4. Pre-fill the tax return |
|---|
| The return that you're pre-filling into must be rolled over to the relevant tax year with a valid Tax File Number (TFN). - When the Pre-fill Status column says Ready to Pre-fill, select the tax return/s to pre-fill
- On the TASKS bar, click Pre-Fill into Tax.
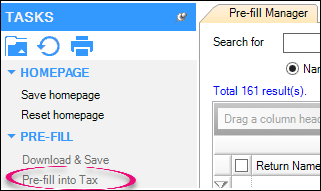 Click Yes. When pre-filling is completed, on the Pre-fill Manager homepage, the Pre-fill Status column says Pre-fill Complete. | UI Text Box |
|---|
| | If the Pre-fill Status column says Pre-fill Error, click the Pre-fill Error status to view the error. Use the Pre-fill FAQ's to see fixes for the errors. |
| Excerpt Include |
|---|
| taxau2018:What data will be pre-filled fills into Tax? |
|---|
| taxau2018:What data will be pre-filled fills into Tax? |
|---|
| nopanel | true |
|---|
|
|
More helpPre-fill Manager What data will be pre-filled fills into Tax? ATO Pre-fill FAQs and common errors | 


 Yes
Yes
 No
No
 Thanks for your feedback.