- Created by Suchi Govindarajan, last modified by MathangiS on Aug 25, 2021
https://help.myob.com/wiki/x/ZyCEAQ
How satisfied are you with our online help?*
Just these help pages, not phone support or the product itself
Why did you give this rating?
Anything else you want to tell us about the help?
Control groups let you organise assets with common characteristics such as cost limits, depreciation rates and methods. In Assets Live, the control group links the asset register to the configured source ledger to ensure:
- depreciation journals are posted into the correct accounts
- default depreciation rates are automatically applied to new assets added to the group.
You can edit information about a control group after it has been created. See Editing a control group.
To move between fields in the Maintain Control Group window use [Tab].
To move to a previous field use [Shift][Tab].
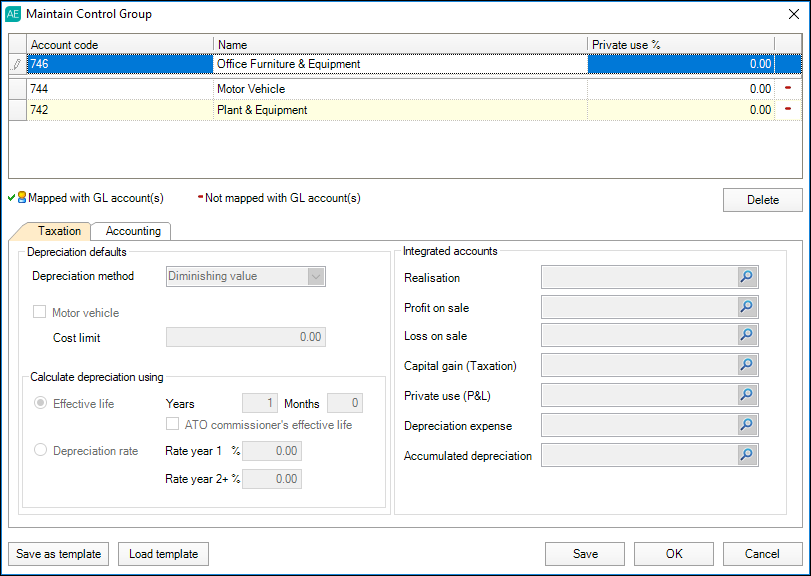
See Maintain Control Group window—Control group fields and Maintain Control Group window—Taxation tab fields for more information regarding the fields in the Maintain Control Group window.
- From the Client Accounting > Assets tab, click Maintain control group on the TASKS bar.
- In the Maintain Control Group window, click the first cell of the Account code column and enter the account code of the control group in the Account code cell.
Enter a control group name of up to 50 alphanumeric characters in the Name field. This field cannot be blank.
If you have selected Integrate with the supported general ledger when specifying your asset register settings, the Name field automatically displays the account name.

- Enter a percentage between 0 and 100% for the group in the Private use % field.
- Press Enter on your keyboard. The control group moves from the entry line to the table and the Taxation and Accounting tabs become available for input according to the configuration of the Asset Register.
On the Taxation and the Accounting tabs, fill in the following fields:
From the Depreciation defaults section, select the appropriate Depreciation method:
For the calculation type... Select from the following
Taxation - Diminishing value
- Immediate write-off
- Prime cost
- Temporary full expensing
Accounting - Diminishing value
- Exempt from depreciation
- Immediate write-off
- Prime cost
- Straight line
If applicable, you can tick the Motor vehicle checkbox to apply the ATO cost limit to all motor vehicles allocated to the control group. This is best if you have purchased multiple motor vehicles in the same financial year. You can look up the cost limit on the ATO website: Car cost limit for depreciation.
Select your Calculate depreciation using preferences from the following options:
Field Description Effective Life (Taxation) The depreciation rate is calculated based on the years and months entered. If applicable, tick the ATO comissioner's effective life checkbox. Useful Life (Accounting) The depreciation rate is calculated based on the useful life in years entered. Useful life is enabled only when the straight line method has been chosen. Depreciation Rate When this option is selected, the depreciation is calculated based on rate that you enter in the Rate year 1 and Rate year 2+ fields. In the Integrated accounts section, select or enter account codes to post journals for each of the following:
- Realisation
- Profit on Sale
- Loss on Sale
- Private use (must be a Profit and Loss account)
- Depreciation expense
- Accumulated depreciation
Account fields can be left blank however, when posting journals to the general ledger, if an integrated account field has been left blank the journal may not be posted.
If you have mapped the integrated accounts with a configured and supported general ledger, the Mapped with GL account(s) icon (
 ) is displayed in the last column of the control group table.
Click Save. The Maintain Control Group window remains open.
Did you know you can save your control group as a template? By clicking the Save as template button located on the bottom left of the Maintain Control Group window you can save the control group settings so they can be re-used for another client on a later date. Learn more about Control group templates here.To create another control group, click the next cell of the Account code column and go step 4. Otherwise, click Close to exit the Maintain Control Group window.

 Yes
Yes
 No
No
 Thanks for your feedback.