
- Created by admin, last modified by AdrianC on Jan 09, 2020
You are viewing an old version of this page. View the current version.
Compare with Current View Page History
« Previous Version 10 Next »
https://help.myob.com/wiki/x/ihLHAg
How satisfied are you with our online help?*
Just these help pages, not phone support or the product itself
Why did you give this rating?
Anything else you want to tell us about the help?
You can import an accounts list into MYOB to replace the default accounts list. This is handy when you're setting up MYOB if you have an accounts list you've exported from another program or have it in a spreadsheet.
You can also export the accounts list from MYOB to use in another program. Exporting is also a quick way to create a template file which you can use to to populate with your accounts info, ready for importing into MYOB.
Let's step you through it.
To import an accounts list
To import an accounts list into MYOB, the import file must:
- be a text (TXT) file
- be in tab-separated format
- contain a header row for all mandatory fields
- be under 20MB
To ensure your import file meets this criteria, we recommend using an import template. See the next task for details on creating an import template.
To import an accounts list
- Click your business name and choose Import and export data.
- On the Import tab, for the Data type choose Chart of accounts.
- Click Browse and locate the import file.
- Click the import file then click Open.
Select the method for handling duplicate records.
- Click Import.
To export an accounts list
- Click your business name and choose Import and export data.
- Click the Export tab.
- For the Data type choose Chart of accounts.
- In the Balances from field, choose the year you want the account balances to be reflected from.
- Choose the Account balances to be included in the export.
- Click Export. The file will be exported as a tab-separated TXT file. The first row will be a header row, listing all field headers.
To use an import template
Need to import an accounts list into MYOB but not sure where to start? The easiest way is to create an import template and populate it with your data, ready for importing.
You can create the template by exporting the accounts list from MYOB. The export file becomes your template.
To use the template, open it in Microsoft Excel and update its contents with your accounts data. You can then import the file into MYOB.
OK, let's step you through it.
- Click your business name and choose Import and export data.
- Click the Export tab.
- For the Data type choose Chart of accounts.
- In the Balances from field, choose the year you want the account balances to be reflected from.
- Choose the Account balances to be included in the export.
- Click Export. The file will be exported as a tab-separated TXT file. The first row will be a header row, listing all field headers.
You can now open the export file in a spreadsheet program, like Microsoft Excel, to enter your accounts info.
Use the import template
Now that you have a template, you can open it in Excel and replace the contents with your data - ready for importing.
Here's how:
- Open Microsoft Excel.
- Go to File > Open.
- For the type of file, select All Files(*.*). This ensures you'll be able to find your import template which is a text (.TXT) file.
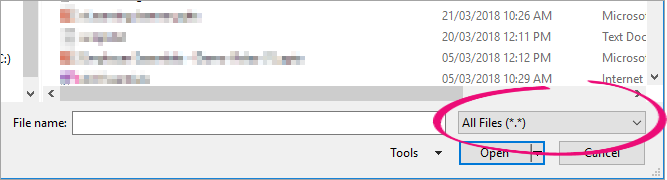
- Locate and open your exported text file. The Text Import Wizard appears.
- In Step 1 of the Text Import Wizard, select the Delimited option, then click Next.
- In Step 2 of the Text Import Wizard, select the Tab option, then click Next.
- In Step 3 of the Text Import Wizard, click Next.
Click Finish. The file contents of your template will be displayed. Notice in our example:
the first cell contains parentheses (brackets) - these need to remain, as they indicate that the import file is from MYOB.
the second row (beneath the row with the brackets) is labeled so you can easily work out what type of information is displayed in each column.
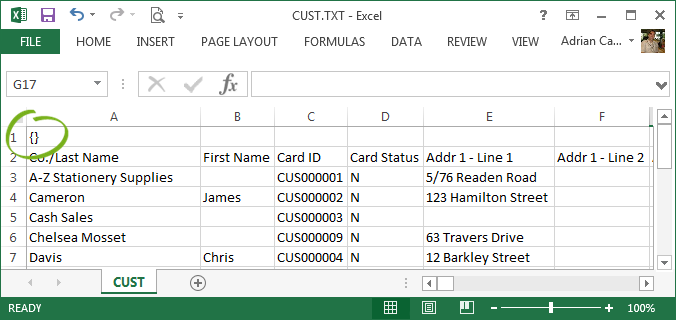
Delete the data from row 3 down. This is the data from MYOB which you don't need. Remember to leave the brackets on the first row, and the headings on the second row.
- Enter your data in each applicable column. Remember - when viewing an import file in Excel:
- each column in the import file represents a field in MYOB.
- each row in the import file represents a different account.
When you're done, save the template as a text (.TXT) file. If you like, you can give the file a meaningful name, such as "Accounts List Import" or similar.
Save in the correct format
The easiest way to ensure your template is saved in the right format, after making your changes to the file attempt to close Excel and you'll be prompted to save. Click Yes and accept the default file type Excel suggests. Here's an example:

Your template is now ready for importing.
Import the prepared template
By importing the prepared template you'll overwrite the existing accounts list with the new accounts list from the file. Be sure this is what you want to do before proceeding.
- Click your business name and choose Import and export data.
- On the Import tab, for the Data type choose Chart of accounts.
- Click Browse and locate your import file template.
- Click the import file then click Open.
For the option If duplicate records are found, select Update existing data.
- Click Import.
 Yes
Yes
 No
No
 Thanks for your feedback.