You can import data such as a list of customers and suppliers (your cards list), items you stock and a list of your accounts. The way you import is the same for all data types, you use the Import/Export Assistant and choose the type of data you want to import.
If you're importing from another MYOB company file or software such as Microsoft Excel, you'll need to export the data you want from the program you’ve used to create the data and save it in a tab-delimited or comma-separated text file.
Need help moving to AccountRight from a different program?Check out our Product Migration Services (Australia | New Zealand).
For the import to work successfully, the data you import needs to meet the import rules and formats required for each field.
What can I import?
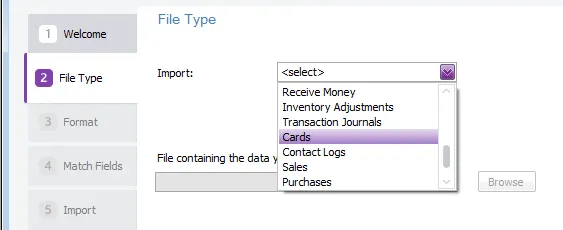
To find out what can be imported, open the Import/Export Assistant (go to the File menu > Import/Export Assistant > Import data > Next). Click the dropdown arrow next to the Import field to see the list.

Other things you can import
There are some things you can import into AccountRight without using the Import/Export Assistant.
To import | Do this |
|---|---|
customised forms (from another AccountRight 2011 or later company file) | Go to Setup > Import Customised Forms. For more information, see Sharing forms with other company files. |
customised forms (from AccountRight v19 or earlier) | Go to File > Migrate Custom Forms. For more information, see Upgrade task - migrating personalised forms. |
an accounts list (from MYOB Accountants Office) | Go to File > AccountantLink > Receive From Accountant > Accounts List. For more information, see Importing an accounts list from MYOB Accountants Office. |
bank transactions | Use bank feeds to automatically bring your bank transactions into AccountRight. Alternatively (or to bring bank transactions into AccountRight from before your bank feeds are set up), import a bank statement downloaded from your bank. Go to Banking > Reconcile Accounts > Get Statement. Statements must be in OFX, QFX, QIF or OFC format. For more information, see Importing a bank statement. |
contacts from Microsoft Outlook | Go to Card File > Cards List > Synchronise Cards. For more information, see Synchronising cards with Microsoft Outlook. |
Using an import template
You can create an import template by exporting data from AccountRight's sample company file. For example, to create an import template for sales data, simply export sales data from AccountRight's sample company file. The export file becomes your template. All you need to do is open the export file and replace the contents with your data, ready for importing.
For more details, see Using an import template.
To import data
Before you import data you should make a backup of your company file. See Back up and restore company files.
Go to the File menu > Import/Export Assistant.
In the Import and Export Assistant window, select Import data and click Next.
Select the type of data you want to import from the Import list.
Importing timesheets (Plus and Premier, Australia only)When you import timesheets, only the entries that don’t have activity slips associated with them are included. You must import activity slips to complete the process.
Click Browse to locate and select the file you want to import. This needs to be a text file which ends with ".txt", such as ITEMS.TXT.
Click Next.
Select the import file format, the type of the first record, and the method of handling duplicate data (data which is already in AccountRight).
Click Next and match the import fields with fields in the Available Fields column. To do this:
Click the name of a field in the Import fields column. These are the names of the fields in your import file.
Click the matching field in the Available fields column. These are the names of the fields in AccountRight that you can match the import fields to.
The import field you selected appears in the Matched Import fields column.
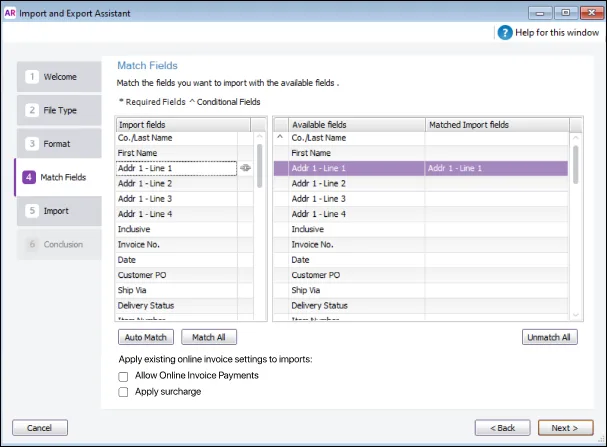
Some fields must be imported
Fields that have an asterisk (*) next to them must have matching import file fields assigned to them.If all the fields in the import file match those in the Available fields column, including their order, click Match All. If the fields in your import file are not in the same order, click Auto Match to match the fields that have the same names.
Importing sales?If you use Online Invoice Payments, you have the option to switch on online invoice payments for imported invoices by selecting Allow Online Invoice Payments. You can also pass on the customer surcharge by selecting Apply surcharge. Online invoice payment options will then appear on these invoices when you send them to customers.
Click Next. If you didn’t make a backup prior to starting the import process, click Back up to make one now.
Click Import to import the data.
If you get a warning or an error message indicating that the import was not successful, refer to the import log, which you can access from the Conclusion step of the assistant.When the data has finished importing, click Close.

