If you have Microsoft Word or another word processing program on your computer, you can create personalised letters (also known as mail-merge letters) for any of your contacts. The letter templates that come with AccountRight are Microsoft Word templates (.dot files) which contain standard text and fields that will be automatically filled with data from your company file (like names and addresses).
Personalised letters are useful when you need to send the same letter to several contacts. For example, you may want to send several slow-paying customers a payment reminder letter (or let AccountRight send automatic invoice reminders). Instead of entering each contact’s information on the letters yourself, you can set up a letter template that contains the text you want to appear, and insert data fields that automatically fill in the contact’s name, address and the amount owing.
Generating personalised letters
Here's how to generate a personalised letter from AccountRight. If you'd like to change the text in a letter template, or add your own personal touch, learn how to edit the letter templates.
To generate a personalised letter using Microsoft Word
Go to the Card File command centre and click Create Personalised Letters. The Review Cards Before Exporting window appears.
If you want to, filter the contact list, for example, to only show contacts located within specific postcodes. To do this, click Advanced Filters and enter your filtering criteria.
Click in the select column next to each contact to whom you would like to send a personalised letter.
Click Mail Merge. The Select from List window appears.
Select the template you'd like to use and click Use Template.
Use this template... | When you want to... |
|---|---|
Apology.dot | apologise for a problem your company has caused for a customer, and to assure the customer that the problem will be addressed. |
Backordr.dot | let your customers know that items they’ve ordered are on backorder and will be shipped as soon as possible. |
Blank.dot | write your own letter. |
BOUNCED.dot | notify customers whose payments have bounced. |
Coll_1st.dot | remind customers whose accounts have become overdue to make a payment. |
Coll_2nd.dot | express greater urgency than Coll_1st.dot and request that your customer contact you immediately. |
Coll_3rd.dot | encourage customers who have overdue payments to make a payment before their credit history is damaged. |
Coll_fin.dot | advise customers that you will turn their account over to a collection agency if payment isn’t made within a specified number of days. |
Credit Application.dot | enable your customers to formally apply for credit. |
FaxCover.dot | create a fax cover page. This page includes room for a memo. |
Resolved.dot | reply to customers who have questioned an amount on their monthly statement. This letter indicates that you are looking into the matter and that you will credit the customer’s account for the amount in question while the matter is investigated. |
Super Choice Form.dot | print a superannuation choice form to provide to an employee.
(Plus and Premier, Australia only) |
Super employee privacy.dot | notify an employee that you are passing on personal details to their superannuation fund.
(Plus and Premier, Australia only) |
ThankYou.dot | thank new customers for their business. |
Your letter appears in Microsoft Word, and depending on the template you've selected, you'll be prompted to enter additional information, such as your name and title.
Edit the letters as required and then print them using Microsoft Word. Any changes will only apply to the letters you're sending now. To permanently change a letter template, see Editing personalised letter templates.
-
If you want to send letters to customers with unpaid invoices Display the Accounts Receivable tab of the To Do List window and click the Select column for each customer to whom you want to send a letter. Click Mail Merge to select a collection letter template, which includes information such as the customer’s outstanding balance.
To generate a personalised letter using other word processors
To use a mail-merge letter template created in a word processor other than Microsoft Word, you export the contact data out of your company file and then merge that data with the letter.
Go to the Card File command centre and click Create Personalised Letters. The Review Cards Before Exporting window appears.
If you want to, filter your contact list, for example, to only show contacts located within specific postcodes. To do this, click Advanced Filters and enter your filtering criteria.
Click in the select column next to each contact to whom you would like to send a personalised letter.
Click Disk. A window with a list of file formats appears.
Choose either the Tab-Delimited Text File or Comma-Separated Text File option.
-
Check what file formats your word processing software requires Most word processing software allows mail-merge data to be tab-delimited (data is separated by tabs) or comma-separated. If your software requires a specific format, choose that format at this step.
-
Click Save. The Save As window appears.
If necessary, change the text file’s name and location and then click Save.
The text file containing your contacts’ details is saved at the location you specified.Use your word processing software to merge the data contained within the text file with a letter template that you have created.
Editing personalised letter templates
You can edit the default letter templates by opening them in Microsoft Word and making your changes. For example you can add a personal touch by including your business logo or changing the font styles, sizes and colours.
If you've used Word before, this'll be easy. Otherwise, see the Microsoft Word help for assistance.
To edit a letter template
Open Microsoft Word.
Open the letter template you want to edit. You'll find the templates here (20xx.x refers to your AccountRight version):
C:\Users\user.name\Documents\MYOB\AccountRight\20xx.x\Letters
Make your changes. See the FAQs below for a list of data fields you can include in the template.
When you're done, save the template.
Save the document in its original location (see step 2)
Save the document as a Word Template so it retains a ".dot" file extension, for example "MyTemplate.dot"

Copy edited templates after updating AccountRight When you update AccountRight, you'll need to copy any modified letter templates into the Letters folder for the new version. Unlike in previous AccountRight releases, with the release of automatic updates in AccountRight 2021.1, you'll only need to do this once. All future updates will preserve the edited templates in the new location. Note that if there's a change to the default template in an AccountRight release this change will override your edited template – changing your edited template's name will stop this from happening. We'll let you know if any changes affect your templates. For example, if you've updated from AccountRight 2020.4 to 2021.1, you'll need to copy edited templates (or the entire Letters folder) from here:
C:\Users\user.name\Documents\MYOB\AccountRight\2020.4\Letters
To here:
C:\Users\user.name\Documents\MYOB\AccountRight\Current\Letters
Personalised letter FAQs
Where are my personalised letters stored?
Personalised letters are stored at this location on your computer:
If you use | located here |
|---|---|
AccountRight PC Edition | 2020.4 and earlier: C:\Users\user.name\Documents\MYOB\AccountRight\20xx.x\Letters 2021.1 onwards: C:\Users\user.name\Documents\MYOB\AccountRight\Current\Letters - note that you'll need to move them to this location after you install AccountRight 2021.1. See the FAQ below about I've updated AccountRight - where is my edited letter template? |
AccountRight Server Edition | C:\Users\Public\Documents\MYOB\AccountRight\20xx.x\Letters |
20xx.x refers to the version number, for example: 2020.4.
Can I email a personalised letter?
While you can't email personalised letters directly from AccountRight, once a letter is displayed in Microsoft Word you can email it from there (see the help in Word for details).
This is fine for emailing one letter at a time. But for multiple contacts it gets a bit more complicated as the single Word document that gets created can't easily be split into separate documents for emailing.
To email lots of contacts at once, you might consider exporting your AccountRight cards to Microsoft Outlook and emailing from there.
How can I change the way a contact's name is displayed on a personalised letter?
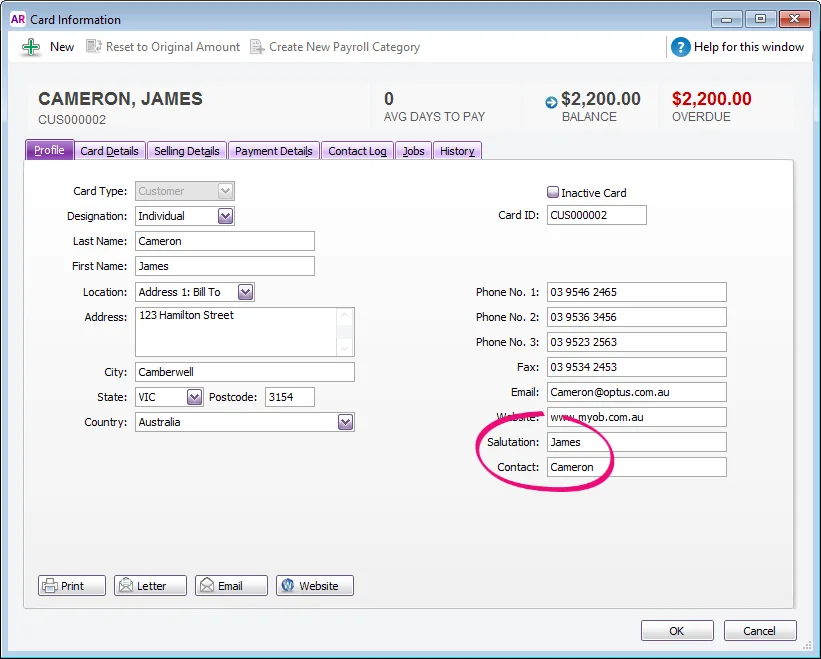
The [[Name]] field in the personalised letter templates displays either the Company Name or First Name, Last Name fields from the contact's card. For companies this is probably OK, but for individuals you might want your personalised letters to display just the first name, or first name then last name.
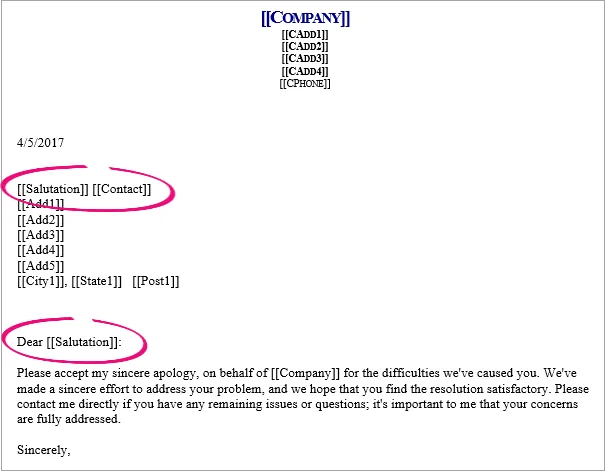
To do this, use the [[Salutation]] and [[Contact]] fields in the contact's card. Here's an example use of these fields for a contact named James Cameron:

You can then edit the personalised letter template in Word to use these fields (and save the template with a new name).

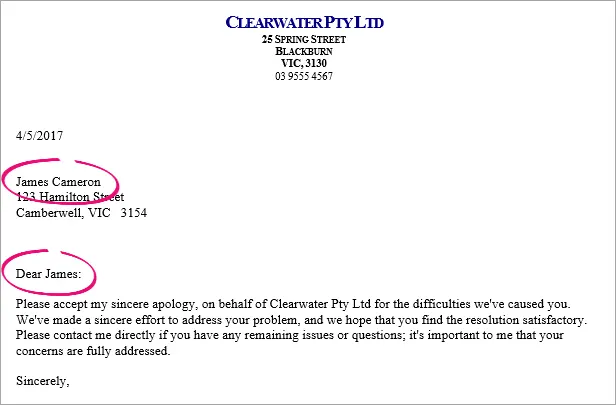
When you use this new template, the contact's name will display in the letter as follows:

Which fields can be merged into a letter?
Field | Where to find the field |
|---|---|
[[Company]] | Company Name field in the Company Information window |
[[Cadd1]] | First line of the Address field in the Company Information window |
[[Cadd2]] | Second line of the Address field in the Company Information window |
[[Cadd3]] | Third line of the Address field in the Company Information window |
[[Cadd4]] | Fourth line of the Address field in the Company Information window |
[[CPhone]] | Phone Number field in the Company Information window |
[[Name]] | Company Name field in the Card Information window for companies; Last Name and First Name fields in the Card Information window for individuals |
[[Add1]] | First line of the Address 1 field in the Card Information window |
[[Add2]] | Second line of the Address 1 field in the Card Information window |
[[Add3]] | Third line of the Address 1 field in the Card Information window |
[[Add4]] | Fourth line of the Address 1 field in the Card Information window |
[[Add5]] | Fifth line of the Address 1 field in the Card Information window |
[[City1]] | The City field of the Address 1 field in the Card Information window |
[[State1]] | The state field of the Address 1 field in the Card Information window |
[[Post1]] | The postcode field of the Address 1 field of the Card Information window |
[[Sadd1]] | First line of the Address 2 field in the Card Information window (used for customers and suppliers only) |
[[Sadd2]] | Second line of the Address 2 field in the Card Information window (used for customers and suppliers only) |
[[Sadd3]] | Third line of the Address 2 field in the Card Information window (used for customers and suppliers only) |
[[Sadd4]] | Fourth line of the Address 2 field in the Card Information window (used for customers and suppliers only) |
[[Sadd5]] | Fifth line of the Address 2 field in the Card Information window (used for customers and suppliers only) |
[[City2]] | The City field of the Address 2 field in the Card Information window (used for customers and suppliers only) |
[[State2]] | The state field of the Address 2 field in the Card Information window (used for customers and suppliers only) |
[[Post2]] | The postcode field of the Address 2 field in the Card Information window (used for customers and suppliers only) |
[[Phone1]] | Phone No. 1 field in Address 1 in the Card Information window |
[[Phone2]] | Phone No. 2 field in Address 1 in the Card Information window |
[[Fax]] | Fax field in Address 1 in the Card Information window |
[[Salutation]] | Salutation field in Address 1 in the Card Information window |
[[Contact]] | Contact field in Address 1 in the Card Information window |
[[Balance]] | The balance, in currency, of customers’ and suppliers’ accounts |
[[Overdue]] | The overdue balance, in currency, of customers and suppliers |
I've updated AccountRight - where is my edited letter template?
When you update AccountRight, you'll need to copy any modified letter templates into the Letters folder for the new version. Unlike in previous AccountRight releases, with the release of automatic updates in AccountRight 2021.1, you'll only need to do this once. All future updates will preserve the edited templates in the new location.
Note that if there's a change to the default template in an AccountRight release this change will override your edited template – changing your edited template's name will stop this from happening. We'll let you know if any changes in future releases affect your edited templates.
For example, if you've updated from AccountRight 2020.4 to 2021.1, you'll need to copy edited templates (or the entire Letters folder) from here:
C:\Users\user.name\Documents\MYOB\AccountRight\2020.4\Letters
To here:
C:\Users\user.name\Documents\MYOB\AccountRight\Current\Letters