Use the Receive Money window to record money your company receives, other than for sales you've recorded in the Sales command centre (for invoice payments use the Receive Payments window in the Sales command centre).
You can use the Receive Money window to record amounts paid to the business such as interest payments, capital injections or donations. Enter the details of the payment, such as the payment details, payee and whether the amount is GST inclusive or not.
Need to print a Receive Money transaction? See Printing payment receipts.
You can specify whether the payment was made directly to a bank account or whether it will be deposited together with other undeposited funds later.
Speed up data entry
Use bank feeds to bring your bank transactions into AccountRight. For recurring transactions, set up rules to automatically record these transactions.
To record money you receive
Go to the Banking command centre and click Receive Money. The Receive Money window appears.
Choose the account that will be used to record the money.
Deposit to Account. Select this option if the money was deposited directly to your bank account.
Group with Undeposited Funds. Select this option if the money will be deposited at a later time. Learn more about undeposited funds and preparing a bank deposit.
If the deposit amount included tax or GST, select the Tax Inclusive (Australia) or GST Inclusive (New Zealand) option.
If the payment you're recording relates to a contact in AccountRight, choose that contact in the Card field. Otherwise you can leave this field empty.
In the Amount field, type the amount received.
[Optional] In the Payment Method field, select the payment method.
[Optional] If you want to record additional details about the transaction, such as a cheque number, click Details and record the details in the Applied Payment Details window that appears.
Enter the date of the transaction.
[Optional] Type a detailed comment in the Memo field to help you identify the transaction later.
Allocate the amount to the appropriate account.

A - Enter an account to which you want to assign the transaction or part of the transaction.
If you only want to see the account name, rather than the account number, go to the Setup menu > Preferences > Windows tab and select the option, Select and Display Account Name, Not Account Number.
B - Type the amount you want to assign to this account. The total amount in this column must equal the amount in the Amount field before you can record the transaction.
C - [Optional] Assign the amount to a job by entering the job code here.
D - [Optional] Type a memo for each entry in the transaction.
E - The tax/GST code that is linked to the allocation account appears here automatically. You can change it if necessary.
If the payment covers more than one account, repeat step 10 on a new transaction line.
If you want to view or change the tax or GST amounts assigned to the transaction, click the zoom arrow next to the Tax (Australia) or GST (New Zealand) field.
[Optional] If you use cost centres and want to assign the transaction to a particular cost centre, select one from the Cost Centre list.
To store the transaction as a recurring transaction so that you can use it again, click Save as Recurring. In the Recurring Schedule Information window, enter the necessary information and click OK. For more information, see Recurring transactions.
Click Record.
FAQs
Which accounts can I receive money into?
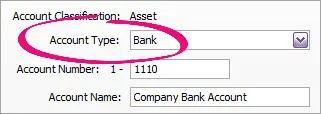
Only banking accounts can be selected as the Deposit to Account in the Receive Money window. Banking accounts have a Bank (for 1-xxxx accounts) or Credit Card (for 2-xxx accounts) account type. If you can't select an account in the Receive Money window, check the account set up (Lists > Accounts > select the account and click Edit). Here's an example of a bank account.

How do I delete a line from a Receive Money transaction?
To delete a line from a Receive Money transaction:
Click to highlight the account number for the line to be removed.
Press the Delete key on your keyboard.
Click out of the account number field. The line will be removed.

What does Auto # mean in the ID No. field?
The default number shown in the ID No. field is the next available number. When you click in the ID No. field, Auto # appears to confirm that the number has been automatically selected for you. If you need a different number you can overtype it. Note the sequence will not carry on from that point.